Dynamic HTML Using Handlebars JavaScript
Last Updated :
13 Mar, 2024
The Dynamic HTML Using Handlebars JavaScript consists of creating the user interactive web pages by combining the HTML with the Handlebars templating engine. The Handlebars mainly ease the process of dynamically rendering the HTML content by allowing the insertion of variables, expressions, and logic directly in the markup.
In this article, we will explore the process of rendering Dynamic HTML Using Handlebars JavaScript using practical examples.
Dynamic HTML Using Handlebars JavaScriptSyntax for Dynamic HTML Using Handlebars JavaScript
<script id="template" type="text/x-handlebars-template">
   {{#each data}}
       <!-- HTML structure using Handlebars expressions {{}} -->
   {{/each}}
</script>
Approach to Render Dynamic HTML Using Handlebars JavaScript:
- Firstly, add the CDN Link of the Handlebars Templating Engine.
- Define the Handlebars template in the HTML file and then compiler and update the task list using the Handlebars.
- The template is then compiled using Handlebars.compile() and a set of tasks is maintained in JavaScript.
- There are functions to handle dynamic updates to the task list which shows the usage of Handlebars for creating data-driver HTML content.
- The template is rendered with updated data upon user interactions like adding, removing, or toggling tasks.
Steps to Render Dynamic HTML Using Handlebars JavaScript
Step 1: Firstly, we will make the folder named root by using the below command in the VScode Terminal. After creation use the cd command to navigate to the newly created folder.
mkdir root
cd root
Step 2: Now create the below Project Structure in your project, including app.js and index.html.
Folder Structure:
--root
    --index.html
    --script.js
Example: We need to write the code for the script.js file, and code for index.html to render Dynamic HTML Using Handlebars JavaScript.
HTML
                    <!DOCTYPE html>
<html>
<head>
    <title>
        Dynamic HTML Using Handlebars JavaScript
    </title>
    <style>
        body {
            font-family: 'Arial', sans-serif;
            margin: 20px;
        }

        h1 {
            color: green;
        }

        #taskInput {
            margin-bottom: 10px;
        }

        ul {
            list-style-type: none;
            padding: 0;
        }

        li {
            margin-bottom: 5px;
        }

        li span {
            margin-right: 10px;
        }

        button {
            cursor: pointer;
        }
    </style>
</head>

<body>
    <h1>GeeksforGeeks</h1>
    <h3>Dynamic HTML Using Handlebars JavaScript</h3>
    <input type="text" id="taskInput" placeholder="Add a new task">
    <button onclick="addTaskFn()">Add Task</button>
    <ul id="taskList"></ul>
    <script src=
"https://cdnjs.cloudflare.com/ajax/libs/handlebars.js/4.7.7/handlebars.min.js">
    </script>
    <script id="template" type="text/x-handlebars-template">
        {{#each tasks}}
            <li>
                <input type="checkbox" {{#if completed}}checked{{/if}}
                    onclick="toggTaskFn('{{id}}')">
                <span>
                    {{title}}
                </span>
                <button onclick="removeTaskFn('{{id}}')">
                    Remove
                </button>
            </li>
        {{/each}}
    </script>
    <script src="script.js"></script>
</body>

</html>
Javascript
                    let tasks = [
    {
        id: "1",
        title: "Python",
        completed: false
    },
    {
        id: "2",
        title: "ReactJS",
        completed: true
    },
];
const src =
    document.getElementById("template").innerHTML;
const template = Handlebars.compile(src);
function updateTaskList() {
    const html = template({ tasks });
    document
        .getElementById("taskList").innerHTML = html;
}
function addTaskFn() {
    const newTaskTitle =
        document.getElementById("taskInput").value;
    const newTask =
    {
        id: Date.now().toString(),
        title: newTaskTitle,
        completed: false
    };
    tasks.push(newTask);
    updateTaskList();
    document.getElementById("taskInput").value = "";
}
function removeTaskFn(taskId) {
    tasks =
        tasks.filter(
            task =>
                task.id !== taskId
        );
    updateTaskList();
}
function toggTaskFn(taskId) {
    tasks = tasks.map(task => {
        if (task.id === taskId) {
            task.completed = !task.completed;
        }
        return task;
    });
    updateTaskList();
}
updateTaskList();
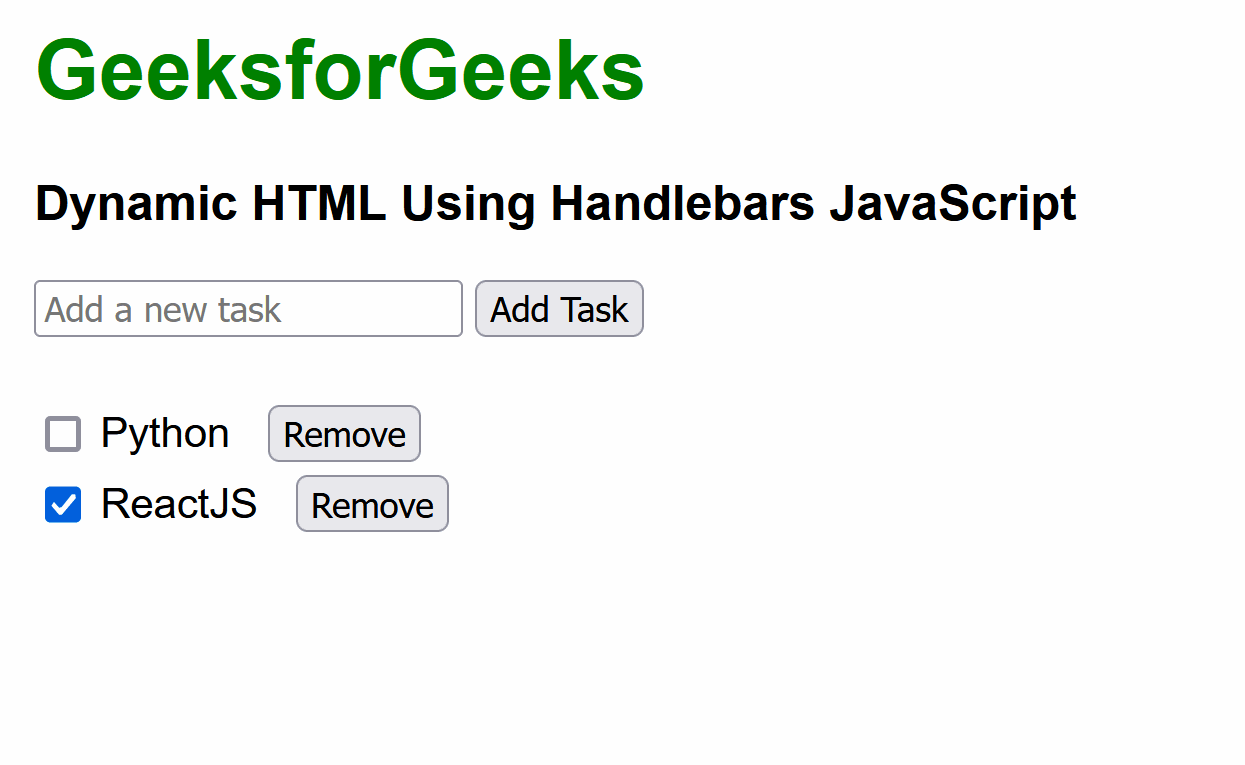
Output:
Share your thoughts in the comments
Please Login to comment...