We all have been very well acquainted with the creation of slideshows by using Microsoft PowerPoint for our schools, colleges, or offices in our day-to-day lives. But, have we ever wondered how would it be to create a slideshow through the Jupyter Notebook? The advantages of creating slideshows with Python and Jupyter are its version control capability, dynamicity in the slideshows, easy sharing of codes with others in the groups, and a single presentation document, but the only con with this is that it doesn’t have many themes to apply in the slides, due to which it may look sort of a little plain.
In this article, we will walk through the different methods used for creating interactive slideshows in Jupyter Notebook like through RISE, with Jupyter’s built-in slideshow feature, Jupyter widgets, and ipywidgets and voila and voila-reveal. Also, we will read about the importance of creating interactive slideshows, how to customize our slides in the slideshows, and the processes involved in exporting the slideshow.
Now, coming to the basic query to ask everyone, and which every individual has in their mind is
Why Interactive SlideShow?
Some of the reasons why interactive slideshows are appreciated are mentioned below:
1. It easily helps in capturing audiences’ attention because of its interactive clickable elements, colours, images, videos, etc. making the presentation more memorable.
2. Users can delve further into data visualizations, charts, and graphs in interactive slideshows for data-driven presentations. To acquire deeper insights, they might filter data or zoom in on particular data points.
3. Interactive slideshows possess features like surveys and quizzes to collect feedback and gauge audience comprehension in real-time, which can be useful for training or instructional purposes.
4. Presenters can adapt their information to their audience’s demands by using interactive slideshows. Users can take their own route through the content by concentrating on the subjects that are most interesting or important to them, creating a more individualized experience.
Customizing Slides in Jupyter Notebook
Customizing slides refers to applying uniqueness to the appearance, content, and behaviour of individual slides to meet specific preferences. Similarly, we can also customize our slides in Jupyter Notebook. This can be done by adding metadata to the individual slides in the cells. Metadata is specified in the cell’s metadata tag, present under the “Cell Toolbar” option. From there you can customize the slide according to your own choice (Metadata is here referred to the information about the book, it is used to control the features and behavior of the notebook).
-(1).webp)
The above image will apply “Edit Metadata” to all the slides.
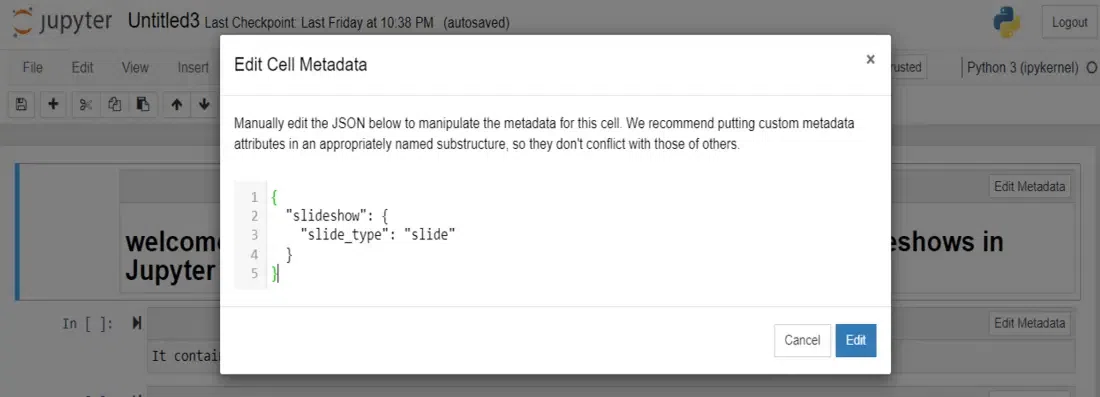
You can now add any metadata to customize your slides as shown in the above image.
Exporting SlideShows in Jupyter Notebook
Once you are done with the creation and customization of the slides, you can export your slideshow from the Jupyter Notebook to your local machine. The slides can be exported in different formats such as HTML, PDF, LaTex, Reveal JS, Markdown (md), ReStructured Text (rst) and executable script. After exporting the file, save it in the same folder as that of where your Jupyter Notebook is installed. Finally, you will be able to easily present your slideshow from your local system to the outside world.
You can do so with the help of nbconvert tool. The nbconvert tool, is a Jupyter Notebook tool that converts notebooks to various other formats via Jinja templates. In order to used the nbconvert tool, you need to follow its basic command.
From the Command Line, use nbconvert to convert a Jupyter Notebook (input) to a different format (output). The basic command structure is given below:
jupyter nbconvert --to <output format> <input notebook>
where <output format> is the desired format in which the notebook is converted and <input notebook> is the filename of your own Jupyter Notebook which you want to convert.
For example: CONVERT JUPYTERNOTEBOOK SLIDESHOW TO HTML
jupyter nbconvert --to html slideshow.ipynb
This command creates an HTML file named as slideshow.ipynb.
Creating Interactive Slideshows in Jupyter Notebook using RISE
Step 1: Set up All the Requirements
Installing Python and Jupyter Notebook
In order to start with the slideshows, firstly you need to install Python and Jupyter Notebook, using Anaconda Navigator.
Installing RISE
RISE, is an acronym which stands for Reveal.js IPython/Jupyter Slideshow Extension and as the name suggests RISE is a Jupyter Notebook extension that enables you to create dynamic presentation slides from your Jupyter Notebook. Through RISE, a notebook is rendered as a Reveal.js based slideshow during which you can execute code, display plots or show your audience any actions you would perform inside the notebook itself.
To use rise, first you need to install this. If you are using Anaconda then, use the command
conda install -c conda-forge RISE
or if you are using Command Prompt then use the command
pip install RISE
You won’t be able to interact directly with RISE, instead you will be access it through your Jupyter Notebook.
Step 2: How to Create a SlideShow
Enabling Slideshow Mode
To start with the creation of slideshows, you will need to start the Jupyter Notebook and open a new Notebook in it (must do this after installing RISE). Once you’re in the new fresh Notebook, you will need to enable the slideshow. For doing this, follow the following steps given below:
1. Click on the “View” tab in the Jupyter Notebook.
2. A dropdown menu will appear. Hover and select over the “Cell Toolbar” option.
3. Another dropdown appears. Now, select the “Slideshow” option in the “Cell Toolbar” menu.
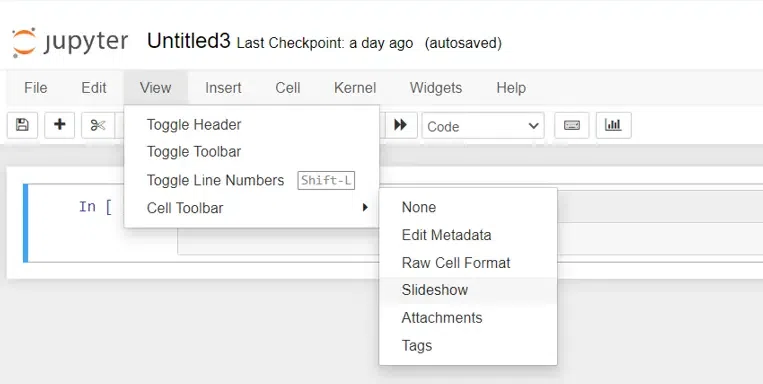
You’ve now enabled the slideshow mode.
Creating the slides with cells
Now, at this point, start working with the cell toolbar present in the dropdown menu.
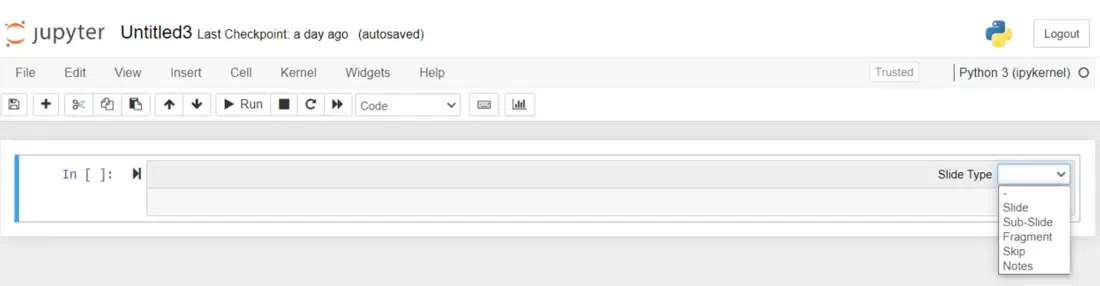
Once, you open the first cell in the Notebook, you’ll observe a “Slide Type” option present at the top right corner of the cell. This contains different types options which determines how each slide would fit in the slideshow. Those are:
slide – designates the selected cell as the first of a new slide.

sub-slide – indicates that the selected cell should be the start of a new sub-slide, which appears in a new frame beneath the previous slide.

fragment – denotes that the chosen cell should be added to the previous slide as a build.

skip – indicates that the selected cell should not be included in the slideshow and should instead be skipped.

notes – indicates that the selected cell should just be the presenter notes.

– – indicates that the selected cell should follow the behavior of the previous cell, which is useful when a markdown cell and a code cell should appear simultaneously.
Step 3: Viewing and Operating the SlideShows
Viewing the slideshow
The slideshow can be seen directly from the notebook once the slide material has been created using cells for the slideshow.
There are two options to view the slideshow:
1. Using the shortcut ALT + R on Windows to enter and exit into the presentation mode within the notebook.
2. Clicking the “Presentation Mode” button from the notebook (Note that it would only appear if you’ve successfully installed RISE) as present at the right most, shown in the image given below.

Once you choose enter into the slideshow presentation mode, a window will open as shown below
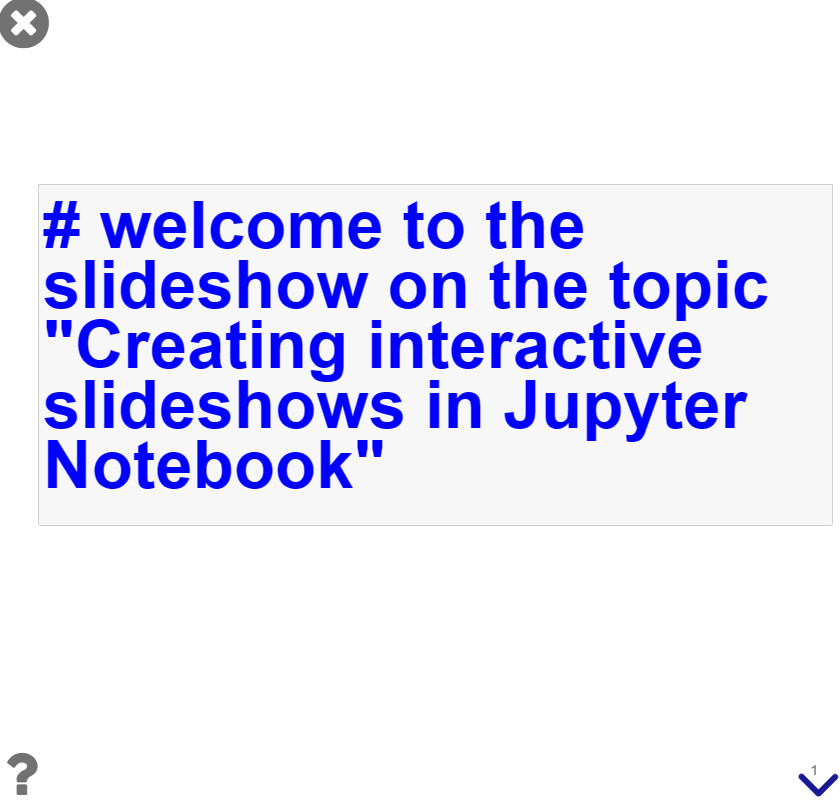
This means the presentation is active now.
Operating the slideshow
Changing the slides
When you enter in the slideshow window, you will see four different types of arrows in the bottom-right corner for controlling the slides. Although using the keys <- and -> may look attractive, but it can lead to skip of many sub-slides. Instead, its recommended to use SPACE for moving the slides forward and SPACE+SHIFT for moving the slides backward, respectively.
Apart from this, you may also access many other keyboard shortcuts within the slideshow by clicking the question mark (?) in the bottom-left corner.
Running and Editing the code
One of the best features of RISE is that you can update and run code while the presentation is in progress because it operates in a live Python session.
A code cell will show up in the slideshow as editable and runnable if it is identified as a slide, sub-slide, fragment, or -. Here’s an illustration:

Finally, you are done with the slideshow to showcase it to others.
Creating Interactive Slideshow using Jupyter’s built-in Slideshow Features
Until now, we learnt about the different ways of creating interactive slideshows in Jupyter Notebook with the help of RISE. But, there are some other methods too, which can be used for creating slideshows in Jupyter Notebook. One of them is “Jupyter’s built-in slideshow feature”. To create interactive slideshows in Jupyter Notebook with the help of its built-in feature, perform the following steps:
Step 1: Open a New Notebook
To start with, open a new notebook and rename it.
Step 2: Create new Slides
Once you are inside a new fresh notebook, start creating slides as much as you want to add in your slideshow.
Step 3: Enable SlideShow Mode
After you are done with the creation of all the slides, define them as specific slide-type such as “Slide”, “Sub-Slide”, “Fragment”, “Skip”, “Notes”, “Markdown”. Also, enable the slideshow mode through the “Cell Toolbar” in the Notebook toolbar.
Step 4: Run the Notebook for SlideShow
Next, save your notebook and close it. Open the Command Prompt, and run the below mentioned command to see your notebook as a slideshow.
jupyter nbconvert myslideshow.ipynb --to slides --post serve
Replace myslideshow.ipynb with your notebook filename. The above command will convert your Jupyter Notebook to a slideshow.

Creating Interactive Slideshow using Jupyter Widgets and IPYwidgets
Ipywidgets, is a python libraray, often termed as Jupyter widgets or simply widgets in short. With this, you can build interactive HTML widgets that will display in your Jupyter Notebook. They are interactive Graphical User Interface (GUI) elements which incorporate user interaction into your code, enhancing the interest and usefulness of your notebooks. They are especially beneficial for activities like data exploration, data analysis, parameter adjustment, and concept demonstration.
There are many different controls available with Jupyter widgets, including buttons, sliders, text input fields, dropdown menus, checkboxes, and more. These features allow for real-time data manipulation and display, parameter changes, and action triggering without the need to run code cells again.
Jupyter widgets or ipywidgets, also helps in building interactive slideshows. You just need to apply the following steps:
Step 1: Install IPYwidgetsINSTALL ‘IPYWIDGETS’
In order to start working with widgets, you need to first install it. For this, you can use Command Prompt or Anaconda.
pip install ipywidgets
Step 2: Import the Libraries
In the next step, import the necessary required libraries in your notebook.
import ipywidgets as widgets
import IPython.display import display
Step 3: Create Interactive Widgets
Now, select the type of interactive widget, you want to include in your presentation. For example, here I have used the slider widget.
slider = widgets.IntSlider(min=0, max=10, step=1, description='Slide me:')
Here, we can assign the min and max value, step value and the description of the slider.
Step 4: Display the Widgets
This will display the widget which is applied to the slide.
display(slider)
 Step 5: Run the SlideShow
Next, when you are done creating the widgets for all the specific slides, turn on the slideshow mode. To do this, go to View -> Cell Toolbar -> Slideshow. Thereafter, use the “Slide Type” dropdown menu in the toolbar to specify how each cell should be treated (e.g., slide, sub-slide, fragment, skip and notes).
Step 6: Start the Slideshow
Finally, start the slideshow by clicking the “Enter/Exit Live Reveal Slideshow” button in the toolbar. Your presentation will begin, and interactive widgets will be functional.

Creating Interactive Slideshow using Voila and Voila-Reveal
Voila is an open-source framework or we can say a web application, with the help of which one can convert Jupyter notebooks into dashboards and interactive online applications. Although it’s primarily responsible for creating web applications, it can also be used to create interactive slideshows for Jupyter notebooks.
On the other hand, Voila-Reveal is just an extension of voila. It allows to convert simple jupyter notebook into a Reveal.js based interactive slideshow.
In order to do so, one can follow the below mentioned steps:
Step 1: Install VOILA
To install voila, you can use Command Prompt
pip install voila
Step 2: Create the Slides
Then, create or open Notebook where you will build the presentation. If you want to customize the slides using Reveal.js features like slide backgrounds, transitions, and themes, then do so by adding appropriate metadata to Markdown cells.
-(1).webp)
Step 3: Run VOILA
Once you created the slides, close your notebook. Then, in the command prompt, navigate to the path where your notebook is stored.
cd C:\Users\hp
Replace C:\Users\hp with your folder path.
Then, start to run your notebook in the Command Prompt.
voila Voila.ipynb
Rename Voila.ipynb with the name of your notebook file.
Once you run your file, voila will start a local server and generate the Reveal.js-based presentation from your notebook. It will provide you with a URL, which is typically something like http://localhost:8866. Open this URL in a web browser to view your interactive slideshow presentation.
-(1)-(1).webp)
NOTE: Voila will convert all the slides in the cells in the notebook to a dashboard.
Share your thoughts in the comments
Please Login to comment...