In this article, we will cover the whole process of creating Windows VM in Azure using Terraform. When you have to create multiple VMs, perhaps even identical ones, or machines with nearly identical configurations, it can be repetitive and time-consuming to go through the manual setup process each time. That’s where Terraform comes in. Think of it as a blueprint for building VMs without the need for manual work, reducing errors and saving you valuable time. Let’s first see what virtual machines, azure, and Terraform are.
What Is Azure?
Azure is a cloud computing platform provided by Microsoft and is fully known as Microsoft Azure. Azure provides a lot of computing services through the cloud which are easily available and are cost effective. This platform provides a wide variety of services like storage, Virtual Machines, databases, AI, Machine Learning, Virtual Networks, functions, and the list goes on and on. If you want to learn more about Azure you can visit its official website or visit our GFG Microsoft Azure Tutorial Page.
What Is Terraform?
Terraform is an Infrastructure as Code(IaC) software tool which is open source and is provided by HashiCorp. You need to write code i.e. a configuration file ( written in HashiCorp Configuration Language – HCL ) for what you want to build and Terraform builds that exactly as told.
Virtual Machine is like a whole physical computer provided virtually. It is software that enables user to create a separate instance of computer virtually with its own operating system, ram and storage. Virtual Machines are mainly used in cloud but can also be installed locally. These are isolated and has flexibility to run any operating system as per need.
How To Create Windows VM In Azure Using Terraform? A Step-By-Step Guide
This Whole tutorial is divided into parts so if you have any part already configured then you can skip that part.
Authenticate Terraform to Azure
- Authenticate to Azure
- Create Service principal
- Setup Env variables
Create Terraform Configuration Files
- Create VM
- Delete Resources
Authenticate To Azure : Implementation Guide
For this you need to have Azure CLI installed already.
Step 1: Open terminal on your computer, any terminal will work as we have use azure cli.
Step 2: Run the below command and follow the instructions if you haven’t did the login yet.
Syntax
az login
Step 3: To confirm the login run az account show.
Syntax
az account show
Output: The output will be similar to this.

Step 4: Save the id (below homeTenantId ) from the output as it is subscription id and you will need that while creating service principal later.
Create Service Principal : Implementation Guide
We create service principals to use it instead of doing Sign In every time while using automation tools like terraform.
Step 5: This will also be done with help of Azure CLI so open any terminal on your computer.
Step 6: First set the MSYS_NO_PATHCONV environment variable.
PowerShell Syntax
$env:MSYS_NO_PATHCONV = 1
Linux Syntax
export MSYS_NO_PATHCONV=1
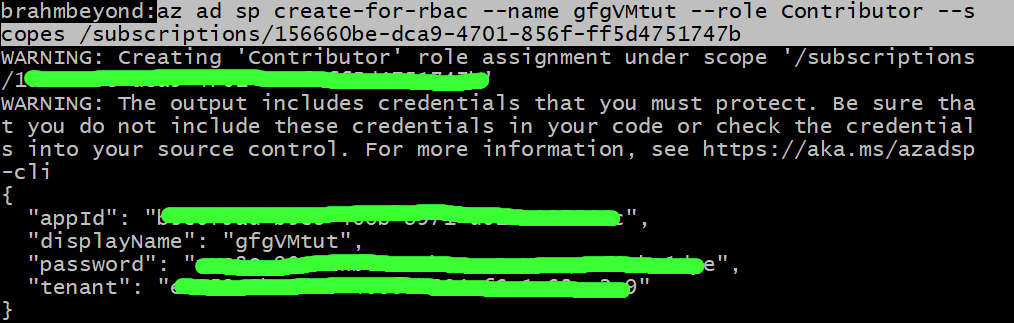
Step 7: To create service principal use command az ad sp create-for-rbac for creating role-based access control (RBAC) service principal.
Syntax
az ad sp create-for-rbac --name <service_principal_name> --role Contributor --scopes /subscriptions/<subscription_id>
- Replace the <service_principal_name> with any name, or you can also skip this and random name will be assigned automatically.
- the –role here Contributor which grants full access to all resources in a specified scope.
- Replace the <subscription_id> with you subscription id which you got in Step 4 in Authenticate to Azure part.
Example: Keep your subscription id secure, I have altered mine in this example command
az ad sp create-for-rbac --name gfgVMtut --role Contributor --scopes /subscriptions/120160be-fda9-4201-85rf-fi5d4551012b
output: Save the appId, password and tenant securely as they will be needed in further steps and remember to don’t include them in code.
Saving Credentials In Environment
- Save the credential in environment variables so that when we’ll write the configuration file then we don’t need to put the credentials explicitly and this will be secure way.
Method 1: Save credentials in Linux
Step 1: Open your terminal.
Step 2: Then go to home directory by using cd command.
Syntax
cd ~
Step 3: Then type ls -a to find the .bashrc file. .bashrc file is a hidden file and is the home directory.
Syntax
ls -a
Step 4: Then type vim .bashrc and press enter to open the file.
Syntax
vim .bashrc
Step 5: Enter the below code in the file and replace all the fields with your data which you got after creating service principal and then save the file.
Syntax:
export ARM_SUBSCRIPTION_ID="<azure_subscription_id>"
export ARM_TENANT_ID="<azure_subscription_tenant_id>"
export ARM_CLIENT_ID="<service_principal_appid>"
export ARM_CLIENT_SECRET="<service_principal_password>"
Example
export ARM_SUBSCRIPTION_ID="12345678-1234-1234-1234-123456789abc"
export ARM_TENANT_ID="abcdefgh-abcd-abcd-abcd-abcdefghijkl"
export ARM_CLIENT_ID="ab12cd34-5678-9012-3456-7890abcdef12"
export ARM_CLIENT_SECRET="my_secret_password123"
Step 6: Now execute the commands that you just saved in the .bashrc file by using following command.
Syntax
. ~/.bashrc
( or )
source ~/.bashrc
Step 6: Verify if your credentials are saved by using below command and you will see the credentials which you just saved will be printed as output.
Syntax
printenv | grep ^ARM*
Output

Method 2: Save Credentials In Windows
Step 1: Open PowerShell.
Step 2: Enter the below c replace all the fields with your data which you got after creating service principal.
Syntax
$env:ARM_SUBSCRIPTION_ID = "<azure_subscription_id>"
$env:ARM_TENANT_ID = "<azure_subscription_tenant_id>"
$env:ARM_CLIENT_ID = "<service_principal_appid>"
$env:ARM_CLIENT_SECRET = "<service_principal_password>"
Example
# Set Azure subscription ID
$env:ARM_SUBSCRIPTION_ID = "12345678-1234-5678-abcd-1234567890ab"

# Set Azure tenant ID
$env:ARM_TENANT_ID = "abcdefgh-1234-5678-9012-abcdefghijkl"

# Set Azure client ID (Service Principal App ID)
$env:ARM_CLIENT_ID = "a1b2c3d4-5678-9012-abcdef123456"

# Set Azure client secret (Service Principal Password)
$env:ARM_CLIENT_SECRET = "YourSuperSecretPassword123"
Output

Step 3: Verify is credentials are saved correctly by printing them.
Syntax
Get-ChildItem Env: | Where-Object { $_.Name -like "ARM_*" } | Select-Object -ExpandProperty Value
Output

Create Terraform Configuration Files
All the code provided for the configuration files is provided by Microsoft Azure. So copy and paste code as it is and don’t change it you don’t know what you are doing.
Step 1: Create a separate folder for this.
Step 2: Create providers.tf file in that folder and open that file. Paste the below code in that.
#providers.tf

terraform {
  required_version = ">=1.0"

  required_providers {
    azurerm = {
      source  = "hashicorp/azurerm"
      version = "~>3.0"
    }
    random = {
      source  = "hashicorp/random"
      version = "~>3.0"
    }
  }
}

provider "azurerm" {
  features {}
}
Step 3: Create main.tf file in same folder and paste the below code in that.
#main.tf

resource "azurerm_resource_group" "rg" {
  location = var.resource_group_location
  name     = "${random_pet.prefix.id}-rg"
}

# Create virtual network
resource "azurerm_virtual_network" "my_terraform_network" {
  name                = "${random_pet.prefix.id}-vnet"
  address_space       = ["10.0.0.0/16"]
  location            = azurerm_resource_group.rg.location
  resource_group_name = azurerm_resource_group.rg.name
}

# Create subnet
resource "azurerm_subnet" "my_terraform_subnet" {
  name                 = "${random_pet.prefix.id}-subnet"
  resource_group_name  = azurerm_resource_group.rg.name
  virtual_network_name = azurerm_virtual_network.my_terraform_network.name
  address_prefixes     = ["10.0.1.0/24"]
}

# Create public IPs
resource "azurerm_public_ip" "my_terraform_public_ip" {
  name                = "${random_pet.prefix.id}-public-ip"
  location            = azurerm_resource_group.rg.location
  resource_group_name = azurerm_resource_group.rg.name
  allocation_method   = "Dynamic"
}

# Create Network Security Group and rules
resource "azurerm_network_security_group" "my_terraform_nsg" {
  name                = "${random_pet.prefix.id}-nsg"
  location            = azurerm_resource_group.rg.location
  resource_group_name = azurerm_resource_group.rg.name

  security_rule {
    name                       = "RDP"
    priority                   = 1000
    direction                  = "Inbound"
    access                     = "Allow"
    protocol                   = "*"
    source_port_range          = "*"
    destination_port_range     = "3389"
    source_address_prefix      = "*"
    destination_address_prefix = "*"
  }
  security_rule {
    name                       = "web"
    priority                   = 1001
    direction                  = "Inbound"
    access                     = "Allow"
    protocol                   = "Tcp"
    source_port_range          = "*"
    destination_port_range     = "80"
    source_address_prefix      = "*"
    destination_address_prefix = "*"
  }
}

# Create network interface
resource "azurerm_network_interface" "my_terraform_nic" {
  name                = "${random_pet.prefix.id}-nic"
  location            = azurerm_resource_group.rg.location
  resource_group_name = azurerm_resource_group.rg.name

  ip_configuration {
    name                          = "my_nic_configuration"
    subnet_id                     = azurerm_subnet.my_terraform_subnet.id
    private_ip_address_allocation = "Dynamic"
    public_ip_address_id          = azurerm_public_ip.my_terraform_public_ip.id
  }
}

# Connect the security group to the network interface
resource "azurerm_network_interface_security_group_association" "example" {
  network_interface_id      = azurerm_network_interface.my_terraform_nic.id
  network_security_group_id = azurerm_network_security_group.my_terraform_nsg.id
}

# Create storage account for boot diagnostics
resource "azurerm_storage_account" "my_storage_account" {
  name                     = "diag${random_id.random_id.hex}"
  location                 = azurerm_resource_group.rg.location
  resource_group_name      = azurerm_resource_group.rg.name
  account_tier             = "Standard"
  account_replication_type = "LRS"
}


# Create virtual machine
resource "azurerm_windows_virtual_machine" "main" {
  name                  = "${var.prefix}-vm"
  admin_username        = "azureuser"
  admin_password        = random_password.password.result
  location              = azurerm_resource_group.rg.location
  resource_group_name   = azurerm_resource_group.rg.name
  network_interface_ids = [azurerm_network_interface.my_terraform_nic.id]
  size                  = "Standard_DS1_v2"

  os_disk {
    name                 = "myOsDisk"
    caching              = "ReadWrite"
    storage_account_type = "Premium_LRS"
  }

  source_image_reference {
    publisher = "MicrosoftWindowsServer"
    offer     = "WindowsServer"
    sku       = "2022-datacenter-azure-edition"
    version   = "latest"
  }


  boot_diagnostics {
    storage_account_uri = azurerm_storage_account.my_storage_account.primary_blob_endpoint
  }
}

# Install IIS web server to the virtual machine
resource "azurerm_virtual_machine_extension" "web_server_install" {
  name                       = "${random_pet.prefix.id}-wsi"
  virtual_machine_id         = azurerm_windows_virtual_machine.main.id
  publisher                  = "Microsoft.Compute"
  type                       = "CustomScriptExtension"
  type_handler_version       = "1.8"
  auto_upgrade_minor_version = true

  settings = <<SETTINGS
    {
      "commandToExecute": "powershell -ExecutionPolicy Unrestricted Install-WindowsFeature -Name Web-Server -IncludeAllSubFeature -IncludeManagementTools"
    }
  SETTINGS
}

# Generate random text for a unique storage account name
resource "random_id" "random_id" {
  keepers = {
    # Generate a new ID only when a new resource group is defined
    resource_group = azurerm_resource_group.rg.name
  }

  byte_length = 8
}

resource "random_password" "password" {
  length      = 20
  min_lower   = 1
  min_upper   = 1
  min_numeric = 1
  min_special = 1
  special     = true
}

resource "random_pet" "prefix" {
  prefix = var.prefix
  length = 1
}
Step 4: Create variables.tf file in same folder and paste below code in that.
#variables.tf

variable "resource_group_location" {
  default     = "eastus"
  description = "Location of the resource group."
}

variable "prefix" {
  type        = string
  default     = "win-vm-iis"
  description = "Prefix of the resource name"
}
Step 5: Create outputs.tf file in same folder and paste below code in that.
#outputs.tf

output "resource_group_name" {
  value = azurerm_resource_group.rg.name
}

output "public_ip_address" {
  value = azurerm_windows_virtual_machine.main.public_ip_address
}

output "admin_password" {
  sensitive = true
  value     = azurerm_windows_virtual_machine.main.admin_password
}
Creating Virtual Machine
Step 1: Open a terminal either Linux Terminal or PowerShell in windows operating system and remember to be in the folder where you created the terraform configuration files.
Step 2: Download the Azure provider for managing resources.
Syntax
terraform init -upgrade
Output

Step 3: Create execution plan. It creates a file determining which actions will be needed for the resources specified in configuration files.
Syntax
terraform plan -out main.tfplan
- This command will create a execution plan and save it in main.tfplan file.
Output

Step 4: Now do apply the actions which are specified in the previous step in main.tfplan file.
Syntax
terraform apply main.tfplan
Output

Step 5: Now your virtual windows machine is created and is ready to be used.
Step 6: To check the IP address of your virtual machine use below commands in your terminal.
Syntax
echo `terraform output -raw public_ip_address`
Syntax
echo $(terraform output -raw public_ip_address)
- You can verify the IP address by visiting that IP in your browser.

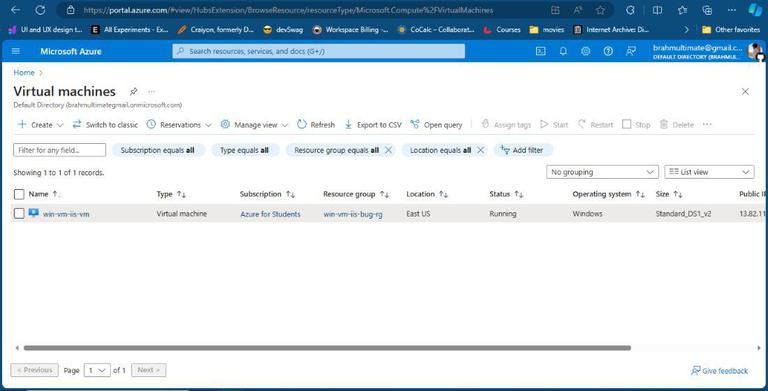
Step 7: You can also go to your Azure Portal in Virtual Machine section to check your Windows VM.
Delete Resources In Azure Using Terraform
When you don’t need the resources which you created using the terraform you can clear them.
Step 1: Open a terminal either Linux Terminal or PowerShell in windows operating system and remember to be in this folder where you created the terraform configuration files.
Step 2: Create a terraform execution plan to delete the resources by using the destroy flag.
Syntax
terraform plan -destroy -out main.destroy.tfplan
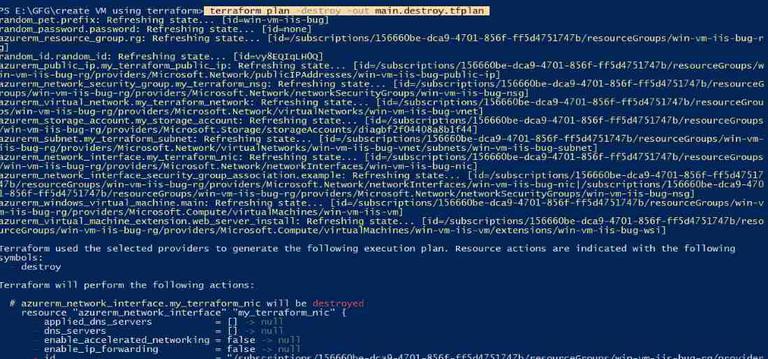
Output
Step 3: Now execute that execution plan to destroy all the resources.
Syntax
terraform apply main.destroy.tfplan
Output
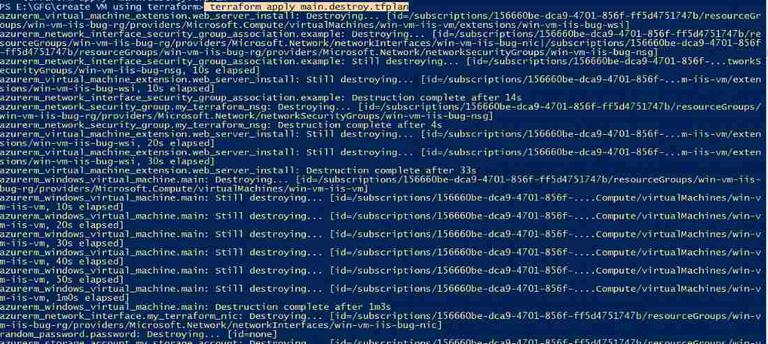
Applying the execution plan to delete resources
Conclusion
So now you know how to create windows Virtual machine using Azure terraform. The steps can be used to create as many virtual machines as you want, and not only for windows but whatever available operating system, you need to specify that in the terraform configuration files. Terraform is a great way for doing stuffs like this and is great tool for DevOps. While there are other options also to create a virtual machine in Azure like manually creating it using Azure Portal.
Creating VM In Azure Using Terraform – FAQ’s
Why Use Terraform To Create Virtual Machine When It Can Created Manually Using Azure Portal?
While creating manually is also good way but tools like terraform are used when you had to automate the repetitive process, like what if you have to create many vm from time to time and with same or similar configuration. terraform can save time and also reduce error.
Why Use Azure For Creating Virtual Machines?
Azure is cost effective way to use cloud infrastructures and also they provide free plans to test yur work before scaling it up.
Is Terraform free?
Yes, terraform is free to download and use.
What Programming Language Does Terraform Files Use?
Terraform files are created using HashiCorp Configuration Language (HCL)
Can We Integrate Terraform With Other Tools?
Yes, Terraform offers integrations with various tools and platforms, including version control systems (e.g., Git), CI/CD pipelines (e.g., Jenkins, GitLab CI/CD), configuration management tools (e.g., Ansible, Chef, Puppet), and cloud platforms (e.g., AWS, Azure, Google Cloud Platform).
Can We Use Terraform On Windows?
Yes, you can install and use terraform on any operating system.
Share your thoughts in the comments
Please Login to comment...