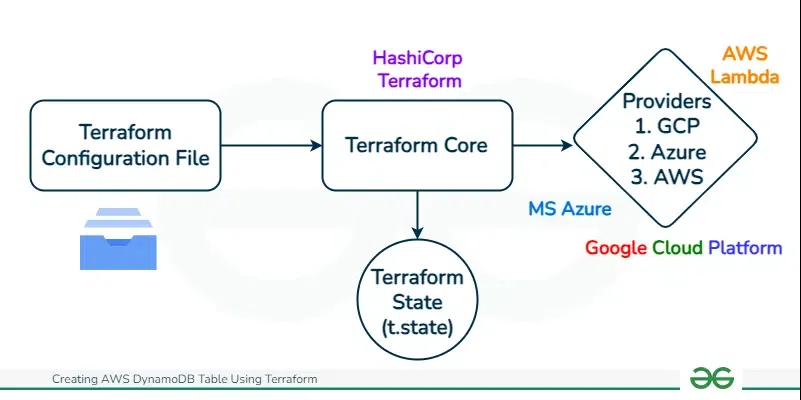
I’m going to show how to use Terraform to create a DynamoDB table in AWS. Terraform lets you define infrastructure like databases as code. This makes it easy to version control and share with others. In this article, I’ll walk through the steps to set up a Terraform file and define a DynamoDB table in it. Then I’ll apply the plan to create the real table in AWS. Following along will show you a hands-on example of using Terraform to manage infrastructure as code. The end result will be a DynamoDB table defined in a Terraform config that can be reused and shared.
Terraform is an Infrastructure management tool. It facilitates automatically creating cloud resources through resource definition in the files. In the past, I would log into my cloud provider’s console and click around to set up things like servers or databases. Doing it manually like that can be tedious and error-prone though. The terraform helps in overcoming this issue by automating the manual setups by defining the tasks and configuring the resources.
The following are The the following are the Features Of Terraform that facilitate:
- Terraform Simplifying Infrastructure Deployment: With Terraform, instead of clicking through a UI, you simply write down what you want to build in a description file. You use a language that Terraform understands to say things like “I want a server with this configuration” or “I need a database with these settings”.
- Automatic Infrastructure Provisioning: Once you’ve described the resources you need in this way, Terraform can connect to your cloud provider and build everything for you automatically! Instead of manual work, your infrastructure gets set up just as you described in the file.
- Infrastructure As Code (IaC) Benefits: The best part is that Terraform as IaC keeps on track of what it built for you. If you want to make changes later, it figures out how to modify your existing resources. I don’t have to worry about deleting or recreating things manually.
- Enhacing Collaborations And Benefits: Being able to codify my infrastructure this way has made my life so much easier. Henry was right that Terraform is a real timesaver! I can share my description files with teammates too so we all know exactly what our development environment looks like.
- Overall, Terraform lets me focus on designing the infrastructure I need, rather than worrying about how to click buttons to set everything up. I highly recommend checking it out if you haven’t already!
Instead of logging into web dashboards and clicking around to setup servers, databases, and more for their projects, her team now just writes text files that describe what they need to deploy. Then Terraform reads those files and automatically creates everything for them! The following are the some of the biggest benefits of using terraform:
- It’s way faster than manual setup. Terraform can spin up a complex stack of resources in just minutes based on the description files. No more repeating the same clicks over and over again.
- The infrastructure is consistent and reproducible. Since it’s defined as code, everyone on the team can easily get the same set of resources deployed. No more wondering if someone configured things slightly differently when setting up manually.
- Changes are simple to apply. To modify their infrastructure, they just update the text files and rerun Terraform. It figures out how to make the necessary changes incrementally.
- Manual mistakes are avoided. When doing things by hand, it’s easy to misconfigure something. But Terraform won’t deploy anything that doesn’t match what’s in the definition files.
- It’s collaborative. The files can be shared and tracked with version control, so the whole team knows exactly what infrastructure is being used for a project.
- Using Terraform for infrastructure as code seems like a huge improvement over manual setup and management! I’ll have to give it a closer look myself based on the benefits Alice described.
What Is DynamoDB?
DynamoDB is a fully managed NoSQL database from Amazon Web Services (AWS). As a non-relational database, it allows for high scalability and performance without the complexity of running your own large database. DynamoDB supports document and key-value data models, providing flexibility in data storage and retrieval.
A major benefit of DynamoDB is automatic scaling capabilities. Based on configured throughput, DynamoDB will scale underlying resources up or down to meet demand. This removes overhead of managing infrastructure and ensures applications have needed throughput.
DynamoDB also supports in-memory caching and expiration of items to improve performance. By caching frequently accessed data in memory, read times are faster. Expiring outdated items reduces storage usage and cost. Overall, DynamoDB’s managed and scalable nature make it a great choice for modern applications needing high-performance, low-latency database services.
For provisioning and managing DynamoDB tables, using Terraform has advantages. Terraform is a tool allowing you to define and deploy cloud resources repeatedly.
For DynamoDB, Terraform provides a straightforward way to define tables, indexes, streams, and settings in code. This approach has benefits like:
- Version control of table schemas and settings.
- Automated table deployment across environments.
- Simple reuse for multiple similar tables.
- Avoiding manual work in the AWS console.
- By using Terraform for DynamoDB tables, developers can work with familiar syntax and integrate tables into broader infrastructure. Terraform’s declarative nature makes reviewing and sharing table configurations easy.
In summary, combining DynamoDB’s managed scaling and Terraform’s codified management enables simpler, more scalable NoSQL database usage in the cloud. This can speed up development workflows.
Step 1: Installation For Terraform On System
- Install the Terraform on your system.
- After Installation, verify it with following command to whether the terraform successfully setup or not.
For installation of Terraform on Linux/Windows refer this – Article.
terraform --version
Step 2: Configuring AWS credentials On Your Command Line
- To start using Terraform with AWS, you first need to configure your AWS credentials so that Terraform can interact with your account resources.
- There are a few options for providing these credentials to Terraform.
- One simple method is to export your AWS access key ID and secret access key as environment variables.
- For example, you can add the following to your bash profile:
export AWS_ACCESS_KEY_ID="<your access key>"
export AWS_SECRET_ACCESS_KEY="<your secret key>"
( or )
- This makes the credentials available to Terraform and avoids hardcoding sensitive info in config files.
- Another option is to create a credentials file at ~/.aws/credentials containing:
[default]
aws_access_key_id = <your access key>
aws_secret_access_key = <your secret key>
Step 3: Create A Terraform Workspace (Repository)
- Creating the “dynamodb-terraform” directory is an important first step to keep things organized as we start using Terraform.
- As a beginner, understanding folder structure and organization is key.
- Terraform configuration files allow us to define the infrastructure we want to build on cloud platforms like AWS.
- This infrastructure can get complex pretty quickly as we add more resources. Without proper organization, it can become unwieldy.
mkdir dynamodb-terraform
cd dynamodb-terraform

Step 4: Define Amazon DynamoDB Resource In Terraform
- Create a new file called main.tf with your favorite text editor. (Recommended VSCode)
- The “main.tf” file that we create is going to be the heart of our Terraform configuration. It will define the AWS resources we want to create, in this case an Amazon DynamoDB table.
- I want to elaborate on why having this dedicated file called “main.tf” is so important:
- The main.tf file serves as the entrypoint to our entire infrastructure definition. When Terraform runs commands like “terraform apply”, it will automatically find and load our main.tf to determine what should be created/updated.
- This “main.tf” becomes the single source of truth for our AWS infrastructure. By having one dedicated file, we always know where to look to find our resource definitions rather than having to hunt across many files or folders.
Step 5: Providing Terraform Credentials In Terraform
Add the AWS provider configuration – Replace “YOUR_AWS_REGION” and “YOUR_AWS_PROFILE”:
provider "aws" {
  region = "YOUR_AWS_REGION"
  profile = "YOUR_AWS_PROFILE"
}
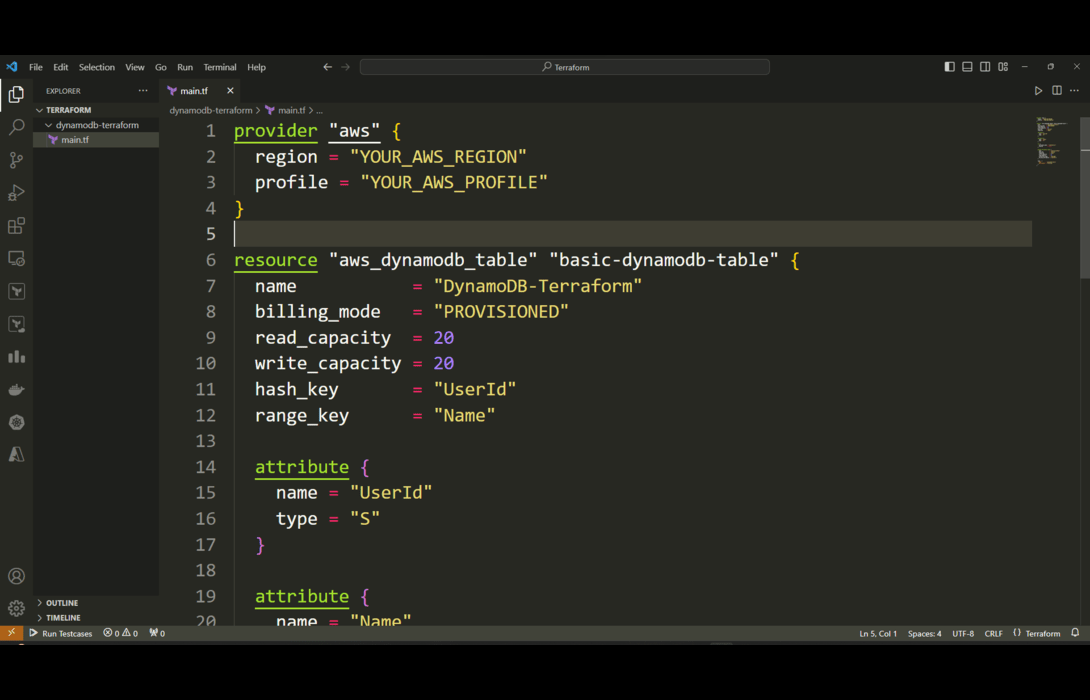
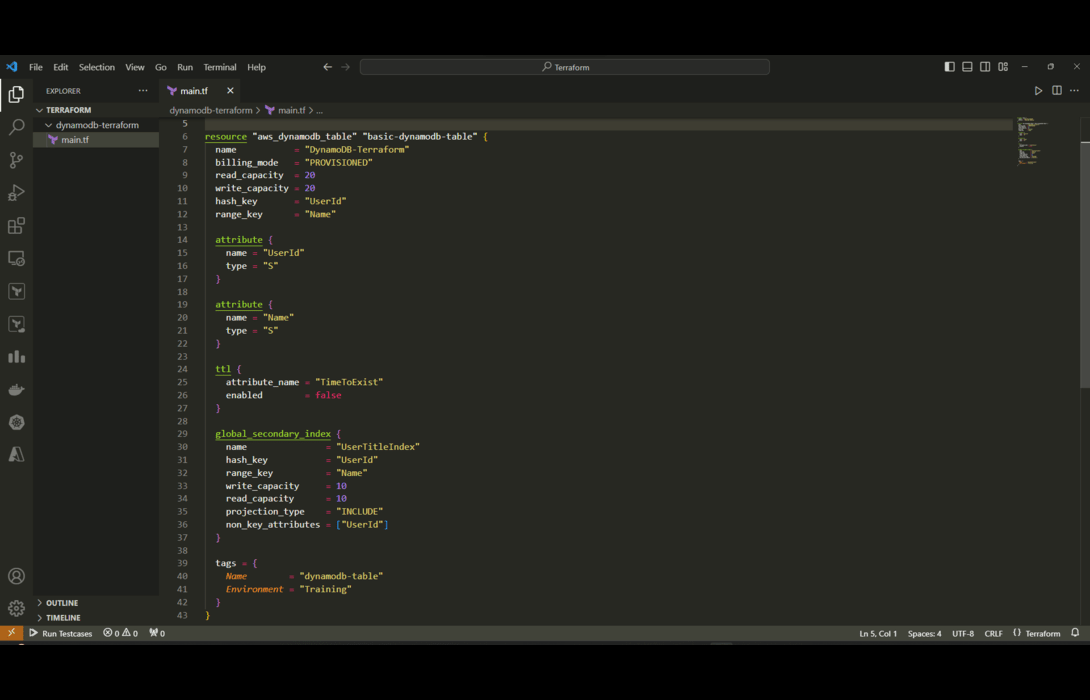
Defining the DynamoDB table resource is where we get to translate our desired table specifications into actual Terraform configuration that will provision this table on AWS. I want to dive deeper on this key step. Within the resource block, every line and setting customizes exactly how the DynamoDB table will be configured on creation.
For Example
- The “name” parameter determines the identifier for our table in DynamoDB. Much like naming files in a filesystem, this uniquely labels our table for easy reference.
- “billing_mode” tells AWS whether to provision a fixed capacity for our table (“PROVISIONED”) or scale it dynamically based on usage (“PAY_PER_REQUEST”). This impacts billing and scalability.
- Read and Write capacity units directly control the throughput performance of our table. This allocates the read and write throughput to suit our application’s traffic needs.
- The hash and range keys are critical because they define the underlying organization for data in the table. This models the primary access patterns that our application requires.
- Any other attributes flesh out the complete schema design for our data. Much like columns in a SQL table, these attributes and their data types define what data the table will hold.
Overall, every single block and argument shapes the end state of our DynamoDB table. This gives us total control to customize our infrastructure to meet our exact application requirements. The ability for infrastructure-as-code to capture these details is what makes Terraform so powerful for cloud provisioning.
provider "aws" {
  region  = "us-east-1"
  version = "~> 2.0"
}

resource "aws_dynamodb_table" "basic-dynamodb-table" {
  name           = "DynamoDB-Terraform"
  billing_mode   = "PROVISIONED"
  read_capacity  = 20
  write_capacity = 20
  hash_key       = "UserId"
  range_key      = "Name"

  attribute {
    name = "UserId"
    type = "S"
  }

  attribute {
    name = "Name"
    type = "S"
  }

  ttl {
    attribute_name = "TimeToExist"
    enabled        = false
  }

  global_secondary_index {
    name               = "UserTitleIndex"
    hash_key           = "UserId"
    range_key          = "Name"
    write_capacity     = 10
    read_capacity      = 10
    projection_type    = "KEYS_ONLY"  # Corrected projection_type
    non_key_attributes = []
  }

  tags = {
    Name        = "dynamodb-table"
    Environment = "Training"
  }
}
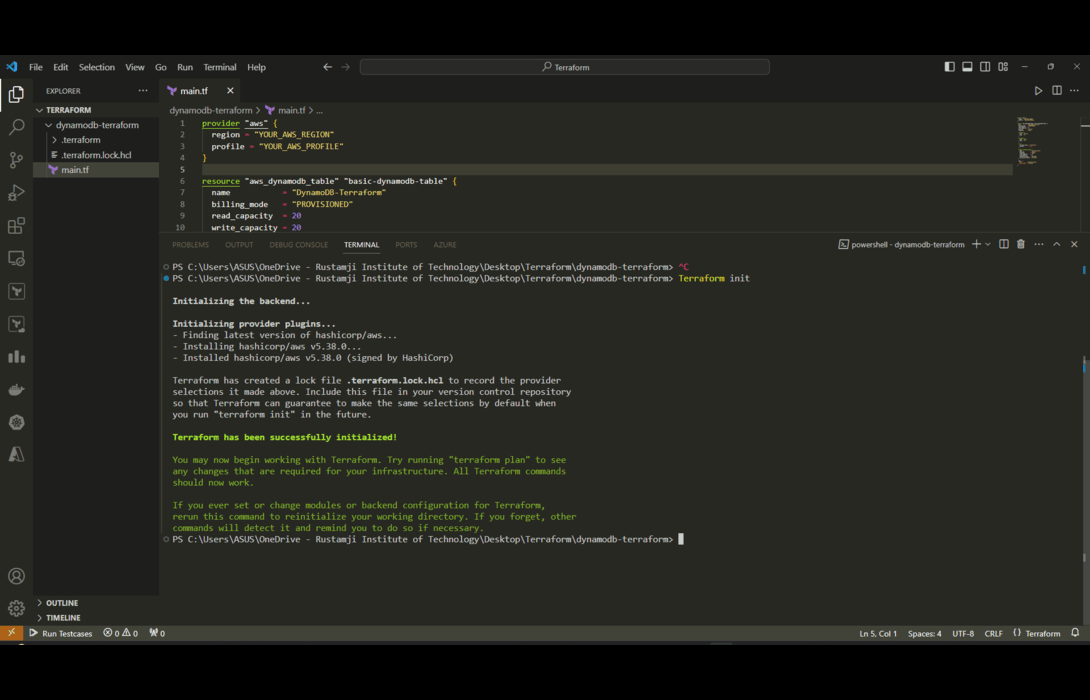
Step 6: Execute The Terrform WorkSpace ( terraform init )
- Run the following command to initialize the provider plugins.
- The “terraform init” command plays an important behind-the-scenes role in setting up Terraform to work its magic. As a beginner, understanding exactly what it does can be helpful.
- When we define AWS resources like a DynamoDB table in our Terraform scripts, Terraform needs a way to actually create these resources by talking to Amazon’s servers.
- It does this through a plugin architecture. The “aws” provider that we configured tells Terraform to download and install a specialized plugin for the Amazon Web Services API. This plugin knows how to translate Terraform resource definitions into real API calls to provision those resources in AWS.
- For example, the plugin contains the programming logic to take our DynamoDB table properties and make a CreateTable API request to Amazon behind the scenes to provision that table based on our specifications.
terraform init
Step 7: Terraform Plan
- Run the following command to preview the changes.
- The “terraform plan” command serves an invaluable purpose – allowing us to preview how Terraform will change our infrastructure before actually applying those changes.
- As Terraform beginners, having this insight into what will actually happen is critical for a few reasons:
- It builds trust. By seeing a readout of the real AWS API calls and resources planned, we verify that Terraform interpreted our config correctly. We can confirm it will make the changes we expect.
- Allows error checking. If we made a mistake in any resource definitions, the plan output will show discrepancies or failures before any real infrastructure is created. We can then fix errors proactively.
- Overall, “terraform plan” provides transparency into provisioning actions before they happen. For first-time users unfamiliar with Terraform or AWS, this visibility builds the confidence needed to then apply changes safely using “terraform apply”. Leveraging plan becomes second nature in mature DevOps workflows.
terraform plan
Step 8: Terraform Apply
- The “terraform apply” command is the final step that actually creates real infrastructure resources in AWS as defined in our Terraform scripts.
- Up until now, we’ve just been declaring what we want our infrastructure to look like. The apply command is what turns those declarations into reality by interfacing with Amazon’s cloud APIs.
Some Key Points About “apply”
- It provisions resources freshly the first time based on our configs. Subsequent applies incrementally update resources according to our current definitions.
- It shows a final “terraform plan” style summary describing all changes that will occur when we confirm execution.
- It outputs statuses on each step required to configure infrastructure components like the DynamoDB table.
- New resources are tagged clearly in the AWS Console making it easy to validate they’ve been created as defined.
Overall, apply puts Terraform’s full power into action making the AWS resources we defined actually come to life. It realizes our infrastructure-as-code vision safely, repeatably, and transparently thanks to built-in planning and visibility every step of the way.
terraform apply

Step 9: Deleting Terraform Workspace
- The “terraform destroy” command gives us an easy way to tear down infrastructure we no longer need. This is a key advantage of Terraform’s infrastructure-as-code approach.
- Being able to safely destroy AWS resources like our DynamoDB table has several benefits.
- Avoids unnecessary AWS charges when we’re done experimenting or developing with services. Shutting them down saves money.
- Allows us to frequently rebuild fresh infrastructure during testing or development. We can recreate tables with new designs rapidly.
- Cleanly rolls back any mistakes. If an apply goes wrong, destroy lets us wipe the slate totally clean very quickly.
- Enables iterating infrastructure revisions by applying, testing, destroying, and repeating the process.
- Teardown can be just as automated as setup thanks to destroy integrating with the same resource definitions.
The destroy command essentially reverses the apply process by telling AWS to delete all the resources it previously created. Thanks to this destroy capability paired with automated applies, Terraform enables very agile, low-risk infrastructure life cycles. We can build exactly what we need when we need it, then take it all down just as easily.
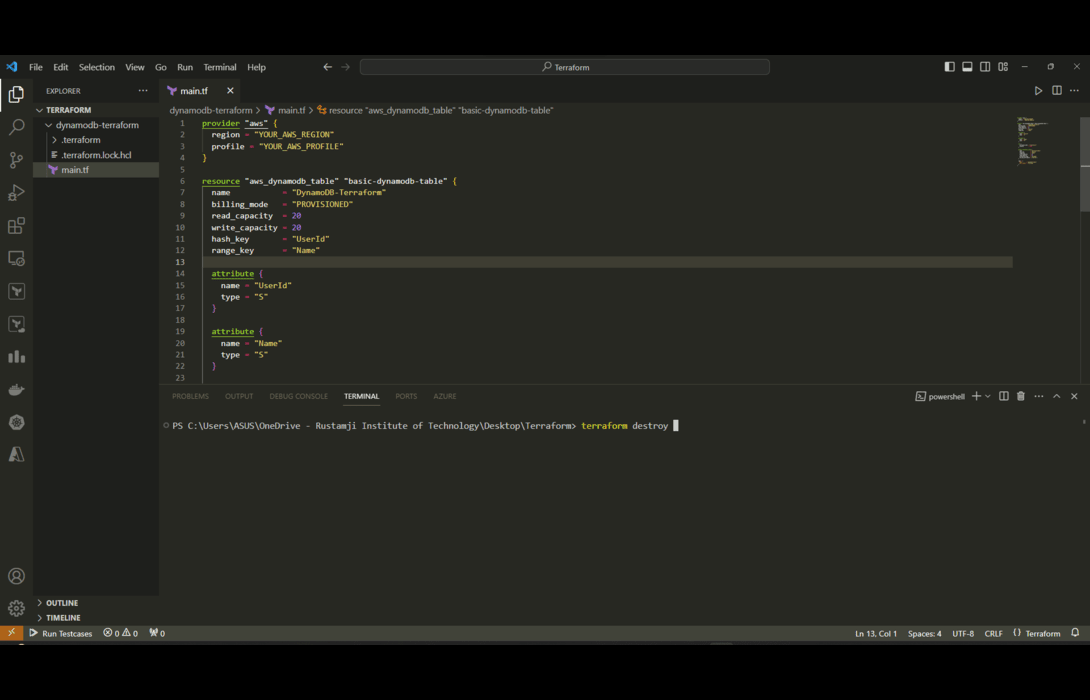
terraform destroy
- The following screenshot illustrates this clearly.
Managing Tables And Items In Database
1. Putting And Getting Items
- Terraform lets you create, update, and delete items in a DynamoDB table using the aws_dynamodb_table_item resource. For example:
resource "aws_dynamodb_table_item" "item" {
table_name = aws_dynamodb_table.mytable.name
hash_key   = aws_dynamodb_table.mytable.hash_key
item = {
"UserId": "user123",
"Name": "John Doe"
}
}
- This puts a new item into the table with UserId and Name. The item contents match the table layout.
- You can also get items by configuring read instead of put. The response will return attributes of matching items.
- This allows basic create and read operations directly in Terraform.
2. Destroying DynamoDB Tables
- When managing infrastructure as code with Terraform, it is a best practice to clean up any resources that are no longer needed. This prevents unused and outdated resources from cluttering up your AWS account.
- With infrastructure as code, unused resources should be destroyed. For DynamoDB, destroying the table resource deletes it:
resource "aws_dynamodb_table" "temptable" {
//config
}
- Running terraform destroy removes temptable and all data. This cleans up unused resources.
- Once this DynamoDB resource is defined in your Terraform configurations, you can easily destroy it by running:
terraform destroy
- This will find all resources flagged to be destroyed in your Terraform state and delete them from AWS. For the temptable example above, the table and all its items will be removed cleanly.
- Destroying resources like tables in Terraform helps prevent accumulating unused tables over time as requirements change. It also enables easily spinning up and tearing down tables for temporary workflows.
3. Advanced Workflows
While Terraform provides simple CRUD operations for DynamoDB items, more complex workflows can also be implemented by leveraging Terraform’s extensive functionality.
For example, batch writing items can help speed up inserts and reduce API calls by combining operations. The aws_dynamodb_batch_write_item resource allows defining batched puts and deletes for efficiency.
- Atomic counters can be implemented via the update_item function which allows conditional updates. This can atomically increment values like visitor counts without race conditions.
- Asynchronous invocations of AWS Lambda functions can be achieved using Terraform’s aws_lambda_invocation resource. This is useful for triggering workflows based on DynamoDB changes via streams.
- These are just some examples of more advanced patterns. By composing Terraform resources, data sources, modules, and built-in functions, quite sophisticated DynamoDB applications can be implemented declaratively.
Things like atomic transactions, indexing/query optimization, conditional chaining of operations, and integration with other services are possible. Terraform enables going far beyond basic create, read, update, delete to implement dynamic cloud-scale applications with DynamoDB.
Managing Indexes And Streams Of DynamoDB
Adding Indexes
- As someone new to DynamoDB, secondary indexes were tricky for me to grasp at first. Coming from a relational database background, I was used to just creating tables with different columns and joining them.
- With DynamoDB’s NoSQL model, you can only query or scan the main table by its primary key attributes. This is great for speed, but limiting.
- Adding global secondary indexes in DynamoDB opens up a lot more flexibility in how you query data. An index lets you organize data by alternative attributes besides the main table key. For example, in my gaming scorekeeping app, my main DynamoDB table uses “UserId” as the primary hash key to look up scores for each player.
- But I also wanted to be able to look up high scores by game title across all players. By adding a global secondary index on the “GameTitle” attribute, I can now query scores organized by game in addition to player. This kind of flexibility with indexing is powerful for modeling complex data relationships in a fast NoSQL paradigm like DynamoDB. Terraform makes it simple to add and manage indexes programmatically.
- DynamoDB supports global secondary indexes to enable alternative query paths. These can be added in Terraform:
resource "aws_dynamodb_table" "table" {
hash_key = "UserId"
index {
name = "GameTitleIndex"
hash_key = "GameTitle"
}
}
- This creates a GameTitleIndex to look up items by GameTitle instead of the main UserId key. Multiple indexes can be added.
Enabling Streams
When I first started with DynamoDB, I just viewed it as a fast NoSQL data store for my applications. But enabling DynamoDB streams opened my eyes to the possibilities of integrating it with other services. Streams provide a time-ordered log of item changes in a table. When enabled on a table, any creates, updates or deletes get captured and sent to a stream.
I can tap into this stream for some powerful workflows:
- Send data to Elasticsearch clusters to enable faster searching of table data.
- Push updates to downstream Lambda functions to trigger additional workflows.
- Sync a backup copy of the table to another region for disaster recovery.
- Analyze change patterns for usage metrics and insights.
The stream Integration patterns are endless!
My favorite use case so far is syncing my critical production tables to a different region every hour using streams and Lambda. This gives me peace of mind that my data is durable. Streams turn DynamoDB into a hub that can integrate with many different AWS services. The stream view options let you tune what data to send downstream. I’m excited to enable streams on more tables and build out sophisticated architectures around them. The ease of use in Terraform is just icing on the cake!
DynamoDB streams can track data changes and send to other services. Turn on streams with:
resource "aws_dynamodb_table" "table" {
stream_enabled = true
stream_view_type = "NEW_IMAGE"
}
This captures table changes and sends new item data.
Deploying Infrastructure
One of the key advantages of Terraform is its ability to repeatedly deploy infrastructure in a consistent way. For DynamoDB, the workflow involves:
- Initializing Terraform to install providers and modules
- Running terraform plan to preview the changes to be made
- Applying the changes with terraform apply to create real resources
I like to run plans first to validate everything will work as expected. The apply command provisions AWS resources like DynamoDB tables based on the Terraform configs.
Terraform also makes clean up easy. Running terraform destroy will remove any resources no longer needed. Overall, Terraform deployment gives me confidence my infrastructure is correct.
Validating Functionality Of DynamoDB
Once DynamoDB tables are deployed, I test them thoroughly. Some validation techniques I use:
- Check tables exist in the AWS console
- Perform sample queries and scans to test response
- Insert and retrieve test items via code
- Verify secondary indexes work as expected
- Query using alternate sort keys configured
- Validate encryption enabled properly
- Thorough testing ensures my tables work as intended before using them in production. Automated tests provide further validation when integrated in CI/CD pipelines.
End-to-End Setup Example
Here is an example walkthrough of a complete setup:
- Define Terraform Configs: Define DynamoDB table resources in Terraform – name, schema, indexes, throughput, etc.
- Initialize And Plan Deployment: Initialize and plan deployment to verify no errors
- Apply Configurations: Apply to create real tables in the AWS account
- Test Data Operations: Use AWS CLI to insert and retrieve test data
- Query With Terraform Configs: Query using alternate indexes configured in Terraform
- Destroy Tables: Destroy tables when done to clean up
This workflow lets me provision fully-featured DynamoDB environments easily.
Conclusion
Well, I’d say this terraforming business has been a success! I laid down my plans like an ethereal gardener, detailing the fertile lands I aimed to cultivate and the bounties I wished to reap. Though my tools were lines of code, with Terraform I tilled the cloud, sowing seeds that would manifest most majestically. Now at harvest time, I behold the fruits of my labors – a DynamoDB constructed to my exact specifications. Sturdy tables now stand where once was empty AWS soil. Lean in close and you may hear the gentle hum of NoSQL databases catalyzing. Our work here is complete…for now at least. The infrastructure alchemy continues!
What Is DynamoDB?
DynamoDB is a fully managed NoSQL database service provided by Amazon Web Services (AWS). It provides fast performance and seamless scalability for modern applications.
How Does DynamoDB Work?
DynamoDB stores data in tables made of items similar to rows. Each item is composed of attributes like columns. Items are retrieved using primary keys. DynamoDB handles the underlying infrastructure automatically.
What Are The Data Models In DynamoDB?
The key data models are document and key-value. With document, each item is a collection of attributes. With key-value, only the primary key and value are stored.
How Is DynamoDB Different From Traditional Databases?
DynamoDB is a NoSQL non-tabular database. It sacrifices some functionality like joins for extreme speed and scalability. DynamoDB tables can grow or shrink on demand.
How Is Throughput Handled In DynamoDB?
DynamoDB provides on-demand capacity or provisioned capacity. On-demand scales automatically while provisioned reserves read/write units. This simplifies throughput management.
How Do I Get Started With DynamoDB?
Getting started is easy using the AWS console. You can create tables, add data, run queries. Integrating via an SDK provides more control for developers.
What Are Some Best Practices With DynamoDB?
Some best practices are enabling encryption, using sort keys, distributing requests, avoiding “hot” keys, and minimizing scans. Table design is important for performance.
Share your thoughts in the comments
Please Login to comment...