Spring Cloud – Tracing Services with Zipkin
Last Updated :
21 Feb, 2024
In Spring Boot, Spring Cloud can provide various features, such as distributed tracing, through its integration with Zipkin, and it is an open-source distributed tracing system. Using Zipkin, you can trace the services of the spring cloud environments.
Key Terminologies:
- Trace: It can be used to represent the whole journey as it propagates through a distributed system and contains multiple spans.
- Trace ID: Every trace contains one unique ID that can be named Trace ID, and it can be used to identify the traces uniquely in the Zipkin tracing service.
- Span: It can represent a single unit of work within a trace, and it contains information that includes the operation of the request, timing information, metadata, and also the initial request and downstream calls.
- Span ID: It can be used to uniquely identify the spans within a trace service, and all spans within the same trace share the same trace ID.
- Parent Span ID: It can represent the initial span of the traces, and it can establish the hierarchy of spans in the Zipkin trace service.
- Trace Context: It can contain the data of the Trace ID, Span ID, and parent Span ID that were propagated along with the request as a traversal through the different services.
- Sampler: It is responsible for deciding which requests should be traced and which are not, and it helps to control a subset of requests.
- Reporter: It can generate reports of the sending of span data to the tracing backend, and it can store and analyze the traces.
- Zipkin UI Dashboard: It can represent the UI dashboard interface of the Zipkin server, and it can visualize traces, analyze performance, and identify issues with the systems.
Step-by-Step Project Implementation
We can develop an employee data service project that can be integrated with Zipkin to trace the request into our project.
Step 1: First, we can create the project using InteljIdea Ultimate and select the spring new project. The project includes the below dependencies:
Dependencies:
- Spring Web
- Spring Data MongoDB
- Spring Dev tools
- Zipkin
Once created, open the InteljIdea IDE and start developing the project. And one more thing: if you want to work on the Zipkin server, we need to add the below external dependencies to your pom.xml file.
XML
<dependency>
<groupId>io.zipkin.java</groupId>
<artifactId>zipkin-server</artifactId>
<version>2.12.9</version>
</dependency>
<dependency>
<groupId>io.zipkin.java</groupId>
<artifactId>zipkin-autoconfigure-ui</artifactId>
<version>2.12.9</version>
<scope>runtime</scope>
</dependency>
<dependency>
<groupId>org.springframework.boot</groupId>
<artifactId>spring-boot-starter-actuator</artifactId>
</dependency>
<dependency>
<groupId>io.micrometer</groupId>
<artifactId>micrometer-tracing-bridge-brave</artifactId>
</dependency>
<dependency>
<groupId>io.zipkin.reporter2</groupId>
<artifactId>zipkin-reporter-brave</artifactId>
</dependency>
<dependency>
<groupId>org.springframework.cloud</groupId>
<artifactId>spring-cloud-starter-sleuth</artifactId>
<version>2.2.8.RELEASE</version>
</dependency>
<dependency>
|
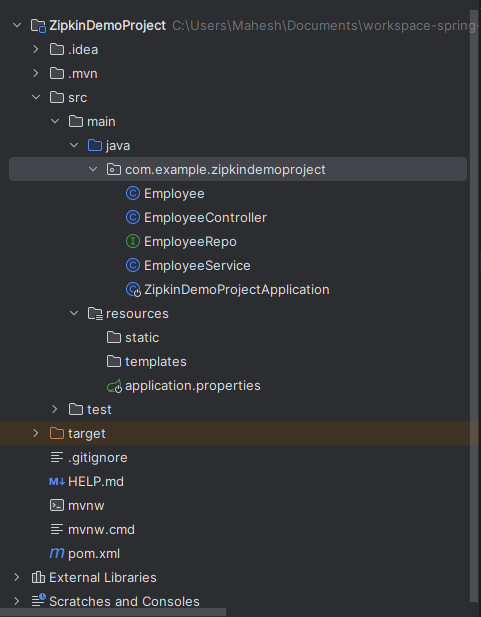
After created the project, our project looks like the below file structure.
Step 2: Once we have completed adding the dependencies, we can now configure the database and Zipkin server in our project. Now open the application.properties file and put the code below.
open src > resources > application.properties, put the code below, and save it.
spring.data.mongodb.uri=mongodb://localhost:27017/Registration
#Zipkin server configuration
spring.zipkin.base-url=http://localhost:9411
spring.sleuth.sampler.probability=1.0
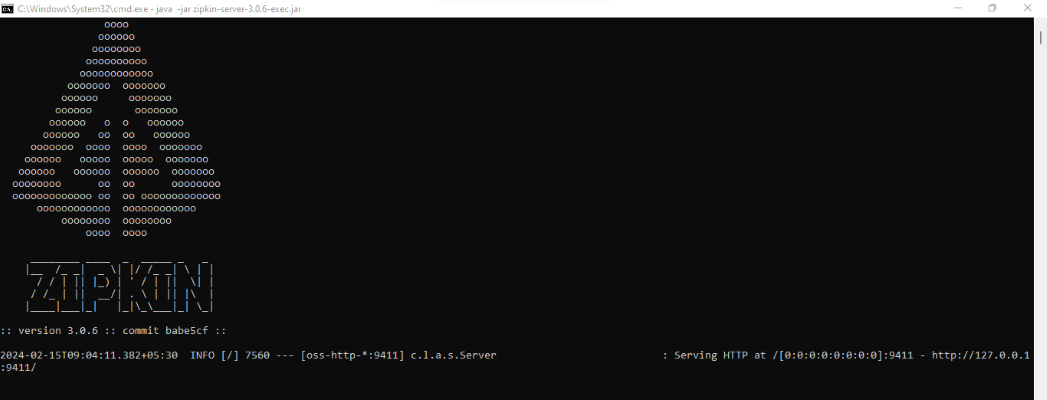
Step 3: After the completion of the configuration, now run the Zipkin server to open the command prompt and run the below command (give the exec file with your download version).
Note: Download the Zipkin into your system (Link)
java -jar zipkin-server-3.0.6-exec.jar
Once we execute the command, the Zipkin server can be running on port number 9411. For better understanding, refer to the below image.
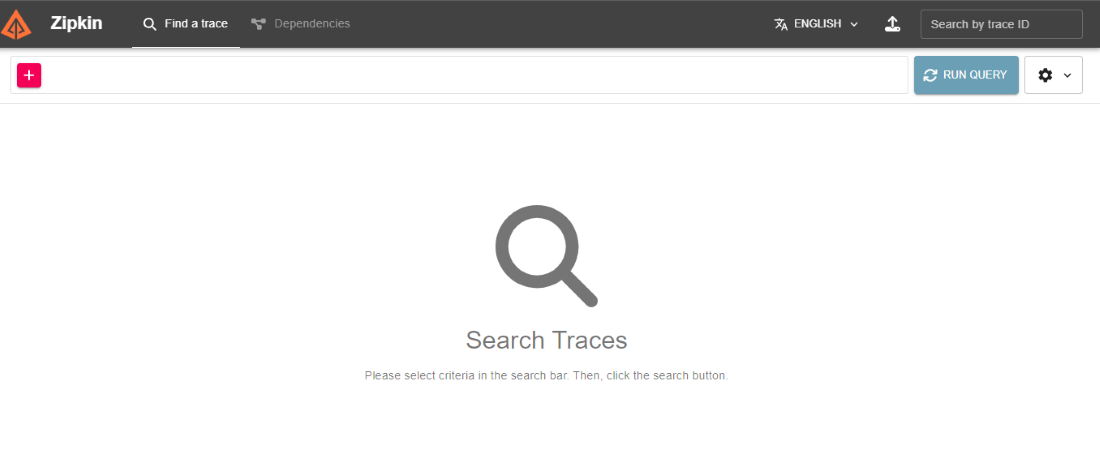
Open the Zipkin server dashboard, then check whether the dashboard is open or not, and the Zipkin dashboard looks like the below image.
Once we have completed the Zipkin server configuration, we can develop the employee service project. Once we have completed the project testing with Postman, check if the Zipkin server can trace the request or not.
Step 4: Open the com.example.zipkindemoproject and create the Employee class that can be manage data model of the spring project.
Go to src > java > com.example.zipkindemoproject > Employee and put the code below:
Java
package com.example.zipkindemoproject;
import org.springframework.data.annotation.Id;
import org.springframework.data.mongodb.core.mapping.Document;
@Document
public class Employee {
@Id
String id;
String fullName;
String Department;
String role;
String experience;
public String getId() {
return id;
}
public void setId(String id) {
this.id = id;
}
public String getFullName() {
return fullName;
}
public void setFullName(String fullName) {
this.fullName = fullName;
}
public String getDepartment() {
return Department;
}
public void setDepartment(String department) {
Department = department;
}
public String getRole() {
return role;
}
public void setRole(String role) {
this.role = role;
}
public String getExperience() {
return experience;
}
public void setExperience(String experience) {
this.experience = experience;
}
}
|
Step 5: Open the com.example.zipkindemoproject and create the EmployeeRepo interface that can be manage repository of the spring project.
Go to src > java > com.example.zipkindemoproject > EmployeeRepo and put the code below:
Java
package com.example.zipkindemoproject;
import org.springframework.data.mongodb.repository.MongoRepository;
import org.springframework.stereotype.Repository;
@Repository
public interface EmployeeRepo extends MongoRepository<Employee,String> {
}
|
Step 6: Service
Java
package com.example.zipkindemoproject;
import org.springframework.beans.factory.annotation.Autowired;
import org.springframework.stereotype.Service;
import java.util.List;
@Service
public class EmployeeService {
@Autowired
private EmployeeRepo repository;
public List<Employee> getAllEmployees() {
return repository.findAll();
}
public Employee saveEmployee(Employee employee) {
return repository.save(employee);
}
}
|
Step 7: Open the com.example.zipkindemoproject and create the EmployeeController class that can be handles the requests of the spring project.
Go to src > java > com.example.zipkindemoproject > EmployeeController and put the code below:
Java
package com.example.zipkindemoproject;
import org.springframework.beans.factory.annotation.Autowired;
import org.springframework.stereotype.Controller;
import org.springframework.web.bind.annotation.*;
import java.util.List;
@RestController
@RequestMapping("/employees")
public class EmployeeController {
@Autowired
private EmployeeService employeeService;
@GetMapping
public List<Employee> getAllEmployees() {
return employeeService.getAllEmployees();
}
@PostMapping("/create")
public Employee createEmployee(@RequestBody Employee employee) {
return employeeService.saveEmployee(employee);
}
}
|
Step 8: Open the com.example.zipkindemoproject and open the Main class that can be used to run the of the spring project.
Go to src > java > com.example.zipkindemoproject > ZipkinDemoProjectApplication and put the code below:
Java
package com.example.zipkindemoproject;
import lombok.extern.slf4j.Slf4j;
import org.springframework.boot.SpringApplication;
import org.springframework.boot.autoconfigure.SpringBootApplication;
import zipkin2.server.internal.EnableZipkinServer;
@SpringBootApplication
@EnableZipkinServer
public class ZipkinDemoProjectApplication {
public static void main(String[] args) {
SpringApplication.run(ZipkinDemoProjectApplication.class, args);
}
}
|
Open the pom.xml file and put the code below:
XML
<?xml version="1.0" encoding="UTF-8"?>
<modelVersion>4.0.0</modelVersion>
<parent>
<groupId>org.springframework.boot</groupId>
<artifactId>spring-boot-starter-parent</artifactId>
<version>3.0.0</version>
<relativePath/>
</parent>
<groupId>com.example</groupId>
<artifactId>ZipkinDemoProject</artifactId>
<version>0.0.1-SNAPSHOT</version>
<name>ZipkinDemoProject</name>
<description>ZipkinDemoProject</description>
<properties>
<java.version>17</java.version>
</properties>
<dependencies>
<dependency>
<groupId>org.springframework.boot</groupId>
<artifactId>spring-boot-starter-actuator</artifactId>
</dependency>
<dependency>
<groupId>org.springframework.boot</groupId>
<artifactId>spring-boot-starter-data-mongodb</artifactId>
</dependency>
<dependency>
<groupId>org.slf4j</groupId>
<artifactId>slf4j-api</artifactId>
<version>2.0.12</version>
</dependency>
<dependency>
<groupId>org.springframework.boot</groupId>
<artifactId>spring-boot-starter-web</artifactId>
</dependency>
<dependency>
<groupId>io.zipkin.java</groupId>
<artifactId>zipkin-server</artifactId>
<version>2.12.9</version>
</dependency>
<dependency>
<groupId>io.zipkin.java</groupId>
<artifactId>zipkin-autoconfigure-ui</artifactId>
<version>2.12.9</version>
<scope>runtime</scope>
</dependency>
<dependency>
<groupId>org.springframework.boot</groupId>
<artifactId>spring-boot-starter-actuator</artifactId>
</dependency>
<dependency>
<groupId>io.micrometer</groupId>
<artifactId>micrometer-tracing-bridge-brave</artifactId>
</dependency>
<dependency>
<groupId>io.zipkin.reporter2</groupId>
<artifactId>zipkin-reporter-brave</artifactId>
</dependency>
<dependency>
<groupId>org.springframework.cloud</groupId>
<artifactId>spring-cloud-starter-sleuth</artifactId>
<version>2.2.8.RELEASE</version>
</dependency>
<dependency>
<groupId>org.springframework.boot</groupId>
<artifactId>spring-boot-devtools</artifactId>
<scope>runtime</scope>
<optional>true</optional>
</dependency>
<dependency>
<groupId>org.projectlombok</groupId>
<artifactId>lombok</artifactId>
<optional>true</optional>
</dependency>
<dependency>
<groupId>org.springframework.boot</groupId>
<artifactId>spring-boot-starter-test</artifactId>
<scope>test</scope>
</dependency>
</dependencies>
<dependencyManagement>
<dependencies>
<dependency>
<groupId>org.springframework.cloud</groupId>
<artifactId>spring-cloud-dependencies</artifactId>
<version>2022.0.3</version>
<type>pom</type>
<scope>import</scope>
</dependency>
</dependencies>
</dependencyManagement>
<build>
<plugins>
<plugin>
<groupId>org.springframework.boot</groupId>
<artifactId>spring-boot-maven-plugin</artifactId>
<configuration>
<excludes>
<exclude>
<groupId>org.projectlombok</groupId>
<artifactId>lombok</artifactId>
</exclude>
</excludes>
</configuration>
</plugin>
</plugins>
</build>
</project>
|
Step 9: Once’s completed the project and run the application as spring project and it runs successfully and started application as port number 8080. Refer the below image for better understanding.

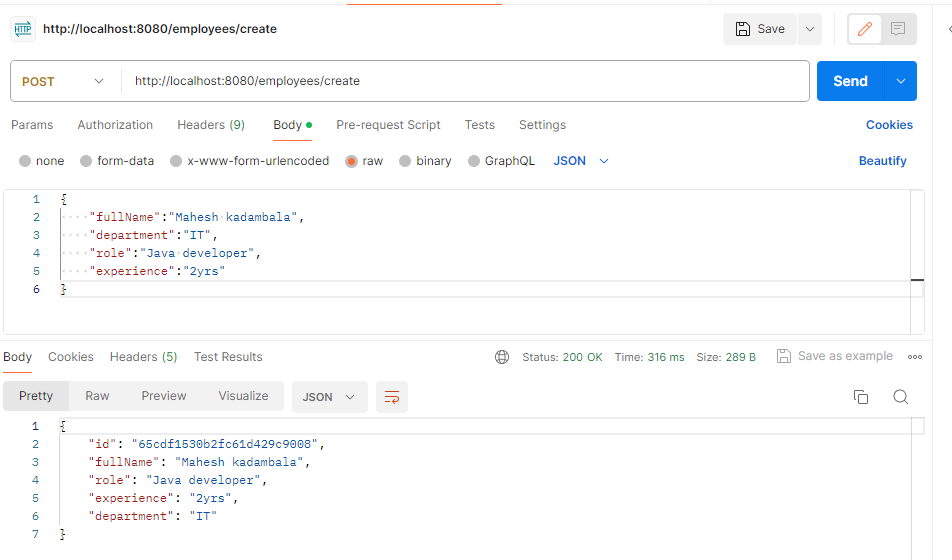
Step 10: Run the API in the Postman tool:
http://localhost:8080/employees/create
Refer to the below image for a better understanding:
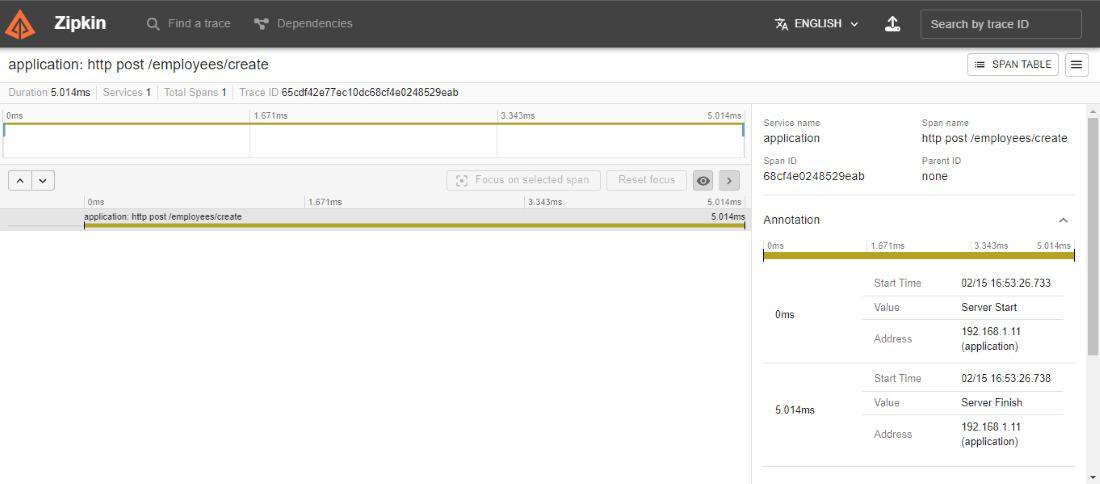
Step 10: Open the Zipkin UI Dashboard and refresh the page check whether it can trace the requests once it can be traced that request can visible into the Zipkin dashboard.
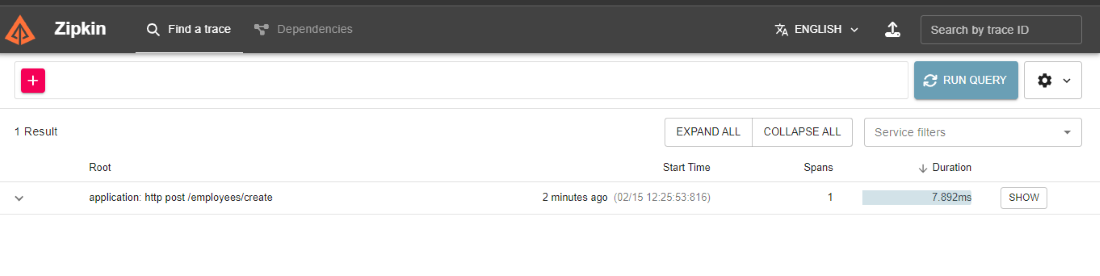
Zipkin can trace all the information of the requests and generates the service name, span name and span ID and parent ID and all the details of the request.
Refer the below image for the better understanding of the concept.
You can follow the above steps and can successfully integrate the zipkin server to your project and it can be used to trace the requests for the project.
Share your thoughts in the comments
Please Login to comment...