Spring Boot – Sending SMS with Twilio
Last Updated :
14 Dec, 2023
Spring is a widely used framework of Java that allows us to create stand-alone and robust applications at the enterprise level. Spring boot is a tool or an extension of the Spring framework that makes developing web applications and microservices much faster and easier. It offers an integrated server & its auto-configuration feature makes it a top-notch tool for software development.
Twilio is a cloud communication platform that provides programmable communication tools – APIs for adding message, voice and video communication to your application. In this article, we’ll learn how to integrate Twilio API functionality using Spring Boot.
Pre-requisites of Topic
- Java JDK version 8 or newer
- Twilio Account: Free or Paid Twilio account, Twilio ACCOUNT_SID, Twilio AUTH_ID.
- REST Controllers, Response entity, Post Man, Build Tool: Maven
Twilio Dependency
We’ll be using this dependency which allows us to utilise the Twilio Java Library.
XML
<dependency>
<groupId>com.twilio.sdk</groupId>
<artifactId>twilio</artifactId>
<version>10.0.0-rc.5</version>
</dependency>
|
Initial Configuration
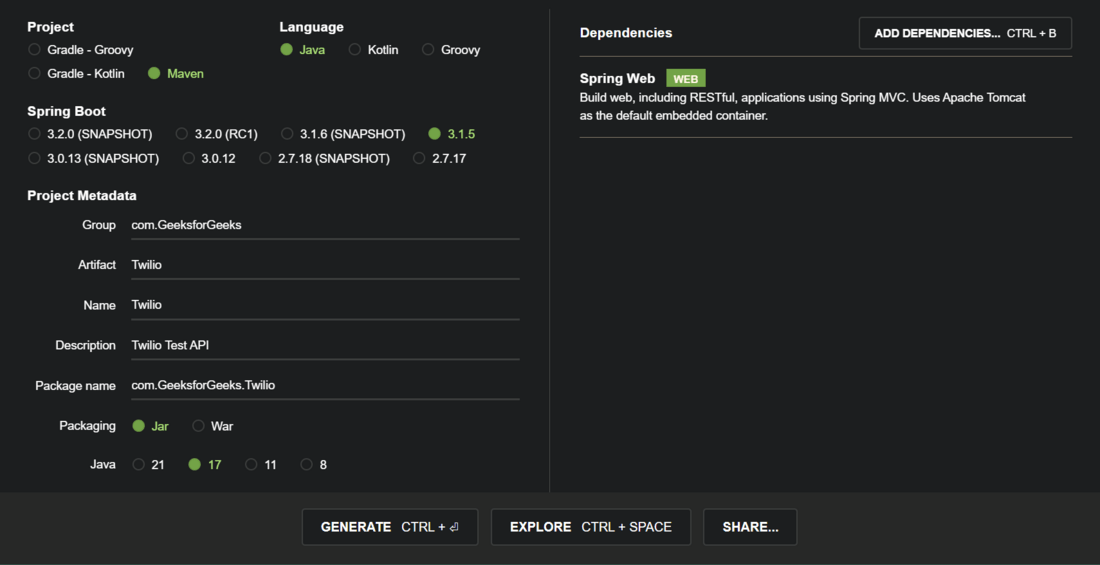
Step 1: Go to Spring Initializr and add Spring-Web Dependency. And following configuration:
Step 2: Download the zip file, extract it.
Step 3: Go to your favourite IDE and open the extracted file (we’ll use Intellij)
Step 4: Under com.GeeksforGeeks.Twilio package, Create two new packages – ‘Entity’ & ‘RESTController’. Your final directory structure should look something like this:
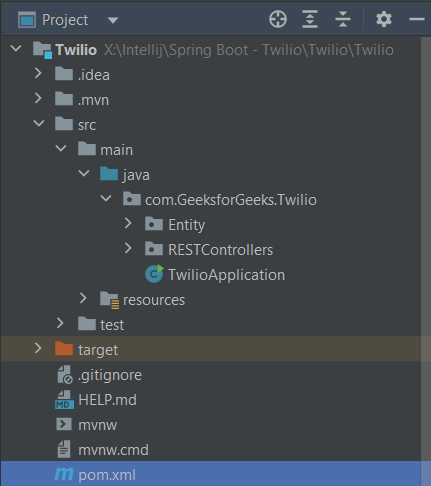
Directory Structure
Java Twilio
Twilio is a third party application build on cloud infrastructure which facilitates voice calls and SMS Services. We’ll send SMS and make a voice call through Twilio using Spring Boot – Java. These two are very common features used by any business across the world offering their extensive services to their customers. Before moving on, let’s have a look at the library we’ll be utilising in this article :
Twilio Java Library main components
1. Twilio Library Initialization with your credentials
Twilio.init(ACCOUNT_SID, AUTH_TOKEN);
Explanation:
- This line of code initialize the Twilio Java Library with your Credentials.
- ACCOUNT_SID is a 32 char long string that you will find at Twilio console
- AUTH_TOKEN is a security token associated with your account for authentication and interaction.
- It is best practice to store these two in environment variables of a system rather than hard coding them
2. Message send method
Message.creator(new PhoneNumber(to_Phone_Number), new PhoneNumber(Your_TWILIO_NUMBER),
               "Hello, this is a Sample Message sent from a Spring Boot Application").create();
Explanation:
- Message is a class of Twilio Java Library, that has a method – .creator() to create a message that we want to send through our application and it further calls the .create() method which sends the message to a specified number from the twilio number provided.
- to_Phone_Number field: This field will be replace with your phone number with country code. Ex : +919893xxxxxx
- Your_TWILIO_NUMBER field: This will be replaced with your Twilio number that you can get at your Twilio Console
Components of Application
We’ll have following components in our application :
- Entity : TwilioRequest. This will be a POJO that will contain the data in the request made by the client.
- REST Controllers : We’ll have two different Rest controllers. One for sending SMS, another for making a Voice Call.
Sending SMS from Twilio
1. Entity – TwilioRequest
Java
import lombok.AllArgsConstructor;
import lombok.Data;
@Data
public class TwilioRequest {
private final String toPhoneNumber;
private final String fromPhoneNumber;
private final String message;
}
|
This is our Entity – TwilioRequest, It contains – message, the Twilio Number (sender) and the cell phone number (receiver)
2. RestController for Sending SMS
Java
import com.GeeksforGeeks.Twilio.Entity.TwilioRequest;
import com.twilio.rest.api.v2010.account.Message;
import com.twilio.type.PhoneNumber;
import org.springframework.http.ResponseEntity;
import org.springframework.web.bind.annotation.*;
@RestController
@RequestMapping("/sms")
public class SmsController {
@PostMapping("/send")
public ResponseEntity<String> sendMessage(@RequestBody TwilioRequest twilioRequest) {
if (twilioRequest == null || twilioRequest.getFromPhoneNumber() == null
|| twilioRequest.getToPhoneNumber() == null || twilioRequest.getMessage() == null) {
return ResponseEntity.badRequest().body("Invalid request data");
}
String fromNumber = twilioRequest.getFromPhoneNumber();
String toNumber = twilioRequest.getToPhoneNumber();
String msg = twilioRequest.getMessage();
Message.creator(new PhoneNumber(toNumber), new PhoneNumber(fromNumber),
msg).create();
return ResponseEntity.ok("SMS sent Succesfully !");
}
}
|
Explanation of above Program:
- URL endpoint to send SMS: /sms/send. And we’ve used REST – POST Mapping to send SMS.
- Firstly, we check if the data received in Request Body is valid or not. If its not, we won’t proceed further and return error – ‘Bad Request’, Status : 400.
- If the request body is validated, we then extract the data into our entity (TwilioRequest), then create a Message using .creator() method which takes 3 parameters – To_Number(Receiver) , From_Number – Its the twilio number (sender) and the message.
3. RestController for Making Voice Calls
Java
import com.GeeksforGeeks.Twilio.Entity.TwilioRequest;
import com.twilio.rest.api.v2010.account.Call;
import com.twilio.type.PhoneNumber;
import org.springframework.http.ResponseEntity;
import org.springframework.web.bind.annotation.*;
import java.net.URI;
@RestController
@RequestMapping("/call")
public class VoiceCallController {
@PostMapping("/voiceCall")
public ResponseEntity<String> makeVoiceCall(@RequestBody TwilioRequest twilioRequest) throws Exception {
if (twilioRequest == null || twilioRequest.getFromPhoneNumber() == null
|| twilioRequest.getToPhoneNumber() == null) {
return ResponseEntity.badRequest().body("Invalid request data");
}
String fromNumber = twilioRequest.getFromPhoneNumber();
String toNumber = twilioRequest.getToPhoneNumber();
Call.creator(new PhoneNumber(fromNumber), new PhoneNumber(toNumber),
return ResponseEntity.ok("Call made Succesfully !");
}
}
|
Explanation of above Program:
- URL Endpoint exposed to make the call: /call/voiceCall, POST Mapping used.
- Just like the SMSController, we perform validation here. However, in this case we don’t really need a message. As this is going to be a sample voice call. Same validation is going to be checked, if the request body has valid data.
- We call the creator() method of class – Call. And it also takes the parameters as the sender and receiver in which sender is the Twilio Number, & receiver is the cell phone number of a user.
- URI – Uniform Resource Identifier is used to locate and access the resource. We’ve provided the sample voice message URI for testing purpose.
Note: Messages and voice calls can only be made to the number verified with twilio account if you have a trial account.
4. Spring Boot Application
Java
import com.twilio.Twilio;
import org.springframework.boot.SpringApplication;
import org.springframework.boot.autoconfigure.SpringBootApplication;
@SpringBootApplication
public class TwilioApplication{
private final static String ACCOUNT_SID = "<Your_TWILIO_ACCOUNT_SID>";
private final static String AUTH_ID = "<Your_TWILIO_AUTH_ID>";
static {
Twilio.init(ACCOUNT_SID, AUTH_ID);
}
public static void main(String[] args) {SpringApplication.run(TwilioApplication.class, args);}
}
|
Explanation of the above Program:
- This is our Twilio Spring Boot Application code that contains the credentials to associate it with our account and perform all the REST Functionalities.
- Now we can run this application and test our code on POSTMAN.
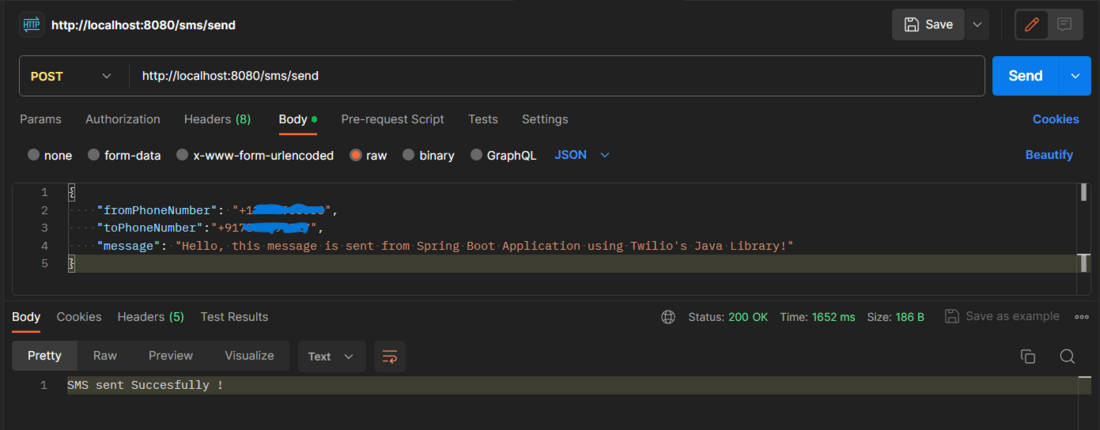
Postman SMS Controller Output:
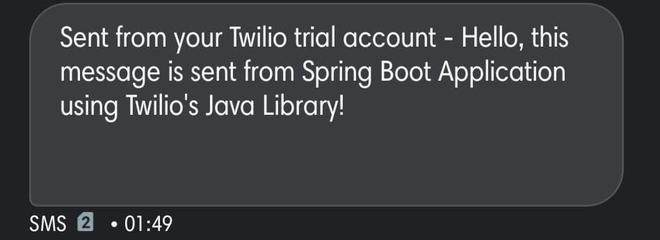
Output Message Received on Cell:
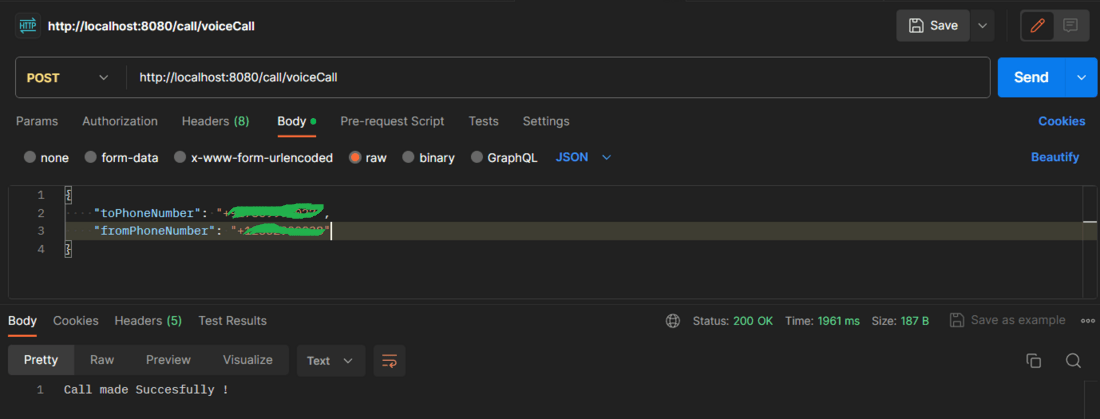
PostMan VoiceController Output:
Once this is executed, you’ll receive a demo call from Twilio.
Share your thoughts in the comments
Please Login to comment...