Smart Parking System Using Arduino
Last Updated :
05 Feb, 2024
Arduino is an open-source electronics platform comprising hardware and software components. It was created to make it easier for non-experts, such as artists, designers, and hobbyists, to work with electronics and create interactive projects. The platform includes an easy-to-use development board, a software development environment, and a community that shares projects, ideas, and resources.
Car Parking System Using Arduino
we will learn how to make a Smart Parking System using Arduino. That will only open its gate for parking when there is an available space. If the parking lot is full, the gate will remain closed, and a message will be displayed on the LCD screen indicating the parking is full. Additionally, each parking slot will have a display indicating whether it is currently occupied or vacant.
Components Required for Car Parking System
- Arduino Uno: Microcontroller Board
- Servo Motor: Used for opening and closing the gate
- 2 Bread Boards: Used for connecting the components
- 5 IR Sensors: They will detect the presence of the car
- 16*2 LCD: Used to display the number of empty slots
- Jumper Wires: For connecting the elements of the circuit
- Potentiometer : Used for the balancing of the lcd display so that it display info in correct intensity
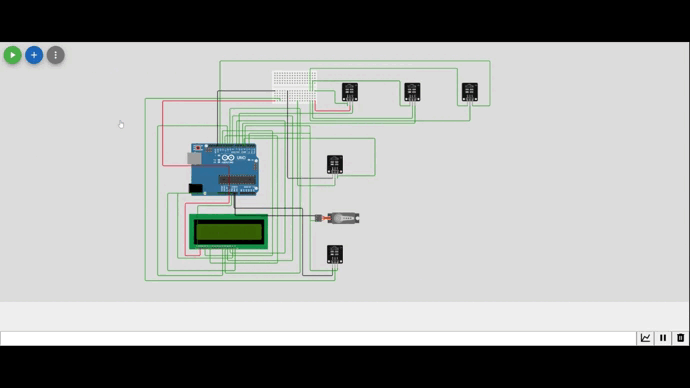
Circuit Diagram of Car Parking System
Let’s discuss the architecture of the project. At the very beginning, a sensor is placed to detect the presence of a car. Depending on the availability of parking slots, the gate (in this case, a servo motor) will open.
.jpg)
Circuit Diagram
Case 1: if the slots are not available (i.e., the parking is full), the LCD display will show that the parking is full, and the gate will remain closed.
Case 2: if the slots are available, the gate will open. When the car passes in front of the second infrared sensor, it will act as an indication that the car is now in a parking lot, and the gate will close.
After that, based on the particular available slot, the car will be parked, and the LCD display will show the corresponding information.
Pins Connection of Car Parking System
1. LCD Pin Connection
- Pin 1 (VDD Pin): Ground
- Pin 2 (VCC Pin): 5V
- Pin 3 (VEE pin): Connected to the middle pin of the potentiometer for contrast adjustment; other two pins of the potentiometer connected to 5V and Ground.
- Pin 4 (Register Pin): Connected to Arduino Pin 12.
- Pin 5 (Read and Write Pin): Connected to Ground.
- Pin 6: Connected to Arduino Pin 11.
- Pin 15 (Positive Pin): Connected to 5V.
- Pin 16 (Negative Pin): Connected to Ground (responsible for LCD backlight)
- Pin 11 (d4): Connected to Arduino Pin 8.
- Pin 12 (d5): Connected to Arduino Pin 7.
- Pin 13 (d6): Connected to Arduino Pin 6.
- Pin 14 (d7): Connected to Arduino Pin 5.
2. Breadboard and Power Connection
Connect power rails of the Breadboard to Arduino Uno’s 5V and Ground pins..
3. IR Sensor and Servo Motor Connections
- First IR Sensor:
- VCC: Connected to 5V
- GND: Connected to Ground
- O/P: Connected to Arduino Pin 2
- Servo Motor:
- VCC: Connected to 5V
- GND: Connected to Ground
- O/P: Connected to Arduino Pin 3
- Second IR Sensor:
- VCC: Connected to 5V
- GND: Connected to Ground
- O/P: Connected to Arduino Pin 4
- Remaining IR Sensors:
- Connect the VCC of each to 5V, GND to Ground, and their O/P pins to Arduino Pins 13, 9, and 10 respectively.
This setup ensures proper connectivity for the LCD, IR sensors, and the servo motor on the breadboard, making it clear and organized for implementation.
Arduino Code of Car Parking System
Now we will do coding for this project setup, where it detects which parking slot is available or unavailable.
// Header Files
#include <LiquidCrystal.h>
#include <Servo.h>

// Declaring constants for the LCD pins
const int rs = 12, en = 11, d4 = 8, d5 = 7, d6 = 6, d7 = 5;
LiquidCrystal lcd(rs, en, d4, d5, d6, d7);
Servo myservo1;

//choose the input pin for entry gate IR sensors
int ir_s1 = 2;
int ir_s2 = 4;

//choose the input pin for parking slot IR sensors
int ir_p_1 = 13;
int ir_p_2 = 9;
int ir_p_3 = 10;

int total = 0;
int slot = 3; // Total capacity of the parking
int flag1 = 0;
int flag2 = 0;

int s1 = 0, s2 = 0, s3 = 0;

void setup()
{
    Serial.begin(9600);  // Initializing the Serial Monitor

    //declare sensor as input
    pinMode(ir_s1, INPUT);
    pinMode(ir_s2, INPUT);
    pinMode(ir_p_1, INPUT);
    pinMode(ir_p_2, INPUT);
    pinMode(ir_p_3, INPUT);

    myservo1.attach(3);   // attaches the servo on pin 3 to the servo object
    myservo1.write(180);

    lcd.begin(16, 2); //Initializing the Lcd display
    lcd.print("Smart Parking"); // Initial message display on the screen
    delay(5000);  //It will provide the delay of 5000 milliseconds
    lcd.clear();  // after delay clearing the lcd display
}

void loop()
{

    read_sensor();

   /* When working with a 16x2 LCD display, it means you can write up to 16 characters horizontally and have 2 rows.
       The indexing for these rows and characters starts from 0.
   */
   lcd.setCursor(0, 0);
    lcd.print("Have Slots:");
    lcd.print(slot);

    lcd.setCursor(0, 1);
    if (s1 == 1) {
        lcd.print("s1:F");
    }
    else {
        lcd.print("s1:E");
    }

    lcd.setCursor(5, 1);
    if (s2 == 1) {
        lcd.print("s2:F");
    }
    else {
        lcd.print("s2:E");
    }

    lcd.setCursor(10, 1);
    if (s3 == 1) {
        lcd.print("s3:F");
    }
    else {
        lcd.print("s3:E");
    }

   // Here the logic begins for opening and closing the gate i.e. servo motor
    if (digitalRead(ir_s1) == 0 && flag1 == 0)
    {

        if (slot > 0)
        {
            flag1 = 1;
            if (flag2 == 0)
             {
                myservo1.write(90);
                slot = slot - 1;
            }
        }
        else
        {
            lcd.clear();
            lcd.setCursor(0, 0);
            lcd.print("Parking ");
            lcd.setCursor(0, 1);
            lcd.print("Full ");
            // delay(5000);
            delay(1500);
        }
   }

    if (digitalRead(ir_s2) == 0 && flag2 == 0)
    {
        flag2 = 1;
        if (flag1 == 0)
        {
            myservo1.write(90);
            slot = slot + 1;
        }
     }
    if (flag1 == 1 && flag2 == 1)
    {
        delay(1000);
        myservo1.write(180);
        flag1 = 0;
        flag2 = 0;
    }
    delay(10);
  }

void read_sensor() //function for keeping track of the parking slots status
{
    s1 = 0, s2 = 0, s3 = 0;
    if (digitalRead(ir_p_1) == 0) {
        s1 = 1;
    }
    if (digitalRead(ir_p_2) == 0) {
        s2 = 1;
    }
    if (digitalRead(ir_p_3) == 0) {
        s3 = 1;
    }
}
Output:
Conclusion
This project demonstrates how Arduino can be used to create a smart parking system. By integrating IR sensors, a servo motor, and an LCD display, we can efficiently manage parking spaces and automate gate control. This system enhances convenience and optimizes parking utilization, showcasing the practical applications of Arduino in real-world scenarios.
Share your thoughts in the comments
Please Login to comment...