Servo motor Interfacing and Control using Arduino
Last Updated :
30 Dec, 2022
In this article, we will learn how to interface and control servo motors using Arduino Uno R3.
Arduino is an open-source electronics platform. It consists ATmega328P 8-bit Microcontroller. It can be able to read inputs from different sensors & we can send instructions to the microcontroller in the Arduino. It provides Arduino IDE to write code & connect the hardware devices like Arduino boards & sensors.
Servo motor:
It is an electric device that is used to control angular rotation. It is a rotary actuator or linear actuator. Servo motors have servomechanism. The servo mechanism helps the servo motor to control and monitor the motion of the motor. The user can control the rotation speed and position (angle) precisely.
Servo motor pins:
A servo motor has 3 pins.
- VCC ( 5 Volts )
- GND
- Signal ( Control input signal )
Components required:
- Servo motor
- Arduino Uno R3
- Jumper wires
Servo motor configuration:
- Connect the Signal pin of the Servo motor to the vacant PWM pin of the Arduino.
- Connect the VCC of the servo motor to the 5V pin.
- Connect the GND of the servo motor to the GND.
- Import the header file to the Arduino code.
- Compile and upload the code to the Arduino Uno R3.
Circuit Diagram:
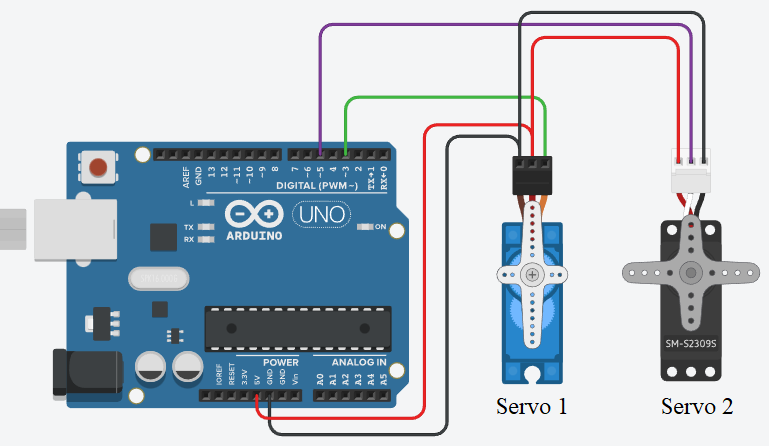
Servo Motor Circuit diagram
Arduino code:
C++
#include <Servo.h>
Servo servo1;
Servo servo2;
int position = 0;
void setup()
{
servo1.attach(3);
servo2.attach(5);
}
void loop()
{
for (position = 0; position <= 180; position++)
{
servo1.write(position);
delay(10);
}
for (position = 180; position >= 0; position--)
{
servo1.write(position);
delay(15);
}
for (position = 0; position <= 180; position++)
{
servo2.write(position);
delay(10);
}
for (position = 180; position >= 0; position--)
{
servo2.write(position);
delay(15);
}
}
|
Note: The direction of rotation may be varied depends on the model of the servo motor.
Output:
Online Simulation: Click here

Servo motor simulation
Applications:
- Robotics arms
- Manufacturing automation
Share your thoughts in the comments
Please Login to comment...