Distance measurement using Ultrasonic sensor and Arduino
Last Updated :
19 Jan, 2023
In This Article, We will learn how to measure the distance using an Ultrasonic sensor & Arduino.
Arduino:
It is an open-source electronics platform. It consists ATmega328 8-bit Microcontroller. It can be able to read inputs from different sensors & we can send instructions to the microcontroller in the Arduino. It provides Arduino IDE to write code & connect the hardware devices like Arduino boards & sensors.
Ultrasonic Sensor:
An ultrasonic Sensor is a device used to measure the distance between the sensor and an object without physical contact. This device works based on time-to-distance conversion.
Working Principle of Ultrasonic Sensor:
Ultrasonic sensors measure distance by sending and receiving the ultrasonic wave. The ultrasonic sensor has a sender to emit the ultrasonic waves and a receiver to receive the ultrasonic waves. The transmitted ultrasonic wave travels through the air and is reflected by hitting the Object. Arduino calculates the time taken by the ultrasonic pulse wave to reach the receiver from the sender.
We know that the speed of sound in air is nearly 344 m/s,
So, the known parameters are time and speed (constant). Using these parameters, we can calculate the distance traveled by the sound wave.
Formula: Distance = Speed * Time
In the code, the “duration” variable stores the time taken by the sound wave traveling from the emitter to the receiver. That is double the time to reach the object, whereas the sensor returns the total time including sender to object and object to receiver. Then, the time taken to reach the object is half of the time taken to reach the receiver.
so we can write the expression as,
Distance = Speed of Sound in Air * (Time Taken / 2)
Note: Speed of sound in air = 344 m/s.
Components Required:
- Arduino Uno R3 board
- Ultrasonic sensor (HC-SR04)
- 16×2 LCD I2C Display
- Jumper Wires
Circuit Diagram:
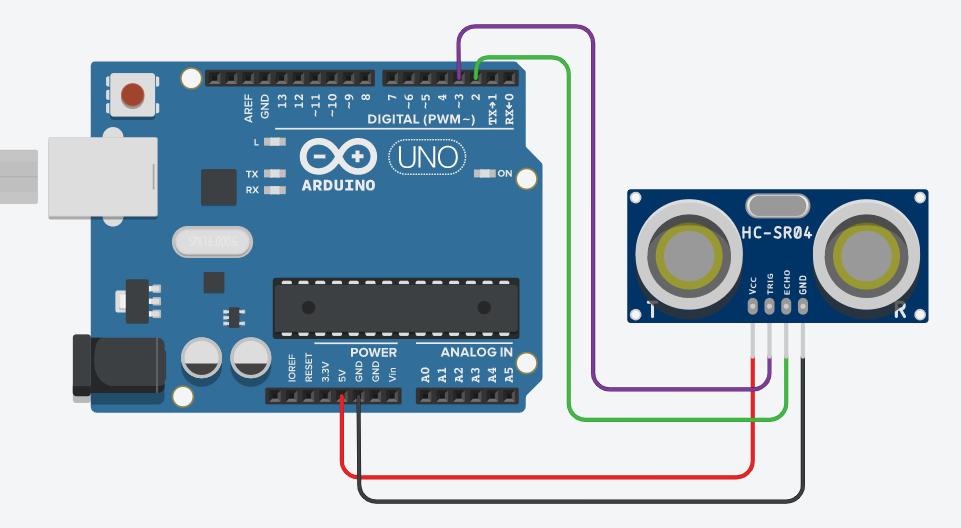
Ultrasonic Distance measurement circuit
Setup:
- Connect the Echo pin of the sensor to the D2 pin of the Arduino.
- Connect the Trig pin of the sensor to the D3 pin of the Arduino.
- Navigate to Tools and select board and port.
- Verify and compile the code, then upload the code to the Arduino Uno R3 board.
- Monitor the output in the Serial monitor (Set the baud rate as 9600). To open Serial monitor Tools>Serial Monitor or (Ctrl+Shift+M).
Arduino Code (Output in Serial monitor):
The following code will show the output on the serial monitor of Arduino software with a baud rate of 9600.
C++
#define echoPin \
2
#define trigPin \
3
long duration;
int distance;
void setup()
{
pinMode(trigPin,
OUTPUT);
pinMode(echoPin, INPUT);
Serial.begin(9600);
Serial.println(
"Distance measurement using Arduino Uno.");
delay(500);
}
void loop()
{
digitalWrite(trigPin, LOW);
delayMicroseconds(2);
digitalWrite(
trigPin,
HIGH);
delayMicroseconds(
10);
digitalWrite(trigPin,
LOW);
duration = pulseIn(echoPin, HIGH);
distance
= duration * 0.0344 / 2;
Serial.print("Distance: ");
Serial.print(
distance);
Serial.println(" cm");
delay(100);
}
|
Output in External Display device (LCD Display):
To monitor the output without a PC, we have to interface display devices to monitor the output. Here, we are using “a 16×2 LCD display with I2C communication.
To interface with the LCD display, we need to install the supporting library to the Arduino IDE.
Steps to Interface LCD display:
1. Install driver library for Liquid Crystal Display.
- Navigate Tools>Library Manager (or) Enter ( Ctrl+Shift+I ) to open library manager.
- Search for “LiquidCrystal I2C” and install the “LiquidCrystal I2C” library.

Library Installation
2. Import the header file “LiquidCrystal_I2C.h” in the code.
3. Connect the SDA pin of an LCD display to the SDA pin of the Arduino Board and the SCL pin of an LCD display to the SCL of the Arduino Board.
4. Connect VCC to 5V pin and GND to GND pin.
5. Include the below code to define the display device.
C++
#include <LiquidCrystal_I2C.h>
LiquidCrystal_I2C
lcd(0x20, 16, 2);
void setup()
{
lcd.init();
lcd.backlight();
}
|
Note: For ADDRESS, Try “0x27” or “0x3F”. If those addresses are not working. Refer manufacturer page.
Or
To find the address, Run the following code to find the address.
Arduino code for I2C device Address Finding:
C++
#include <Wire.h>
void setup()
{
Wire.begin();
Serial.begin(9600);
Serial.println("I2C Scanner");
}
void loop()
{
byte error, address;
int nDevices;
Serial.println("Scanning...");
nDevices = 0;
for (address = 1; address < 127; address++) {
Wire.beginTransmission(address);
error = Wire.endTransmission();
if (error == 0) {
Serial.print("I2C device found at address 0x");
if (address < 16)
Serial.print("0");
Serial.print(address, HEX);
Serial.println(" !");
nDevices++;
}
else if (error == 4) {
Serial.print("Unknown error at address 0x");
if (address < 16)
Serial.print("0");
Serial.println(address, HEX);
}
}
if (nDevices == 0)
Serial.println("No I2C devices found");
else
Serial.println("done");
delay(5000);
}
|
Serial monitor Output:
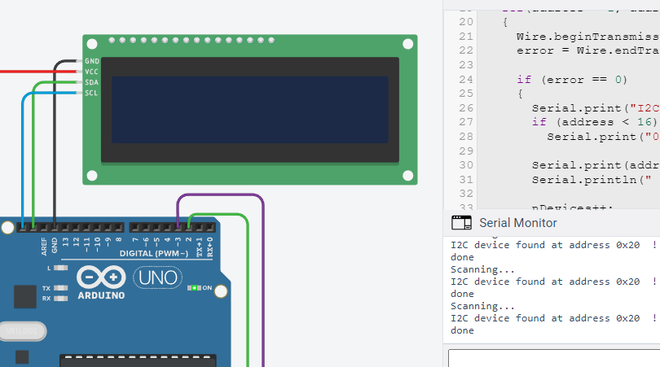
LCD Address Finding
Here I2C Address is “0x20”, So replace the address with “0x20” in the code.
(Ensure that you have connected the LCD display device as per the instruction while running this program in the Arduino).
Circuit Diagram with LCD display:
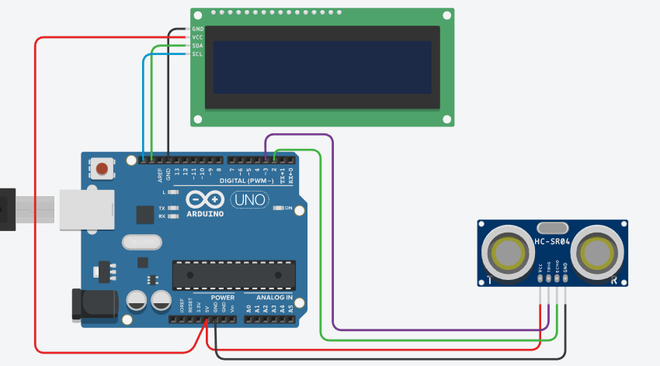
Ultrasonic Distance Measurement Output in LCD Display
Arduino code (Output in Serial Monitor + LCD display):
C++
#include <LiquidCrystal_I2C.h>
LiquidCrystal_I2C lcd(0x20, 16, 2);
#define echoPin 2 // attach pin D2 Arduino to Echo pin of Sensor module
#define trigPin 3 // attach pin D3 Arduino to Trig pin of Sensor module
long duration;
int distance;
void setup()
{
lcd.init();
lcd.backlight();
pinMode(trigPin,OUTPUT);
pinMode(echoPin, INPUT);
Serial.begin(9600);
Serial.println("Distance measurement using Arduino Uno");
delay(500);
}
void loop()
{
digitalWrite(trigPin, LOW);
delayMicroseconds(2);
digitalWrite(trigPin, HIGH);
delayMicroseconds(10);
digitalWrite(trigPin, LOW);
duration = pulseIn(echoPin, HIGH);
distance = duration * 0.0344 / 2;
Serial.print("Distance: ");
Serial.print(distance);
Serial.println(" cm");
lcd.clear();
lcd.setCursor(0, 0);
lcd.print("Distance:");
lcd.setCursor(0,1);
lcd.print(distance);
lcd.setCursor(4, 1);
lcd.print("cm");
delay(100);
}
|
Output:
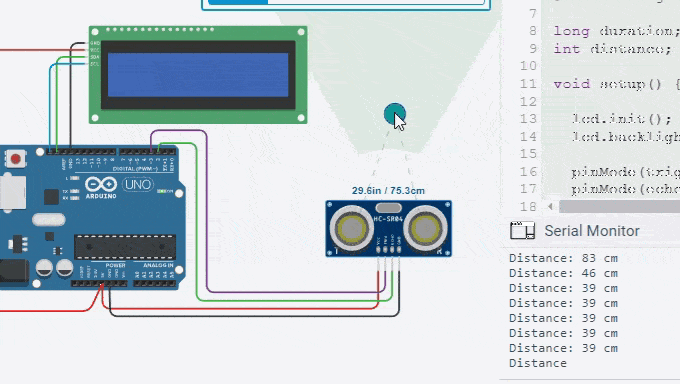
Ultrasonic Distance Measurement Simulation Output
Applications of Ultrasonic Distance Measurement:
- Used in RADAR system.
- To measure distance without physical contact with measuring instruments.
- Used in object detection for security purposes.
Like Article
Suggest improvement
Share your thoughts in the comments
Please Login to comment...