Python MySQL Connector is a Python driver that helps to integrate Python and MySQL. This Python MySQL library allows the conversion between Python and MySQL data types. MySQL Connector API is implemented using pure Python and does not require any third-party library.

This Python MySQL tutorial will help to learn how to use MySQL with Python from basics to advance, including all necessary functions and queries explained in detail with the help of good Python MySQL examples. So, let’s get started.
Installation
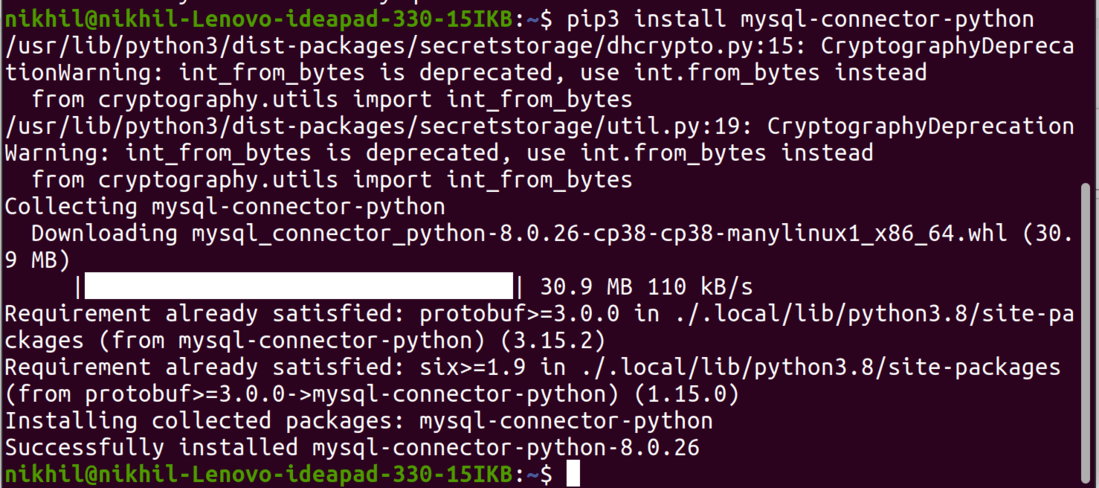
To install the Python-mysql-connector module, one must have Python and PIP, preinstalled on their system. If Python and pip are already installed type the below command in the terminal.
pip3 install mysql-connector-python
Note: If Python is not present, go through How to install Python on Windows and Linux? and follow the instructions provided.
Connecting to MySQL Server
We can connect to the MySQL server using the connect() method.
Python3
import mysql.connector
dataBase = mysql.connector.connect(
host ="localhost",
user ="user",
passwd ="password"
)
print(dataBase)
dataBase.close()
|
Output:
<mysql.connector.connection_cext.CMySQLConnection object at 0x7f73f0191d00>
Note: For more information, refer to Connect MySQL database using MySQL-Connector Python.
Creating Database
After connecting to the MySQL server let’s see how to create a MySQL database using Python. For this, we will first create a cursor() object and will then pass the SQL command as a string to the execute() method. The SQL command to create a database is –
CREATE DATABASE DATABASE_NAME
Example: Creating MySQL database with Python
Python3
import mysql.connector
dataBase = mysql.connector.connect(
host ="localhost",
user ="user",
passwd ="password"
)
cursorObject = dataBase.cursor()
cursorObject.execute("CREATE DATABASE gfg")
|
Output:

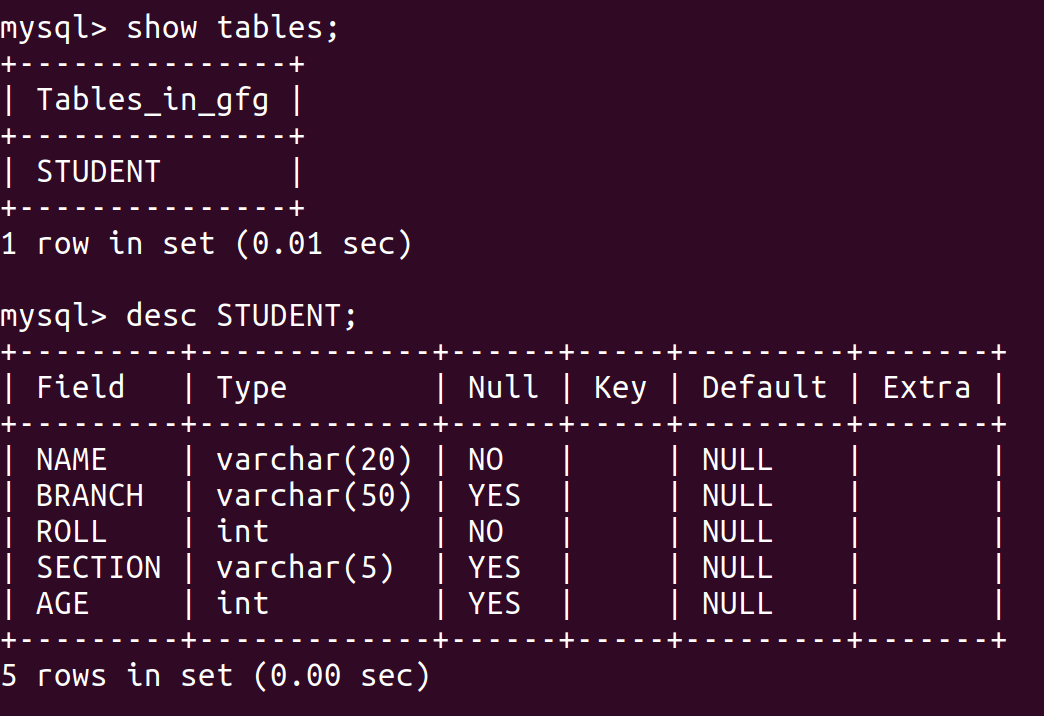
Creating Tables
For creating tables we will follow the similar approach of writing the SQL commands as strings and then passing it to the execute() method of the cursor object. SQL command for creating a table is –
CREATE TABLE
(
    column_name_1 column_Data_type,
    column_name_2 column_Data_type,
    :
    :
    column_name_n column_Data_type
);
Example: Creating MySQL table using Python
Python3
import mysql.connector
dataBase = mysql.connector.connect(
host ="localhost",
user ="user",
passwd ="password",
database = "gfg"
)
cursorObject = dataBase.cursor()
studentRecord =
cursorObject.execute(studentRecord)
dataBase.close()
|
Output:
Insert Data into Tables
To insert data into the MySQL table Insert into query is used.
Syntax:
INSERT INTO table_name (column_names) VALUES (data)
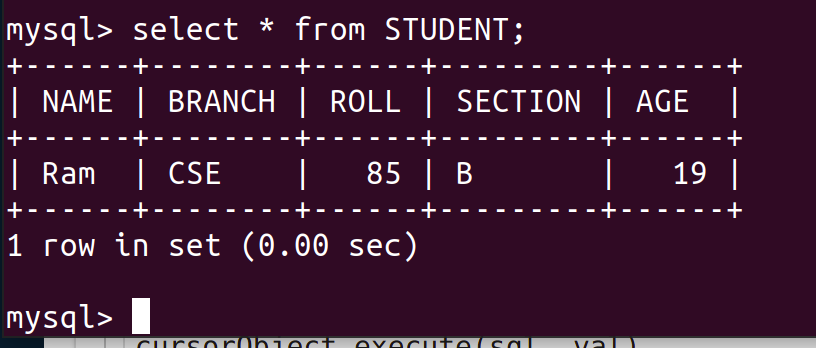
Example 1: Inserting Single Row
Python3
import mysql.connector
dataBase = mysql.connector.connect(
host ="localhost",
user ="user",
passwd ="password",
database = "gfg"
)
cursorObject = dataBase.cursor()
sql = "INSERT INTO STUDENT (NAME, BRANCH, ROLL, SECTION, AGE)\
VALUES (%s, %s, %s, %s, %s)"
val = ("Ram", "CSE", "85", "B", "19")
cursorObject.execute(sql, val)
dataBase.commit()
dataBase.close()
|
Output:
Example 2: Inserting Multiple Rows
To insert multiple values at once, executemany() method is used. This method iterates through the sequence of parameters, passing the current parameter to the execute method.
Python3
import mysql.connector
dataBase = mysql.connector.connect(
host ="localhost",
user ="user",
passwd ="password",
database = "gfg"
)
cursorObject = dataBase.cursor()
sql = "INSERT INTO STUDENT (NAME, BRANCH, ROLL, SECTION, AGE)\
VALUES (%s, %s, %s, %s, %s)"
val = [("Nikhil", "CSE", "98", "A", "18"),
("Nisha", "CSE", "99", "A", "18"),
("Rohan", "MAE", "43", "B", "20"),
("Amit", "ECE", "24", "A", "21"),
("Anil", "MAE", "45", "B", "20"),
("Megha", "ECE", "55", "A", "22"),
("Sita", "CSE", "95", "A", "19")]
cursorObject.executemany(sql, val)
dataBase.commit()
dataBase.close()
|
Output:

Fetching Data
We can use the select query on the MySQL tables in the following ways –
- In order to select particular attribute columns from a table, we write the attribute names.
SELECT attr1, attr2 FROM table_name
- In order to select all the attribute columns from a table, we use the asterisk ‘*’ symbol.
SELECT * FROM table_name
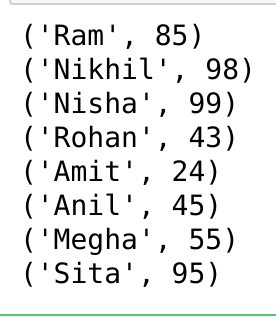
Example: Select data from MySQL table using Python
Python3
import mysql.connector
dataBase = mysql.connector.connect(
host ="localhost",
user ="user",
passwd ="password",
database = "gfg"
)
cursorObject = dataBase.cursor()
query = "SELECT NAME, ROLL FROM STUDENT"
cursorObject.execute(query)
myresult = cursorObject.fetchall()
for x in myresult:
print(x)
dataBase.close()
|
Output:
Where Clause
Where clause is used in MySQL database to filter the data as per the condition required. You can fetch, delete or update a particular set of data in MySQL database by using where clause.
Syntax:
SELECT column1, column2, …. columnN FROM [TABLE NAME] WHERE [CONDITION];
Example: Where clause in MySQL using Python
Python3
import mysql.connector
dataBase = mysql.connector.connect(
host ="localhost",
user ="user",
passwd ="password",
database = "gfg"
)
cursorObject = dataBase.cursor()
query = "SELECT * FROM STUDENT where AGE >=20"
cursorObject.execute(query)
myresult = cursorObject.fetchall()
for x in myresult:
print(x)
dataBase.close()
|
Output:
('Rohan', 'MAE', 43, 'B', 20)
('Amit', 'ECE', 24, 'A', 21)
('Anil', 'MAE', 45, 'B', 20)
('Megha', 'ECE', 55, 'A', 22)
Order By Clause
OrderBy is used to arrange the result set in either ascending or descending order. By default, it is always in ascending order unless “DESC” is mentioned, which arranges it in descending order. “ASC” can also be used to explicitly arrange it in ascending order. But, it is generally not done this way since default already does that.
Syntax:
SELECT column1, column2
FROM table_name
ORDER BY column_name ASC|DESC;
Example: Order By clause in MySQL using Python
Python3
import mysql.connector
dataBase = mysql.connector.connect(
host ="localhost",
user ="user",
passwd ="password",
database = "gfg"
)
cursorObject = dataBase.cursor()
query = "SELECT * FROM STUDENT ORDER BY NAME DESC"
cursorObject.execute(query)
myresult = cursorObject.fetchall()
for x in myresult:
print(x)
dataBase.close()
|
Output:
Limit Clause
The Limit clause is used in SQL to control or limit the number of records in the result set returned from the query generated. By default, SQL gives out the required number of records starting from the top but it allows the use of OFFSET keyword. OFFSET allows you to start from a custom row and get the required number of result rows.
Syntax:
SELECT * FROM tablename LIMIT limit;
SELECT * FROM tablename LIMIT limit OFFSET offset;
Example: Limit Clause in MySQL using Python
Python3
import mysql.connector
dataBase = mysql.connector.connect(
host ="localhost",
user ="user",
passwd ="password",
database = "gfg"
)
cursorObject = dataBase.cursor()
query = "SELECT * FROM STUDENT LIMIT 2 OFFSET 1"
cursorObject.execute(query)
myresult = cursorObject.fetchall()
for x in myresult:
print(x)
dataBase.close()
|
Output:
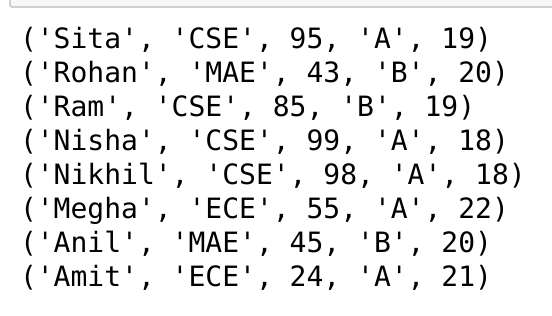
('Nikhil', 'CSE', 98, 'A', 18)
('Nisha', 'CSE', 99, 'A', 18)
Update Data
The update query is used to change the existing values in a database. By using update a specific value can be corrected or updated. It only affects the data and not the structure of the table. The basic advantage provided by this command is that it keeps the table accurate.
Syntax:
UPDATE tablename
SET ="new value"
WHERE ="old value";
Example: Update MySQL table using Python
Python3
import mysql.connector
dataBase = mysql.connector.connect(
host ="localhost",
user ="user",
passwd ="password",
database = "gfg"
)
cursorObject = dataBase.cursor()
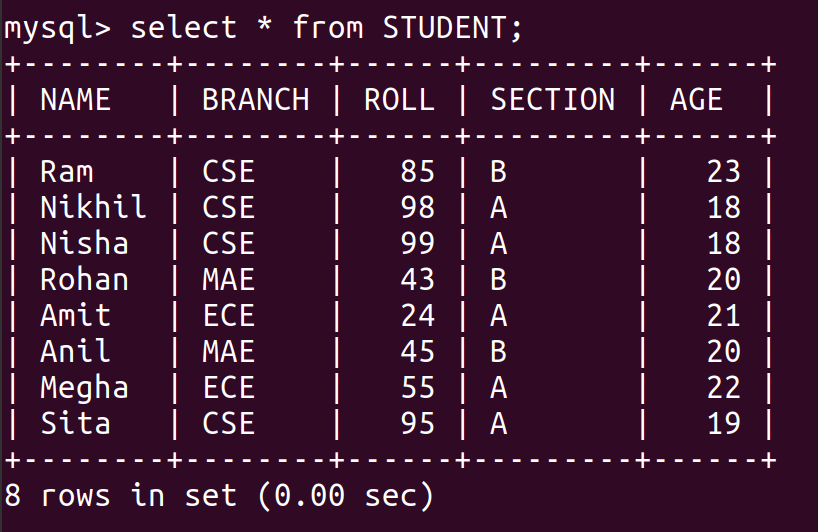
query = "UPDATE STUDENT SET AGE = 23 WHERE Name ='Ram'"
cursorObject.execute(query)
dataBase.commit()
dataBase.close()
|
Output:
Delete Data from Table
We can use the Delete query to delete data from the table in MySQL.
Syntax:
DELETE FROM TABLE_NAME WHERE ATTRIBUTE_NAME = ATTRIBUTE_VALUE
Example: Delete Data from MySQL table using Python
Python3
import mysql.connector
dataBase = mysql.connector.connect(
host ="localhost",
user ="user",
passwd ="password",
database = "gfg"
)
cursorObject = dataBase.cursor()
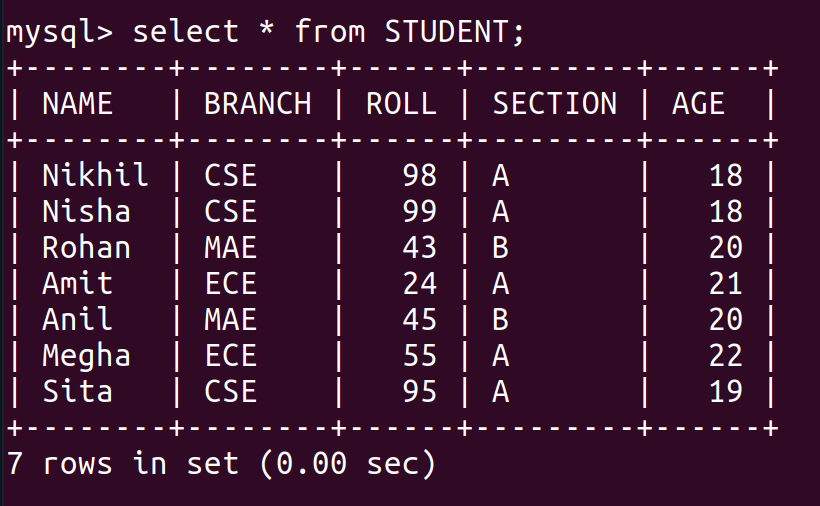
query = "DELETE FROM STUDENT WHERE NAME = 'Ram'"
cursorObject.execute(query)
dataBase.commit()
dataBase.close()
|
Output:
Drop Tables
Drop command affects the structure of the table and not data. It is used to delete an already existing table. For cases where you are not sure if the table to be dropped exists or not DROP TABLE IF EXISTS command is used. Both cases will be dealt with in the following examples.
Syntax:
DROP TABLE tablename;
DROP TABLE IF EXISTS tablename;
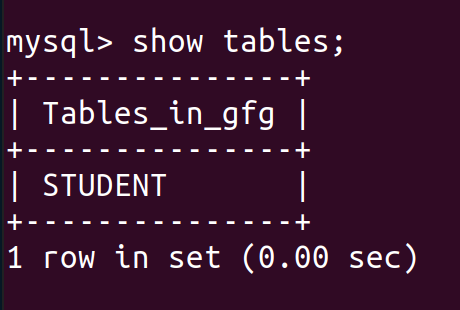
At first, let’s see the list of tables in our database.
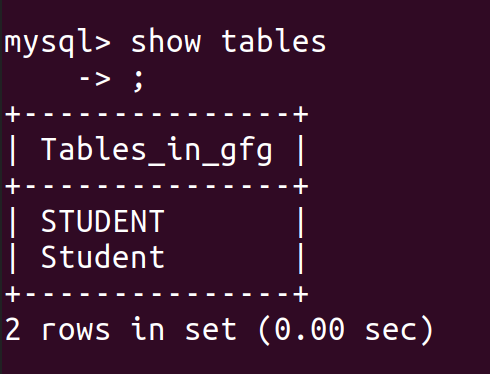
We can see that there are two tables for students, so let’s drop the second table.
Example 1: Drop Table in MySQL using Python
Python3
import mysql.connector
dataBase = mysql.connector.connect(
host ="localhost",
user ="user",
passwd ="password",
database = "gfg"
)
cursorObject = dataBase.cursor()
query ="DROP TABLE Student;"
cursorObject.execute(query)
dataBase.commit()
dataBase.close()
|
Output:
Example 2: Drop Table if exists
Python3
import mysql.connector
dataBase = mysql.connector.connect(
host ="localhost",
user ="user",
passwd ="password",
database = "gfg"
)
cursorObject = dataBase.cursor()
query ="Drop Table if exists Employee;"
cursorObject.execute(query)
dataBase.commit()
dataBase.close()
|
The above example, will not create any error and output because we have used the Drop Table is exists query. If we will simply use the Drop table Employee then ProgrammingError: 1051 (42S02): Unknown table ‘gfg.Employee’ is raised.
Python MySQL Exercises
Working With Tables
Working on Columns
Python MySQL Applications and Projects
Share your thoughts in the comments
Please Login to comment...