MySQL is an open-source RDBMS, i.e. Relational Database Management System which is maintained by Oracle. MySQL has support for major operating systems like Windows, MacOS, Linux, etc. MySQL makes it easy for users to interact with your relational databases, which store data in the form of tables. You can write SQL queries to get the required data from the databases using MySQL.
In this article, we will look at “Views in MySQL”, which act as virtual tables, and understand its advantages, as well as the syntax of Views for creation, updation, and deletion, with the help of awesome examples.
What are Views in MySQL?
Views in MySQL are indeed “virtual tables” that are used to view data from one or more tables. Views do not have their data but rather store data virtually, consisting of rows and columns. Views are very helpful in restricting access to your application’s critical data to third-party users. Views in MySQL can be created by selecting some/all columns and some/all rows of a table by filtering out the rows based on some condition(s).
What is the Benefit of Using Views in MySQL?
Views help particularly in the following ways:
- Simplicity: Instead of writing complex joins & queries, views provide a way of writing simple SELECT statements.
- Enhanced Security: Views expose only the data to the third-party apps and hide the internal details like table structure, attributes, etc, thus adding extra security.
- Consistency: By writing views instead of common queries, we can write a view that avoids multiple declarations & definitions of the same queries and eventually provides a centralized way.
Just like the normal tables, you can perform operations like create, update, drop, etc., on the views. We will look at their syntax along with examples now.
What is MySQL Command Line Client?
MySQL Command Line Client is a simple and elegant SQL shell with inline editing ability. It is basically a Non-GUI based approach to query and interact with our MySQL database. So in simpler terms, it is a tool that permits sending MySQL queries to MySQL database from the command line i.e. shell. This is typically useful when we cannot install GUI-based tools like MySQL Workbench for interaction with MySQL database like when we are having MySQL database on a remote server.
To connect to the local MySQL database using the command line, follow the below steps:
- Open the command prompt/shell.
- Run the command mysql -u root -p
- Enter the password, then you will be connected to your MySQL database.

MySQL Command Line Client connection
Let us consider the following schemas for the examples in the following article.
StudentDetails Table:
|
1
|
Girish
|
24
|
IIT Hyderabad
|
|
2
|
Aaditya
|
24
|
SRM University
|
|
3
|
Aashish
|
23
|
IIT Hyderabad
|
|
4
|
John
|
25
|
Mumbai University
|
|
5
|
Shruti
|
24
|
IIT Hyderabad
|
|
6
|
Leena
|
25
|
Mumbai University
|
CourseDetails Table:
|
1
|
Python Fundamentals
|
4.6
|
2999
|
|
2
|
Machine Learning
|
4.3
|
1999
|
|
3
|
DSA A-Z
|
4.9
|
5999
|
|
4
|
Competitive Programming
|
4.7
|
4999
|
EnrolledIn Table:
Create View in MySQL
A view in MySQL can be created based on a single table or multiple tables. The CREATE VIEW statement is used to create a view in MYSQL.
1. Create a View Based On Single Table
Syntax:
CREATE VIEW <view_name> AS
SELECT <column1>, <column2>……., <columnN>
FROM <table-name>
WHERE [conditions];
Example:
Let’s us create a view named “IITHyderabadStudentsView” from the StudentDetails table. This view selects the students from the StudentDetails table who study in “IIT Hyderabad” university and outputs their details like student id, name, and age.
CREATE VIEW IITHyderabadStudentsView AS
SELECT sid, sname, age
FROM StudentDetails
WHERE university = "IIT Hyderabad";
Output:
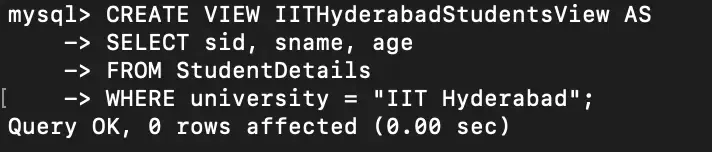
Create VIEW – Single table
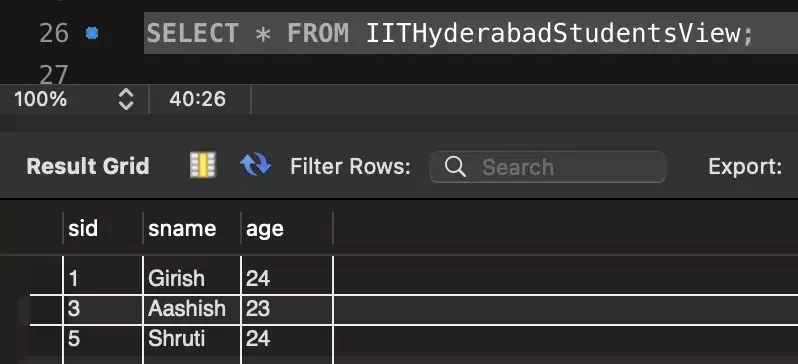
Now to view the tuples in the IITHyderabadStudentsView, we will query the view the just like how we query a normal table.
SELECT * FROM IITHyderabadStudentsView;
Output:

Query Output – Create VIEW – Single table
2. Create a View Based On Multiple Tables With JOIN Clause
We can create a view by joining multiple tables using the JOIN clause and additionally using WHERE keyword or GROUP BY, HAVING clauses.
Syntax:
CREATE VIEW <view_name> AS
SELECT <column1>, <column2>……., <columnN>
FROM <table1>
[ INNER | LEFT | RIGHT | FULL ] JOIN <table2> ON <joining-column>
WHERE [condition1 | condition2 | ……];
Example:
Let’s us create a view named “PythonEnrolledView” using the StudentDetails, CourseDetails, and EnrolledIn table. This view outputs the students who are enrolled in “Python Fundamentals” course the details as student id, name, and age.
CREATE VIEW PythonEnrolledView AS
SELECT S.sid, S.sname, S.age
FROM StudentDetails S JOIN EnrolledIn E ON S.sid = E.sid
JOIN CourseDetails C ON C.cid = E.cid
WHERE C.cname = "Python Fundamentals";
Output:

Create VIEW – Multiple table using JOIN
Now to view the tuples in the PythonEnrolledView, we will again query the view the just like how we query a normal table.
SELECT * FROM PythonEnrolledView;
Output:
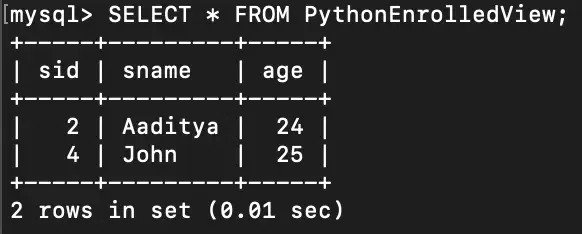
Query Output – Create VIEW – Multiple tables (JOIN)
Update View in MySQL
There are certain conditions that need to be satisfied to update a view. If any one of these conditions is not met, then we are not allowed to update the view.
- The View should be created from a single table. If the view is created using multiple tables then we will not be allowed to update the view.
- The View should not be created using nested queries or complex queries.
- The View should have all NOT NULL values.
- The SELECT statement should not have the DISTINCT keyword.
- The SELECT statement which is used to create the view should not include GROUP BY clause or ORDER BY clause.
1. Update View Definition/Structure
To update the view for adding or remove columns and rows by changing WHERE clause condition, we can use CREATE OR REPLACE VIEW statement.
Syntax:
CREATE OR REPLACE VIEW <view_name> AS
SELECT <column1>, <column2>, ………, <columnN>
FROM <table_name>
WHERE [condition];
Example:
Suppose we want to update the view IITHyderabadStudentsView we created above and delete the column sid from this view from StudentDetails table, we can do this as follows:
CREATE OR REPLACE VIEW IITHyderabadStudentsView AS
SELECT sname, age
FROM StudentDetails
WHERE university = "IIT Hyderabad";
Output:

UPDATE VIEW Definition
2. Insert Into View
To insert the new row into the view, we can do it in a similar way just like how we do it for normal tables.
Syntax:
INSERT INTO <view_name>(<column1>, <column2>, <column3>,.........)
VALUES(<value1>, <value2>, <value3>,...........);
Example:
Let us insert a new row in the view IITHyderabadStudentsView which we have created above in the example of “Create View-based On Single Table”.
INSERT INTO IITHyderabadStudentsView(sid, sname, age)
VALUES(7, "Tenali Rama", 26);

SELECT * FROM IITHyderabadStudentsView;
SELECT * FROM StudentDetails;
Output:
You can see from the image below that inserting a row into view inserted the row into our original table as well. To see the changes, you can query the data from original table before and after insertion into the view.

Insert Into View
Output:
.webp)
SELECT * FROM View
3. Delete From View
To insert the new row into the view, we can do it in a similar way just like how we do it for normal tables. The syntax is:
DELETE FROM <view_name> WHERE [condition];
Example:
Let us delete a row in the view IITHyderabadStudentsView which we have created above in the example of “Create View-based On Single Table”. Let us delete the details of student whose name is “Tenali Rama”.
DELETE FROM IITHyderabadStudentsView WHERE sname = "Tenali Rama";
Output:
The data in the view before deletion is performed.
SELECT * FROM View
The data in the view after deletion is performed.
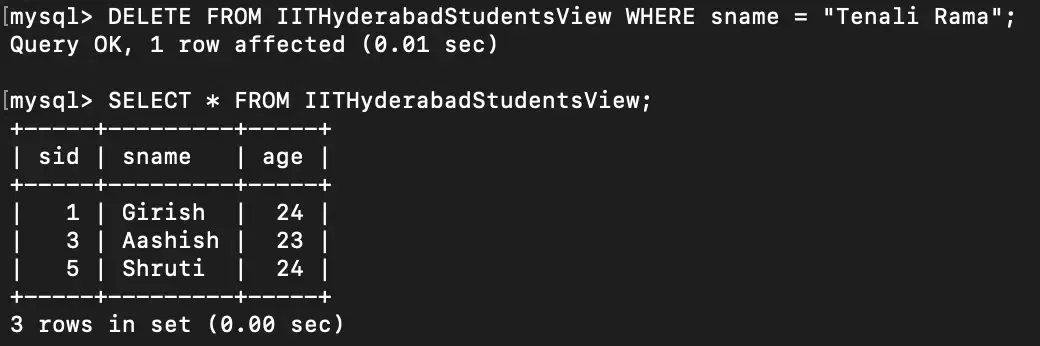
DELETE FROM VIEW
Drop View in MySQL
Suppose now there is no need of the created view anymore? So, we want to delete it now. MySQL allows to deletion an already existing view. We can drop a view using the DROP statement.
Syntax:
DROP VIEW <view_name>;
Example:
Let’s suppose we want to delete the view named “PythonEnrolledView” that we created above, which can be done as follows:
DROP VIEW PythonEnrolledView;
Output:

DROP View
CREATE VIEW using MySQL Workbench
Step 1: Open the MySQL Workbench
Open the MySQL workbench which you would have installed on your system.
Open MySQL Workbench
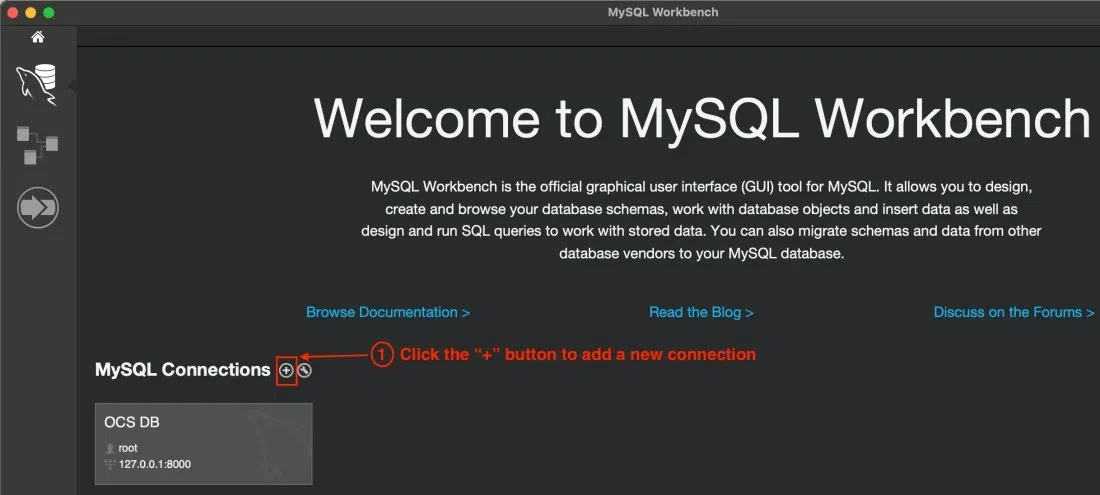
Step 2: Connect to Local Database
Add a new connection to connect to local db on your system. Click the “+” icon to create new connection. Then give the connection a name, here we gave it as “Local DB”, then enter your MySQL password by clicking “Store in Keychain”, then click “OK” to save and close the dialog boxes.
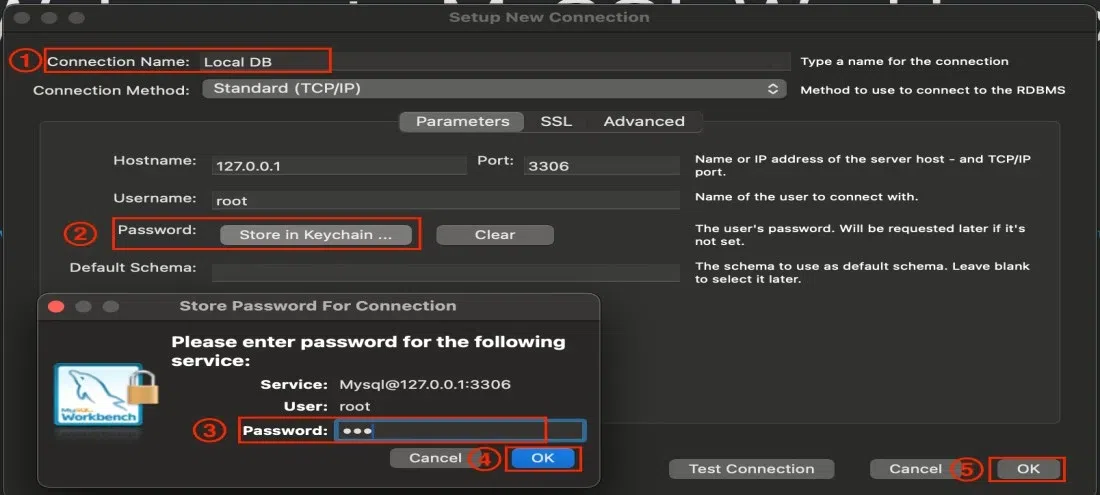
Add New DB Connection
Now, by following above steps, you will get connected to Local DB and then you will see a GUI-based MySQL editor.

Opened Local DB using MySQL workbench
Step 3: Create Database and Table
Create a database named “ViewsInMySQL”, then create table “StudentDetails” inside this database. Insert some rows in this StudentDetails table.
CREATE DATABASE ViewsInMySQL;

USE ViewsInMySQL;

CREATE TABLE StudentDetails(
    sid int not null,
    sname varchar(255) not null,
    age int not null,
    university varchar(255) not null
);
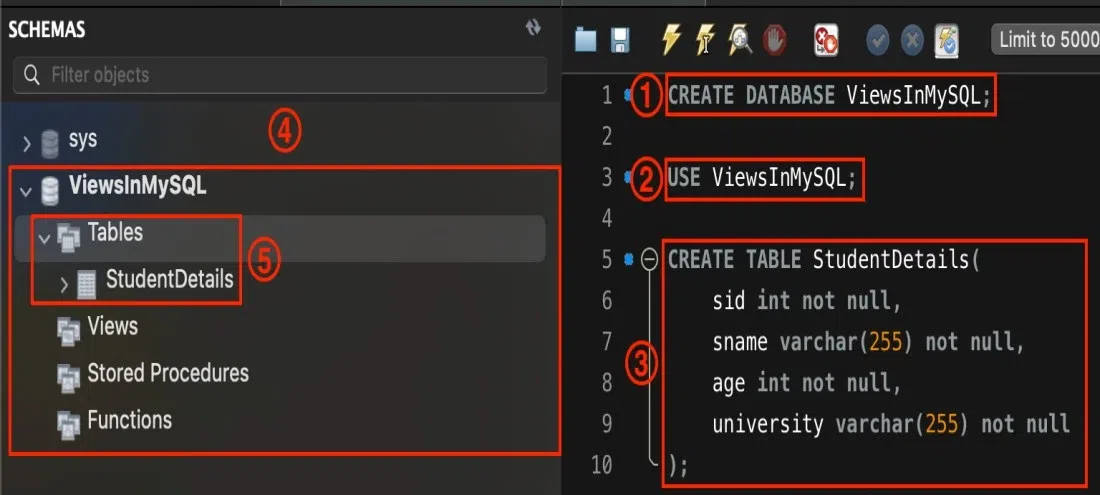
Create Schema & Tables in Workbench
INSERT INTO StudentDetails VALUES(1, "Girish", 24, "IIT Hyderabad");
INSERT INTO StudentDetails VALUES(2, "Aaditya", 24, "SRM University");
INSERT INTO StudentDetails VALUES(3, "Aashish", 23, "IIT Hyderabad");
INSERT INTO StudentDetails VALUES(4, "John", 25, "Mumbai University");
INSERT INTO StudentDetails VALUES(5, "Shruti", 24, "IIT Hyderabad");
INSERT INTO StudentDetails VALUES(6, "Leena", 25, "Mumbai University");

SELECT * FROM StudentDetails;
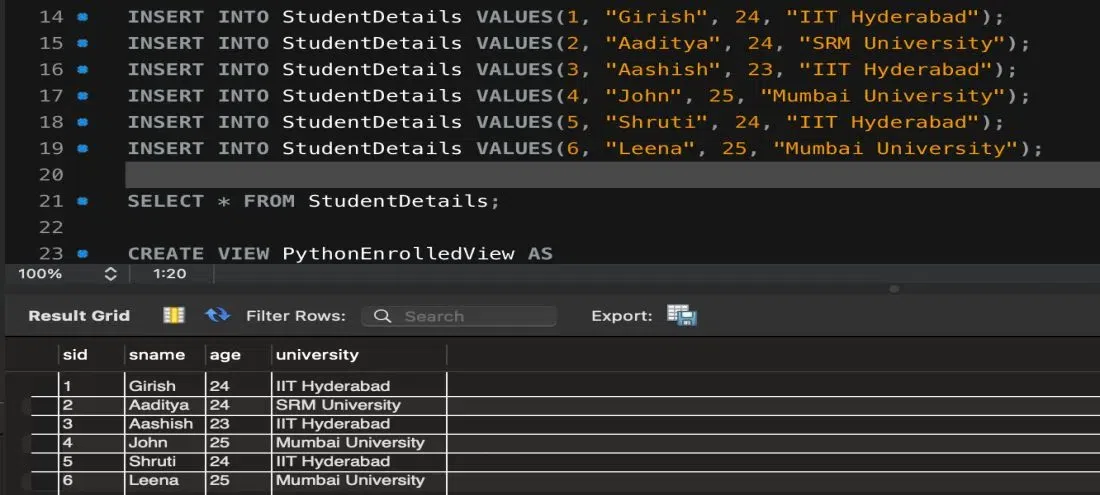
Data from StudentDetails Table
Step 4: Create the View
Create a view that selects the students from StudentDetails table which are from “IIT Hyderabad” university.
CREATE VIEW IITHyderabadStudentsView AS
SELECT sid, sname, age
FROM StudentDetails
WHERE university = "IIT Hyderabad";
Output: Once you created the view, you can see the view in the left panel. See the (2) in the image below.
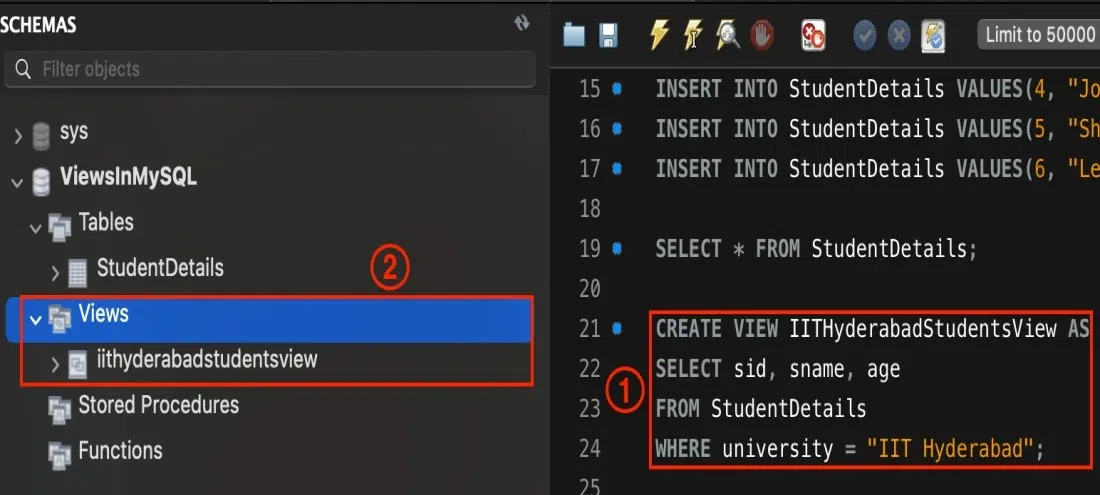
CREATE VIEW using MySQL Workbench
Step 5: Query the View using SELECT Statement
Now you can query the data from the newly created view using SELECT statement.
SELECT * FROM IITHyderabadStudentsView;
SELECT * from View
Temporary Table in MySQL
A temporary table in MySQL is a table that allows one to store temporary result set of a query, and which one can reuse multiple times during one session. A temporary table is useful in cases where a SELECT statement is expensive to query the data as it may involve complex and multiple joins on tables such that every table contain huge amount of data. So, one can use the temporary table to store the result and then use another query to process this data.
How is Temporary Table Different from MySQL View?
Once you create a temporary table, it will exist in the database until the current session is not terminated. So, when you close/terminate your session, it is automatically dropped. Now if you start another session you will not see the temporary table of your previous session. This means, two separate sessions can have temporary tables with same name without having any name conflict. A view once created is persistent across multiple sessions and the data in the view is maintained even if your current session is terminated.
1. How to Create Temporary Table?
The syntax to create a temporary table is as very similar to syntax for creating any normal table. Instead of CREATE TABLE which creates a normal table, we add TEMPORARY keyword so, eventually we use CREATE TEMPORARY TABLE clause to create a temporary table.
Syntax:
CREATE TEMPORARY TABLE <table_name>(
<column1> <datatype>,
<column2> <datatype>,
<column3> <datatype>,
………………..,
<columnN> <datatype>
table_constraints like PRIMARY KEY, FOREIGN KEY
);
Example:
CREATE TEMPORARY TABLE StudentDetailsTemp(
  sid int PRIMARY KEY,
  sname varchar(255),
  age int
);
Output:
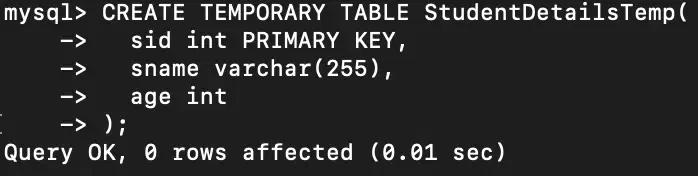
CREATE TEMPORARY TABLE
2. How to Insert into Temporary Table?
The syntax to insert into temporary table is exactly same as any normal table.
Syntax:
INSERT INTO table_name(<column1>,<column2>,………..)
VALUES(<value1>,<value2>,……….);
OR
INSERT INTO table_name(<column1>,<column2>,………..)
SELECT <column1>,<column2>,……
FROM <table_name>;
Example:
Insert students’ details who are from “IIT Hyderabad” University from the StudentDetails table created above the into a temporary table named StudentDetailsTemp.
INSERT INTO StudentDetailsTemp(sid, sname, age)
SELECT sid, sname, age
FROM StudentDetails
WHERE university = "IIT Hyderabad";
Output:

INSERT into TEMPORARY TABLE
3. How to DROP Temporary Table?
You can drop the temporary table just like how we drop normal table using DROP TABLE <table_name> statement. But, this way there is a risk of drop the normal table instead of temporary table which has same name as normal table.
To drop the temporary table, you can use the DROP TEMPORARY TABLE <table_name> statement which removes temporary table named <table_name> only, but not a regular table.
Moreover, even if you do not drop the temporary table manually by running the query, it is dropped automatically once your current session is closed.
Syntax:
DROP TEMPORARY TABLE <table_name>;
Example:
Let us drop the above-created temporary table named “StudentDetailsTemp”.
DROP TEMPORARY TABLE StudentDetailsTemp;
Output:

DROP Temporary Table
Conclusion
Views in MySQL provide a way to avoid writing lengthy SELECT complex joins and queries again and again. It also helps in limiting the access of table attributes from the end users. In this article, we looked at how to create, delete, and update views in MySQL using MySQL command line client and also using workbench and how it benefits in general, their syntax of views for creation, updation, and deletion, with the help of awesome examples.
Share your thoughts in the comments
Please Login to comment...