Middleware is a series of processing layers present between the web server and the view (controller in some frameworks), allowing the user to intercept, modify, and add behavior to these requests and responses.
What is Middleware in Django?
In Python Django, middleware is a framework that provides a method to process requests and responses globally before they are processed by the view or after they leave the view. Middleware components are designed so that they remain between the web server and the view, allowing us to perform various operations on requests and responses as they pass through the Django application and web browser.
Working of Middleware
The working of middleware in Django involves a series of steps that are followed when requests pass through the middleware components in the application. Middleware is present between the web server and the view and hooks for pre-processing and post-processing of requests and responses.
In summary, the middleware process in Django involves a series of processing steps applied to requests and responses:
- Request Phase: The request is received by the server and then it passes through each middleware component. If a response is returned from a middleware
process_request, further processing is stopped.
- View Processing: When a request reaches the view, it processes it and generates a response according to the code written inside the view function.
- Response Phase: WhenResponse passes through each middleware component in reverse order. Modified response from each middleware is passed to the next one. A modified response is sent back to the web server and then to the user.
This flow allows us to insert custom logic, security measures, session handling, and other behaviors at various points of the request-response cycle in a modular and reusable manner.
Types of Middleware in Django
Django’s middleware can be divided into 2 types: built-in and custom.
Built-in Django Middleware: Django comes with a set of built-in middleware classes. These are some of the most commonly used default middleware classes in Django:
- SecurityMiddleware: It provides several security-related features such as ensuring that all HTTP requests are redirected to HTTPS and is used to add security headers to responses.
- SessionMiddleware: It helps in managing sessions for users. It enables Django to handle session data, making it available to views and templates.
- CommonMiddleware: Handles common operations such as URL redirection (adding/removing “www” prefix), appending slashes to URLs.
- CsrfViewMiddleware: Enables protection against Cross-Site Request Forgery (CSRF) attacks. It adds and verifies a CSRF token in POST requests to protect against malicious requests from other sites.
- AuthenticationMiddleware: Adds the ‘
user' attribute to the request, representing the currently logged-in user, if applicable. It also manages the user’s session and authentication state.
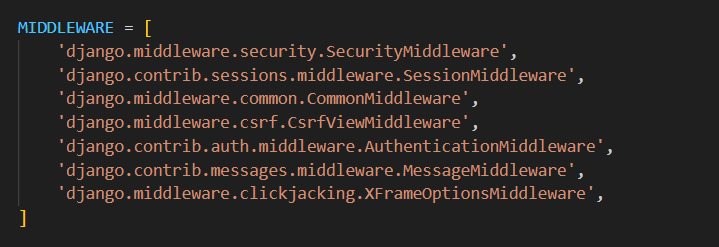
Sample middleware already included in ‘setting.py’
Custom Middleware: These are the middleware that a user creates for their purpose. It can be built as a class-based style with a call method that processes requests and responses or as a function style that accepts a get_response callable. It is produced in the middleware.py file. A middleware is turned on by including it in the Django settings’ MIDDLEWARE list.
Create Custom Middleware in Django
Let us look at an example in we are creating a middleware in a django project.Suppose there are three types of users such as teacher,student and principal.The main motive behind creating middleware is that it diverges the request according the types of user it is ,such as the teacher after login on the website lands on the teachers homepage and same in this way the principal lands on the principal home page and similarly for the student.
Setting up the Project
Step 1: Make sure your PC has Django Installed. First make a project with name ‘projectmiddleware’ by using the command
Django-admin startproject projectmiddleware
Step 2: Create a application named ‘testapp’ by using the command
python3 manage.py startapp testapp
Creating Necessary Files
views.py: This views.py file manages user authentication, user registration, and various user-specific home pages within the Django application, making it a central component for handling user interactions.
Python3
from django.contrib.auth import authenticate, login, logout
from django.shortcuts import render, redirect
from django.contrib.auth.forms import UserCreationForm
from testapp.forms import CustomUserCreationForm
from django.contrib.auth import get_user_model
User = get_user_model()
def login_view(request):
if request.method == 'POST':
username = request.POST['username']
password = request.POST['password']
user = authenticate(request, username=username, password=password)
if user is not None:
login(request, user)
return redirect('home')
return render(request, 'login.html')
def home_view(request):
return render(request, 'home.html')
def logout_view(request):
logout(request)
return render(request, 'home.html')
def signup_view(request):
if request.method == 'POST':
print(request.POST['username'])
print(request.POST['password1'])
print(request.POST['role'])
form = CustomUserCreationForm(request.POST)
print(form.data)
print(form.errors)
if form.is_valid():
print("Valid")
form.save()
return redirect('login')
else:
form = CustomUserCreationForm()
print("HI")
return render(request, 'signup.html', {'form': form})
def teacher_home(request):
print("Welcome Teacher")
return render(request, 'teacher.html')
def student_home(request):
print("Welcome Student")
return render(request, 'student.html')
def principal_home(request):
print("Welcome Principal")
return render(request, 'principal.html')
|
models.py: This Django code defines a custom user model, CustomUser, which extends Django’s AbstractUser. It adds a role field to categorize users as teachers, students, or principals, providing role-based functionality within the application.
Python3
from django.contrib.auth.models import AbstractUser
from django.db import models
class CustomUser(AbstractUser):
ROLE_CHOICES = (
('teacher', 'Teacher'),
('student', 'Student'),
('principal', 'Principal'),
)
role = models.CharField(max_length=10, choices=ROLE_CHOICES)
def __str__(self):
return self.username
|
forms.py: This code defines a custom user creation form, CustomUserCreationForm, that extends Django’s UserCreationForm. It adds a role field to the form, enabling users to select their role when registering. This aligns with the role-based functionality provided by the custom user model.
Python3
from django import forms
from django.contrib.auth.forms import UserCreationForm
from .models import CustomUser
class CustomUserCreationForm(UserCreationForm):
role = forms.ChoiceField(choices=CustomUser.ROLE_CHOICES, required=True)
class Meta:
model = CustomUser
fields = UserCreationForm.Meta.fields + ('role',)
|
custom_middleware.py: This Django middleware, named CustomMiddleware, adds custom logic to the request processing flow. It distinguishes requests for login, logout, and the admin panel, handling them accordingly. For authenticated users, it redirects them to the appropriate home page based on their role (teacher, student, or principal) if necessary.
Python3
from django.utils.deprecation import MiddlewareMixin
from django.shortcuts import redirect
from testapp import views
from django.contrib.auth import get_user_model
User = get_user_model()
class CustomMiddleware(MiddlewareMixin):
def process_request(self, request):
if request.path == '/login/':
print("Login Request")
elif request.path == '/logout/':
print("Logout Request")
elif request.path == '/admin/' :
print("Admin")
elif request.user.is_authenticated:
role = request.user.role
print(role)
if role == 'teacher' and not request.path.startswith('/teacher_home'):
return redirect('teacher_home')
elif role == 'student' and not request.path.startswith('/student_home'):
return redirect('student_home')
elif role == 'principal' and not request.path.startswith('/principal_home'):
return redirect('principal_home')
|
admin.py: This Django admin code configures the admin panel for managing custom users based on the CustomUser model. It customizes the displayed fields and registers the model for admin management.
Python3
from django.contrib import admin
from django.contrib.auth.admin import UserAdmin
from .models import CustomUser
class CustomUserAdmin(UserAdmin):
list_display = (
'username', 'email', 'first_name', 'last_name','role'
)
admin.site.register(CustomUser, CustomUserAdmin)
|
urls.py: This Django URL configuration maps URLs to view functions within the testapp application. It defines routes for admin access, user authentication, and role-based home pages, connecting specific URLs to corresponding view functions.
Python3
from django.contrib import admin
from django.urls import path, include
from testapp import views
urlpatterns = [
path('admin/', admin.site.urls),
path('login/', views.login_view, name='login'),
path('home/', views.home_view, name='home'),
path('logout/', views.logout_view, name='logout'),
path('signup/', views.signup_view, name='signup'),
path('teacher_home/', views.teacher_home, name='teacher_home'),
path('student_home/', views.student_home, name='student_home'),
path('principal_home/', views.principal_home, name='principal_home'),
]
|
Setting up GUI
home.html: This is a homepage created in HTML.
HTML
<!DOCTYPE html>
<html lang="en">
<head>
<meta charset="UTF-8">
<meta name="viewport" content="width=device-width, initial-scale=1.0">
<title>Welcome to Gfg</title>
<style>
body {
font-family: Arial, sans-serif;
margin: 0;
padding: 0;
background-color: #f5f5f5;
display: flex;
justify-content: center;
align-items: center;
height: 50vh;
}
h1 {
font-size: 24px;
color: green;
text-align: center;
padding: 50px;
border: 10px solid #ddd;
background-color: #fff;
box-shadow: 0px 2px 4px rgba(0, 0, 0, 0.1);
}
</style>
</head>
<body>
<h1>Welcome to Gfg</h1>
</body>
</html>
|
login.html: This is the login page which is used to collect the credentials from the user and then pass them to the backend.
HTML
<!DOCTYPE html>
<html>
<head>
<title>Login</title>
</head>
<body>
<h1>Login</h1>
<form method="post">
{% csrf_token %}
<label for="username">Username:</label>
<input type="text" name="username">
<label for="password">Password:</label>
<input type="password" name="password">
<button type="submit">Login</button>
</form>
</body>
</html>
|
signup.html: This is the signup page which is used to collect the credentials from the user and then register the user.
HTML
<!DOCTYPE html>
<html>
<head>
<title>Sign Up</title>
</head>
<body>
<h2>Sign Up</h2>
<form method="post">
{% csrf_token %}
<div>
<label for="{{ form.username.id_for_label }}">Username:</label>
{{ form.username }}
</div>
<div>
<label for="{{ form.password1.id_for_label }}">Password:</label>
{{ form.password1 }}
</div>
<div>
<label for="{{ form.password2.id_for_label }}">Confirm Password:</label>
{{ form.password2 }}
</div>
<div>
<label for="{{ form.role.id_for_label }}">Role:</label>
{{ form.role }}
</div>
<button type="submit">Sign up</button>
</form>
</body>
</html>
|
student.html: This is the homepage for student.
HTML
<!DOCTYPE html>
<html>
<head>
<title>Student Home</title>
</head>
<body>
<h2>Welcome, Student!</h2>
<p>This is the student's home page.</p>
</body>
</html>
|
teacher.html: This is the homepage for Teacher.
HTML
<!DOCTYPE html>
<html>
<head>
<title>Teacher Home</title>
</head>
<body>
<h2>Welcome, Teacher!</h2>
<p>This is the teacher's home page.</p>
</body>
</html>
|
principal.html: This is the homepage for principal.
HTML
<!DOCTYPE html>
<html>
<head>
<title>Principal Home</title>
</head>
<body>
<h2>Welcome, Principal!</h2>
<p>This is the principal's home page.</p>
</body>
</html>
|
urls.py: This Django URL configuration maps URLs to view functions within the testapp application. It defines routes for admin access, user authentication, and role-based home pages, connecting specific URLs to corresponding view functions.
Python3
from django.contrib import admin
from django.urls import path, include
from testapp import views
urlpatterns = [
path('admin/', admin.site.urls),
path('login/', views.login_view, name='login'),
path('home/', views.home_view, name='home'),
path('logout/', views.logout_view, name='logout'),
path('signup/', views.signup_view, name='signup'),
path('teacher_home/', views.teacher_home, name='teacher_home'),
path('student_home/', views.student_home, name='student_home'),
path('principal_home/', views.principal_home, name='principal_home'),
]
|
Deploying Project
Run these commands to apply the migrations:
python3 manage.py makemigrations
python3 manage.py migrate
Now, Run the server with the help of following command:
python3 manage.py runserver
Output Video:
Share your thoughts in the comments
Please Login to comment...