JPA – Object Relational Mapping
Last Updated :
09 Apr, 2024
JPA in Java is defined as the Java Persistence API and consists of Java specification for accessing, persisting, and maintaining data between Java objects and related databases One of the main features of JPA is Object Relational Mapping (ORM). This is the bridge between, or we can say the difference between an object-oriented domain model and a relational database model.
Understanding of the Object Relational Mapping in JPA
JPA ORM allows developers to work with Java objects to represent entities in the application and map them to the corresponding tables in a relational database.
Below are the processes to Implement.
1. Define the Entity Classes
An Entity class represents the table in the database. These classes are annotated with the @Entity to mark them as JPA entities of the JPA application.
@Entity
public class Product {
    @Id
    @GeneratedValue(strategy = GenerationType.IDENTITY)
    private Long id;
    private String name;
    private double price;

    // Constructors, getters, setters
}
2. Define the Relationships
We can use the annotation such as the @OneToOne, @OneToMany, @ManyToOne and @ManyToMany to define the relationships between the entities of the application.
3. Configure the Persistence Unit
Define the persistece.xml file to the configure the persistence unit and it can specify the database connection details and the entity classes of the JPA application.
// Configuration in persistence.xml
<persistence-unit name="myPU" transaction-type="RESOURCE_LOCAL">
    <class>com.example.Product</class>
    <properties>
        <property name="javax.persistence.jdbc.url" value="jdbc:mysql://localhost:3306/mydb"/>
        <property name="javax.persistence.jdbc.user" value="username"/>
        <property name="javax.persistence.jdbc.password" value="password"/>
        <property name="javax.persistence.jdbc.driver" value="com.mysql.jdbc.Driver"/>
    </properties>
</persistence-unit>
4. Perform the CRUD operations
We can use the EntityManager interface provided by the JPA to perform the CRUD (Create, Read, Update, Delete) operations on the entities.
// CRUD Operations
EntityManagerFactory emf = Persistence.createEntityManagerFactory("myPU");
EntityManager em = emf.createEntityManager();
// Create
em.getTransaction().begin();
Product product = new Product();
product.setName("Laptop");
product.setPrice(1000.0);
em.persist(product);
em.getTransaction().commit();
// Read
Product retrievedProduct = em.find(Product.class, 1L);
System.out.println(retrievedProduct.getName()); // Output: Laptop
// Update
em.getTransaction().begin();
retrievedProduct.setPrice(1200.0);
em.getTransaction().commit();
// Delete
em.getTransaction().begin();
em.remove(retrievedProduct);
em.getTransaction().commit();
5. Transaction Management
We can use the transactions to the ensure the data consistency and integrity and it can annotations such as the @Transcational can be used for the declarative transactions management of the JPA application.
Implementing JPA ORM in a Java application
We will develop a simple JPA application that can demonstrate the Object relational Mapping of the application.
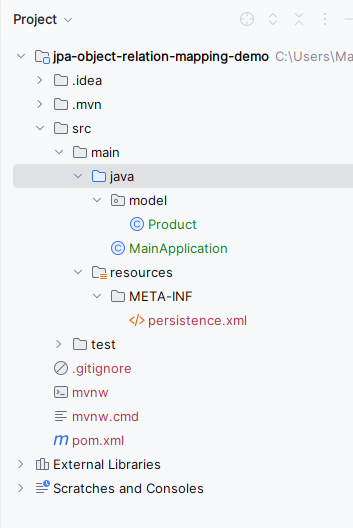
Step 1: Create the new JPA project using the Intellj Idea named jpa-object-relation-mapping-demo. After creating the project, the file structure looks like the below image.
Step 2: Open the pom.xml and add the below dependencies into the project.
<dependency>
            <groupId>org.hibernate.orm</groupId>
            <artifactId>hibernate-core</artifactId>
            <version>6.0.2.Final</version>
        </dependency>
        <dependency>
            <groupId>org.glassfish.jaxb</groupId>
            <artifactId>jaxb-runtime</artifactId>
            <version>3.0.2</version>
        </dependency>
        <dependency>
            <groupId>org.junit.jupiter</groupId>
            <artifactId>junit-jupiter-api</artifactId>
            <version>${junit.version}</version>
            <scope>test</scope>
        </dependency>
        <dependency>
            <groupId>org.junit.jupiter</groupId>
            <artifactId>junit-jupiter-engine</artifactId>
            <version>${junit.version}</version>
            <scope>test</scope>
        </dependency>
        <dependency>
            <groupId>mysql</groupId>
            <artifactId>mysql-connector-java</artifactId>
            <version>8.0.28</version>
        </dependency>
Step 3: Open the persistence.xml and put the below code into the project and it can configure the database of the project.
XML
<?xml version="1.0" encoding="UTF-8" standalone="yes"?>
<persistence xmlns="https://jakarta.ee/xml/ns/persistence"
             xmlns:xsi="http://www.w3.org/2001/XMLSchema-instance"
             xsi:schemaLocation="https://jakarta.ee/xml/ns/persistence https://jakarta.ee/xml/ns/persistence/persistence_3_0.xsd"
             version="3.0">
    <persistence-unit name="jpa-example">

        <properties>
            <property name="javax.persistence.jdbc.url" value="jdbc:mysql://localhost:3306/example"/>
            <property name="javax.persistence.jdbc.user" value="root"/>
            <property name="javax.persistence.jdbc.password" value=""/>
            <property name="javax.persistence.jdbc.driver" value="com.mysql.jdbc.Driver"/>
            <property name="hibernate.dialect" value="org.hibernate.dialect.MySQL5Dialect"/>
            <property name="hibernate.hbm2ddl.auto" value="update"/>
        </properties>

    </persistence-unit>
</persistence>
Step 4: Create the new Java package named as model. In that package, create the new Entity Java class named as Product.
Go to src > main > java > model > Product and put the below code.
Java
package model;

import jakarta.persistence.Entity;
import jakarta.persistence.GeneratedValue;
import jakarta.persistence.GenerationType;
import jakarta.persistence.Id;

@Entity
public class Product {
    @Id
    @GeneratedValue(strategy = GenerationType.IDENTITY)
    private Long id;
    private String name;
    private double price;
    // Getters and Setters


    public Long getId() {
        return id;
    }

    public void setId(Long id) {
        this.id = id;
    }

    public String getName() {
        return name;
    }

    public void setName(String name) {
        this.name = name;
    }

    public double getPrice() {
        return price;
    }

    public void setPrice(double price) {
        this.price = price;
    }
}
Step 5: Create the new Java main class named as the MainApplication.
Go to src > main > java > MainApplication and put the below code.
Java
import jakarta.persistence.EntityManager;
import jakarta.persistence.EntityManagerFactory;
import jakarta.persistence.Persistence;
import model.Product;

public class MainApplication {
    public static void main(String[] args) {
        EntityManagerFactory emf = Persistence.createEntityManagerFactory("jpa-example");
        EntityManager em = emf.createEntityManager();

        // Create
        em.getTransaction().begin();
        Product product = new Product();
        product.setName("Laptop");
        product.setPrice(1000.0);
        em.persist(product);
        em.getTransaction().commit();

        // Read
        Product retrievedProduct = em.find(Product.class, 1L);
        System.out.println(retrievedProduct.getName()); // Output: Laptop

        // Update
        em.getTransaction().begin();
        retrievedProduct.setPrice(1200.0);
        em.getTransaction().commit();

        // Delete
        em.getTransaction().begin();
        em.remove(retrievedProduct);
        em.getTransaction().commit();

        em.close();
        emf.close();
    }
}
pom.xml:
XML
<?xml version="1.0" encoding="UTF-8"?>
<project xmlns="http://maven.apache.org/POM/4.0.0"
         xmlns:xsi="http://www.w3.org/2001/XMLSchema-instance"
         xsi:schemaLocation="http://maven.apache.org/POM/4.0.0 https://maven.apache.org/xsd/maven-4.0.0.xsd">
    <modelVersion>4.0.0</modelVersion>

    <groupId>org.example</groupId>
    <artifactId>jpa-object-relation-mapping-demo</artifactId>
    <version>1.0-SNAPSHOT</version>
    <name>jpa-object-relation-mapping-demo</name>

    <properties>
        <project.build.sourceEncoding>UTF-8</project.build.sourceEncoding>
        <maven.compiler.target>11</maven.compiler.target>
        <maven.compiler.source>11</maven.compiler.source>
        <junit.version>5.9.2</junit.version>
    </properties>

    <dependencies>
        <dependency>
            <groupId>org.hibernate.orm</groupId>
            <artifactId>hibernate-core</artifactId>
            <version>6.0.2.Final</version>
        </dependency>
        <dependency>
            <groupId>org.glassfish.jaxb</groupId>
            <artifactId>jaxb-runtime</artifactId>
            <version>3.0.2</version>
        </dependency>
        <dependency>
            <groupId>org.junit.jupiter</groupId>
            <artifactId>junit-jupiter-api</artifactId>
            <version>${junit.version}</version>
            <scope>test</scope>
        </dependency>
        <dependency>
            <groupId>org.junit.jupiter</groupId>
            <artifactId>junit-jupiter-engine</artifactId>
            <version>${junit.version}</version>
            <scope>test</scope>
        </dependency>
        <dependency>
            <groupId>mysql</groupId>
            <artifactId>mysql-connector-java</artifactId>
            <version>8.0.28</version>
        </dependency>
    </dependencies>

    <build>
        <plugins>
        </plugins>
    </build>
</project>
Step 6: Once the project is completed, run the application. It will then show the Product name as output. Refer the below output image for the better understanding of the concept.
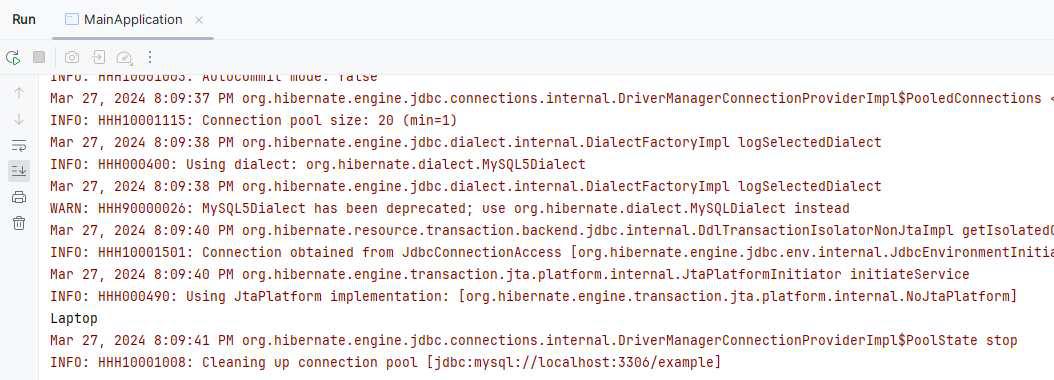
In the above example, we can demonstrate the object relational mapping of the JPA application.
Share your thoughts in the comments
Please Login to comment...