JPA – Map Mapping
Last Updated :
23 Apr, 2024
JPA refers to the Java Persistence API(JPA) and it can provide the features to map relational database tables to Java objects. Among of the features, Map Mapping is the versatile approach for handling the relationships between the entities of the JPA application.
Understanding of the Map Mapping in JPA
Map Mapping in JPA allows the representation of the relationships between the entities using the Java Map data structures. It can be particularly useful when dealing with the associations where the relationship involves the collection of the key-value pairs.
1. Define the Entity classes
We can define the two entity classes, Employee and Department where each employee belongs to the department of the application.
Employee Entity:
@Entity
public class Employee {
    @Id
    private Long id;
    private String name;
    // Other attributes

    @ManyToOne
    private Department department;
    // Getter and setters
}
Department Entity:
@Entity
public class Department {
    @Id
    private Long id;
    private String name;
    // Other attributes

    // Getter and setters
}
2. Map the Relationship using Map
In Employee entity, We can use the map to represent the relationship with the department of the application.
@Entity
public class Employee {
    @Id
    private Long id;
    private String name;
    // Other attributes

    @ElementCollection
    @CollectionTable(name="employee_department",
        joinColumns=@JoinColumn(name="employee_id"))
    @MapKeyColumn(name="department_key")
    @Column(name="department_value")
    private Map<String, String> departments;
    // Getter and setters
}
3. Usage and ouput
We can use the mapped relationship in the application.
EntityManagerFactory emf = Persistence.createEntityManagerFactory("pu");
        EntityManager em = emf.createEntityManager();

        em.getTransaction().begin();

        Employee employee = new Employee();
        employee.setId(1L);
        employee.setName("John");

        Map<String, String> departments = new HashMap<>();
        departments.put("IT", "Information Technology");
        departments.put("HR", "Human Resources");

        employee.setDepartments(departments);

        em.persist(employee);

        em.getTransaction().commit();
        em.close();
        emf.close();
Further Subtopics:
- Bidirectional Map Mapping: It can establishing the bidirectional relationships using the Map Mapping of the JPA application.
- Customizing Map Mapping: It can be adding the customizations such as the specifying the key type, value type and table mappings of the application.
- Lazy Loading: It can exploring the lazy loading the strategies for the Map Mapping associations.
- Handling Complex Relationships: It can dealings with the complex relationships and involving the nested maps or the maps of the entities of the JPA application.
Project Implementation of the Map Mapping in JPA
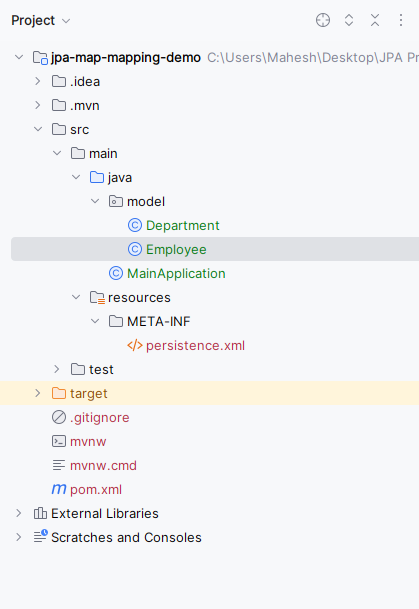
Step 1: First, we will create a JPA project using Intellij Idea IDE. The project named as jpa-map-mapping-demo.
Step 2: Now, we will add the following dependencies into the created JPA project.
Dependencies:
<dependency>
            <groupId>org.hibernate.orm</groupId>
            <artifactId>hibernate-core</artifactId>
            <version>6.0.2.Final</version>
        </dependency>
        <dependency>
            <groupId>org.glassfish.jaxb</groupId>
            <artifactId>jaxb-runtime</artifactId>
            <version>3.0.2</version>
        </dependency>
        <dependency>
            <groupId>mysql</groupId>
            <artifactId>mysql-connector-java</artifactId>
            <version>8.0.28</version>
        </dependency>
Now the project structure will look like below image:
Step 3: Now, open the persistance.xml file and write the below code for MYSQL database configuration of the database.
XML
<?xml version="1.0" encoding="UTF-8" standalone="yes"?>
<persistence xmlns="https://jakarta.ee/xml/ns/persistence"
             xmlns:xsi="http://www.w3.org/2001/XMLSchema-instance"
             xsi:schemaLocation="https://jakarta.ee/xml/ns/persistence https://jakarta.ee/xml/ns/persistence/persistence_3_0.xsd"
             version="3.0">
    <persistence-unit name="example">

        <properties>
            <property name="javax.persistence.jdbc.url" value="jdbc:mysql://localhost:3306/example"/>
            <property name="javax.persistence.jdbc.user" value="root"/>
            <property name="javax.persistence.jdbc.password" value=""/>
            <property name="javax.persistence.jdbc.driver" value="com.mysql.jdbc.Driver"/>
            <property name="hibernate.dialect" value="org.hibernate.dialect.MySQL5Dialect"/>
            <property name="hibernate.hbm2ddl.auto" value="update"/>
        </properties>

    </persistence-unit>
</persistence>
Step 4: After all the above steps, now create a package named model and create an entity class inside that package named as Employee. Go to src > main > java > model > Employee and write the below code file..
Java
package model;

import jakarta.persistence.*;

import java.util.HashMap;
import java.util.Map;

@Entity
public class Employee {
    @Id
    private Long id;
    private String name;

    @ElementCollection
    @CollectionTable(name="employee_department",
            joinColumns=@JoinColumn(name="employee_id"))
    @MapKeyColumn(name="department_key")
    @Column(name="department_value")
    private Map<String, String> departments = new HashMap<>();

    // Constructors, getters, and setters


    public Long getId() {
        return id;
    }

    public void setId(Long id) {
        this.id = id;
    }

    public String getName() {
        return name;
    }

    public void setName(String name) {
        this.name = name;
    }

    public Map<String, String> getDepartments() {
        return departments;
    }

    public void setDepartments(Map<String, String> departments) {
        this.departments = departments;
    }
}
In the Employee Entity class:
- @ElementCollection: This annotation can be used to the map the collectionof the basic types or the embeddable objects of the application.
- @CollectionTable: It can specifies the name of the table to the store the collection of the departments.
- @MayKeyColumn: It can specifies the column name for the map key.
- @Column: It can specifies the column name for the map value.
Step 5: Create the new Java package named as model. In that package, create a new entity class named Department. Go to src > main > java > model > Department and put the below code.
Java
package model;

import jakarta.persistence.Entity;
import jakarta.persistence.Id;

@Entity
public class Department {
    @Id
    private Long id;
    private String name;

    // Constructors, getters, and setters


    public Long getId() {
        return id;
    }

    public void setId(Long id) {
        this.id = id;
    }

    public String getName() {
        return name;
    }

    public void setName(String name) {
        this.name = name;
    }
}
The above class can represents the Department with the id and name attributes.
Step 6: Create a new Java class and named as the MainApplication. Go to src > main > java > MainApplication and put the below code.
Java
import jakarta.persistence.EntityManager;
import jakarta.persistence.EntityManagerFactory;
import jakarta.persistence.Persistence;
import model.Employee;

import java.util.HashMap;
import java.util.Map;

public class MainApplication {
    public static void main(String[] args) {
        EntityManagerFactory emf = Persistence.createEntityManagerFactory("example");
        EntityManager em = emf.createEntityManager();

        em.getTransaction().begin();

        // Create and persist employee
        Employee employee = new Employee();
        employee.setId(1L);
        employee.setName("Mahesh");

        Map<String, String> departments = new HashMap<>();
        departments.put("IT", "Information Technology");
        departments.put("HR", "Human Resources");

        employee.setDepartments(departments);

        em.persist(employee);

        em.getTransaction().commit();

        // Retrieve employee from database
        Employee retrievedEmployee = em.find(Employee.class, 1L);

        // Output retrieved employee details
        if (retrievedEmployee != null) {
            System.out.println("Retrieved Employee:");
            System.out.println("ID: " + retrievedEmployee.getId());
            System.out.println("Name: " + retrievedEmployee.getName());
            System.out.println("Departments:");
            for (Map.Entry<String, String> entry : retrievedEmployee.getDepartments().entrySet()) {
                System.out.println(entry.getKey() + ": " + entry.getValue());
            }
        } else {
            System.out.println("Employee not found.");
        }

        em.close();
        emf.close();
    }
}
In the MainApplication class:
- After the persisting the employee, we can retrieve the same employee from the database using the EntityManager.find() method of the application.
- We can print the details of the retrieved the employee and it can including its the ID, name and departments.
pom.xml:
XML
<?xml version="1.0" encoding="UTF-8"?>
<project xmlns="http://maven.apache.org/POM/4.0.0"
         xmlns:xsi="http://www.w3.org/2001/XMLSchema-instance"
         xsi:schemaLocation="http://maven.apache.org/POM/4.0.0 https://maven.apache.org/xsd/maven-4.0.0.xsd">
    <modelVersion>4.0.0</modelVersion>

    <groupId>org.example</groupId>
    <artifactId>jpa-map-mapping-demo</artifactId>
    <version>1.0-SNAPSHOT</version>
    <name>jpa-map-mapping-demo</name>

    <properties>
        <project.build.sourceEncoding>UTF-8</project.build.sourceEncoding>
        <maven.compiler.target>11</maven.compiler.target>
        <maven.compiler.source>11</maven.compiler.source>
        <junit.version>5.9.2</junit.version>
    </properties>

    <dependencies>
        <dependency>
            <groupId>org.hibernate.orm</groupId>
            <artifactId>hibernate-core</artifactId>
            <version>6.0.2.Final</version>
        </dependency>
        <dependency>
            <groupId>org.glassfish.jaxb</groupId>
            <artifactId>jaxb-runtime</artifactId>
            <version>3.0.2</version>
        </dependency>
        <dependency>
            <groupId>mysql</groupId>
            <artifactId>mysql-connector-java</artifactId>
            <version>8.0.28</version>
        </dependency>
        <dependency>
            <groupId>org.junit.jupiter</groupId>
            <artifactId>junit-jupiter-api</artifactId>
            <version>${junit.version}</version>
            <scope>test</scope>
        </dependency>
        <dependency>
            <groupId>org.junit.jupiter</groupId>
            <artifactId>junit-jupiter-engine</artifactId>
            <version>${junit.version}</version>
            <scope>test</scope>
        </dependency>
    </dependencies>

    <build>
        <plugins>
        </plugins>
    </build>
</project>
Step 7: Once the project is done, run the application and we will get the output like the below image.
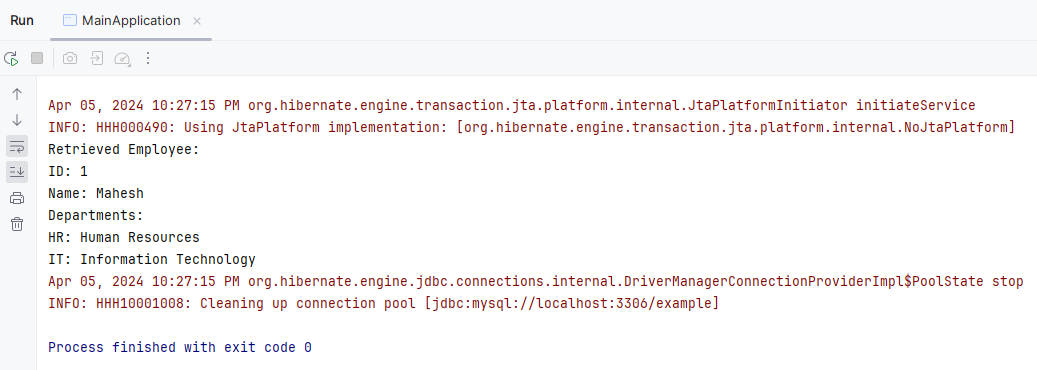
The above example demonstrates a simple Java application using JPA for the Map mapping and it includes the entity classes for the Employee and Department along with the JPA utility class for the managing the EntityManager instances.
Conclusion
Map Mapping in the JPA can offers the flexible and efficient way to the manage the relationships between the entities, especially in this scenarios involving the key-value pairs of the JPA application.
Share your thoughts in the comments
Please Login to comment...