Spring Boot – Build a Dynamic Full Text Search API Using JPA Queries
Last Updated :
10 Jan, 2024
A Global Full-Text Entity Search is a search functionality that allows users to find entities such as records or objects within a dataset by searching through the entirety of their content. Global Full-Text Entity Search is like having a super-smart search companion that digs deep into the entire content of entities. Consider the below examples to understand this better.
Examples for Building Text API
1). GeeksforGeeks Website Example
- Without Full-Text Search (on GeeksforGeeks):
- Scenario: Imagine you’re on GeeksforGeeks, a site with lots of coding articles.
- Challenge: If you want to learn about a coding topic but don’t know the exact titles or categories, finding the right articles can be a bit tricky.
- Process: You might have to click around different sections or look for specific tags to find what you need.
- With Global Full-Text Entity Search:
- Scenario: Now, think of having a magical search on GeeksforGeeks.
- Improvement: Instead of clicking around, you just tell the search what you’re interested in, like “sorting algorithms.”
- Result: The magical search instantly shows you all relevant articles, tutorials, and code snippets about sorting algorithms, no matter where they are on the site.
- Advantage: This makes it super easy to find and learn about specific coding topics without knowing exact titles or categories.
2). Library Example
- Without Full-Text Search:
- Scenario: Imagine you’re in a large library with countless books, each on various topics.
- Challenge: If you want to learn about a specific topic but don’t know the exact titles or categories, you might struggle to find relevant books.
- Process: You’d have to manually scan through book titles or rely on predefined categories, which could be time-consuming and may lead to missing out on valuable information.
- With Global Full-Text Entity Search:
- Scenario: Now, envision having a magical librarian.
- Enhanced Experience: Instead of struggling with titles or categories, you simply tell the librarian a keyword or topic you’re interested in.
- Outcome: The librarian, being magical, instantly fetches all the relevant books containing that word, regardless of titles or categories.
- Advantage: This streamlined process allows you to discover information efficiently, even when you lack specific details.
3). Restaurant Example
- Without Full-Text Search:
- Scenario: Picture yourself in a restaurant with an extensive menu offering a variety of dishes.
- Challenge: If you have a specific craving but aren’t sure which section of the menu it’s in, finding the right dish can be cumbersome.
- Process: You’d have to browse through different sections or rely on dish names, which might not be the most efficient way to locate what you want.
- With Global Full-Text Entity Search:
- Scenario: Now, imagine having a waiter equipped with a special search ability.
- Enhanced Experience: Instead of manually searching, you tell the waiter your craving, say “spicy.”
- Outcome: The waiter, with the magic of the search ability, instantly brings you a list of all dishes, appetizers, or desserts with that spicy element.
- Advantage: This quick and tailored approach allows you to discover and enjoy dishes based on your preferences without the need to navigate through the entire menu.
These examples illustrate how a Global Full-Text Entity Search simplifies the process of finding specific information in a large dataset, whether it’s a library of books or a restaurant menu.
Implementing REST API for Entity Global Search
Now we are going to implement global search API for Article Entity.Below steps to be followed while creating a spring boot REST API for entity global search.
Step 1: Set Up a Spring Boot Project
- Open your preferred Integrated Development Environment (IDE), such as IntelliJ IDEA or Eclipse or Spring Tool Suite (STS).
- Create a new Spring Boot project using the Spring Initializr:
- Visit spring_initializer.
- Choose the necessary project settings, such as Group, Artifact, and dependencies.Select dependencies like “Spring Web” to include Spring MVC for creating RESTful APIs.
- consider below pom.xml file configurations where needed dependencies are selected:
XML
<?xml version="1.0" encoding="UTF-8"?>
<modelVersion>4.0.0</modelVersion>
<parent>
<groupId>org.springframework.boot</groupId>
<artifactId>spring-boot-starter-parent</artifactId>
<version>3.2.1</version>
<relativePath />
</parent>
<groupId>com.example</groupId>
<artifactId>FullTextSearchApi</artifactId>
<version>0.0.1-SNAPSHOT</version>
<name>FullTextSearchApi</name>
<description>RESTful API for global full-text entity search</description>
<properties>
<java.version>8</java.version>
</properties>
<dependencies>
<dependency>
<groupId>org.springframework.boot</groupId>
<artifactId>spring-boot-starter-data-jpa</artifactId>
</dependency>
<dependency>
<groupId>org.springframework.boot</groupId>
<artifactId>spring-boot-starter-web</artifactId>
</dependency>
<dependency>
<groupId>com.h2database</groupId>
<artifactId>h2</artifactId>
<scope>runtime</scope>
</dependency>
<dependency>
<groupId>org.projectlombok</groupId>
<artifactId>lombok</artifactId>
<scope>provided</scope>
</dependency>
<dependency>
<groupId>jakarta.validation</groupId>
<artifactId>jakarta.validation-api</artifactId>
</dependency>
<dependency>
<groupId>org.hibernate.validator</groupId>
<artifactId>hibernate-validator</artifactId>
</dependency>
<dependency>
<groupId>org.junit.jupiter</groupId>
<artifactId>junit-jupiter-api</artifactId>
<version>5.8.1</version>
<scope>test</scope>
</dependency>
<dependency>
<groupId>org.springframework.boot</groupId>
<artifactId>spring-boot-starter-test</artifactId>
<scope>test</scope>
</dependency>
</dependencies>
<build>
<plugins>
<plugin>
<groupId>org.springframework.boot</groupId>
<artifactId>spring-boot-maven-plugin</artifactId>
<configuration>
<excludes>
<exclude>
<groupId>org.projectlombok</groupId>
<artifactId>lombok</artifactId>
</exclude>
</excludes>
</configuration>
</plugin>
</plugins>
</build>
</project>
|
- Click on “Generate” to download the project zip file.
- Extract the downloaded zip file and open the project in your IDE.
- Below is the project directory structure:
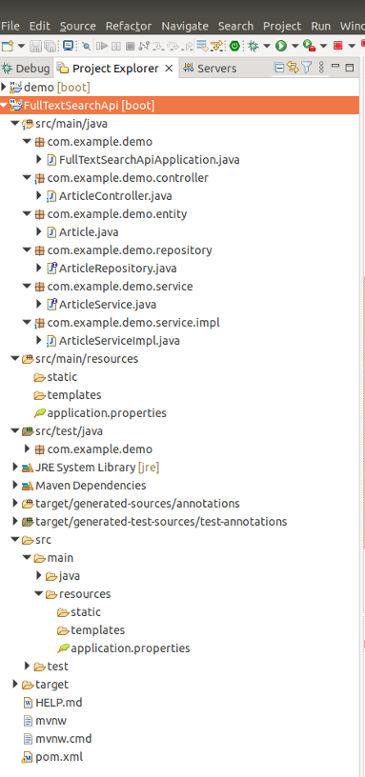
Step 2: Define the Article Entity
Create an Article class representing the entity you want to search. Include relevant attributes such as id, title, content, etc.
Java
package com.example.demo.entity;
import java.time.LocalDate;
import java.util.UUID;
import jakarta.persistence.Column;
import jakarta.persistence.Entity;
import jakarta.persistence.GeneratedValue;
import jakarta.persistence.GenerationType;
import jakarta.persistence.Id;
import jakarta.persistence.Table;
import lombok.Data;
@Entity
@Table(name = "articles")
@Data
public class Article {
@Id
@GeneratedValue(strategy = GenerationType.UUID)
private UUID id;
/**
* Title of the article.
*/
@Column(name = "title")
private String title;
/**
* Author of the article.
*/
@Column(name = "author")
private String author;
@Column(name = "content")
private String content;
@Column(name = "publication_date")
private LocalDate publicationDate;
@Column(name = "category")
private String category;
@Column(name = "keywords")
private String keywords;
}
|
where,
- @Entity: Indicates that the class is a JPA entity.
- @Table(name = “articles”): Specifies the table name for the entity.
- @Data: Lombok annotation to automatically generate getter, setter, toString, equals, and hashCode methods.
Step 3: Set Up Repository
Create a repository interface for the Article entity to interact with the database.
Java
package com.example.demo.repository;
import com.example.demo.entity.Article;
import org.springframework.data.jpa.repository.JpaRepository;
import org.springframework.data.jpa.repository.Query;
import org.springframework.data.repository.query.Param;
import java.util.List;
import java.util.UUID;
public interface ArticleRepository extends JpaRepository<Article, UUID> {
@Query("SELECT a FROM Article a WHERE " +
"LOWER(a.content) LIKE LOWER(CONCAT('%', :searchText, '%')) OR " +
"LOWER(a.title) LIKE LOWER(CONCAT('%', :searchText, '%')) OR " +
"LOWER(a.author) LIKE LOWER(CONCAT('%', :searchText, '%')) OR " +
"LOWER(a.category) LIKE LOWER(CONCAT('%', :searchText, '%')) OR " +
"LOWER(a.keywords) LIKE LOWER(CONCAT('%', :searchText, '%'))")
List<Article> findArticlesBySearchText(@Param("searchText") String searchText);
List<Article> findByAuthor(String author);
List<Article> findByTitle(String title);
List<Article> findByCategory(String category);
}
|
Step 4: Implement Service Interface
Create a service interface (ArticleService) that declares the operations to be performed on articles.
Java
package com.example.demo.service;
import com.example.demo.entity.Article;
import java.util.List;
import java.util.UUID;
public interface ArticleService {
List<Article> getAllArticles();
Article getArticleById(UUID id);
Article createArticle(Article article);
Article updateArticle(UUID id, Article article);
void deleteArticle(UUID id);
List<Article> searchArticles(String searchText);
}
|
Step 5: Implement Service Class
Create a service class (ArticleServiceImpl) that implements the ArticleService interface.
Java
package com.example.demo.service.impl;
import com.example.demo.entity.Article;
import com.example.demo.repository.ArticleRepository;
import com.example.demo.service.ArticleService;
import org.springframework.beans.factory.annotation.Autowired;
import org.springframework.stereotype.Service;
import java.util.List;
import java.util.Optional;
import java.util.UUID;
@Service
public class ArticleServiceImpl implements ArticleService {
@Autowired
private ArticleRepository articleRepository;
@Override
public List<Article> getAllArticles() {
return articleRepository.findAll();
}
@Override
public Article getArticleById(UUID id) {
return articleRepository.findById(id).orElse(null);
}
@Override
public Article createArticle(Article article) {
return articleRepository.save(article);
}
@Override
public Article updateArticle(UUID id, Article article) {
Optional<Article> existingArticleOptional = articleRepository.findById(id);
if (existingArticleOptional.isPresent()) {
Article existingArticle = existingArticleOptional.get();
existingArticle.setTitle(article.getTitle());
existingArticle.setAuthor(article.getAuthor());
existingArticle.setContent(article.getContent());
existingArticle.setPublicationDate(article.getPublicationDate());
existingArticle.setCategory(article.getCategory());
existingArticle.setKeywords(article.getKeywords());
return articleRepository.save(existingArticle);
} else {
return null;
}
}
@Override
public void deleteArticle(UUID id) {
articleRepository.deleteById(id);
}
@Override
public List<Article> searchArticles(String searchText) {
return articleRepository.findArticlesBySearchText(searchText);
}
}
|
Step 6: Create Controller for REST API
Implement a controller class (ArticleController) that handles HTTP requests for your REST API.
Java
package com.example.demo.controller;
import com.example.demo.entity.Article;
import com.example.demo.service.ArticleService;
import org.springframework.beans.factory.annotation.Autowired;
import org.springframework.http.ResponseEntity;
import org.springframework.web.bind.annotation.*;
import java.util.List;
import java.util.UUID;
@RestController
@RequestMapping("/api/articles")
public class ArticleController {
@Autowired
private ArticleService articleService;
@GetMapping
public List<Article> getAllArticles() {
return articleService.getAllArticles();
}
@GetMapping("/{id}")
public Article getArticleById(@PathVariable String id) {
UUID uuid = UUID.fromString(id);
return articleService.getArticleById(uuid);
}
@PostMapping
public Article createArticle(@RequestBody Article article) {
return articleService.createArticle(article);
}
@PutMapping("/{id}")
public Article updateArticle(@PathVariable String id, @RequestBody Article article) {
UUID uuid = UUID.fromString(id);
return articleService.updateArticle(uuid, article);
}
@DeleteMapping("/{id}")
public void deleteArticle(@PathVariable String id) {
UUID uuid = UUID.fromString(id);
articleService.deleteArticle(uuid);
}
@GetMapping("/search")
public ResponseEntity<List<Article>> searchArticles(@RequestParam String searchText) {
List<Article> foundArticles = articleService.searchArticles(searchText);
if (!foundArticles.isEmpty()) {
return ResponseEntity.ok(foundArticles);
} else {
return ResponseEntity.noContent().build();
}
}
}
|
Step 7: Configure application.properties
Open the src/main/resources/application.properties file and configure your application properties:
# DataSource settings
spring.datasource.url=jdbc:h2:mem:testdb  # JDBC URL for the H2 in-memory database
spring.datasource.driverClassName=org.h2.Driver  # JDBC driver class for H2
spring.datasource.username=sa  # Username for connecting to the database
spring.datasource.password=password  # Password for connecting to the database
spring.jpa.database-platform=org.hibernate.dialect.H2Dialect  # Hibernate dialect for H2

# H2 Console settings
spring.h2.console.enabled=true  # Enable the H2 console
spring.h2.console.path=/h2-console  # URL path for accessing the H2 console

# Hibernate settings
spring.jpa.hibernate.ddl-auto=update  # Automatically update the database schema based on JPA entity classes
spring.jpa.show-sql=true  # Show SQL statements in the console
spring.jpa.properties.hibernate.format_sql=true  # Format SQL statements for better readability

# Server port
server.port=8080  # Port on which the embedded Tomcat server will run
POSTMAN Testing Process for Article API Endpoints
Let’s walk through the steps to create an article and then search for it using the searchArticles endpoint.
Create a New Article
- Method: POST
- URL: http://localhost:8080/api/articles
- Body: Select “raw” and “JSON (application/json),” then enter the JSON data for a new article.
For example:
{
  "title": "Sample Article",
  "author": "John Doe",
  "content": "This is a sample article content.",
  "publicationDate": "2023-12-25",
  "category": "Sample Category",
  "keywords": "sample, article"
}
Click on the “Send” button to create the new article. Consider below images.
POSTMAN Request and response:
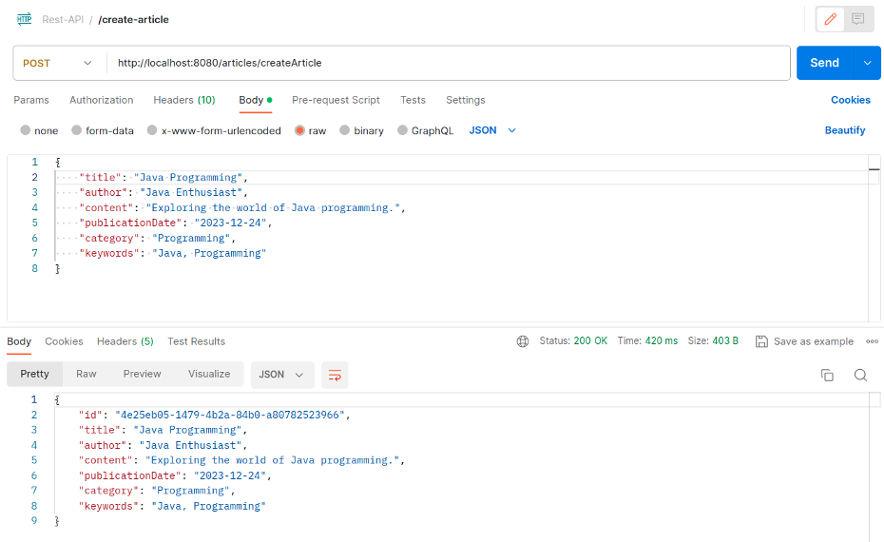
creating an article
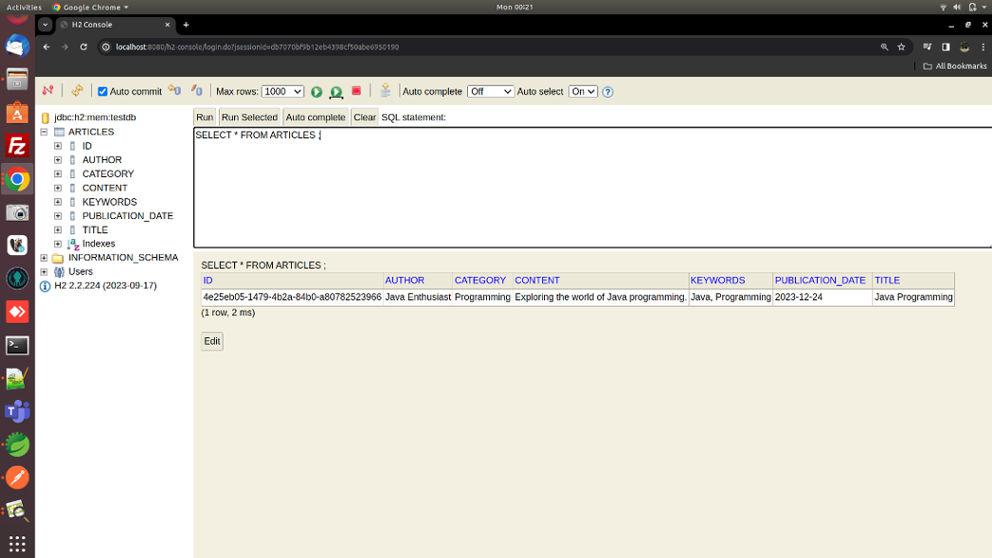
Database Record:
Search for the Created Article:
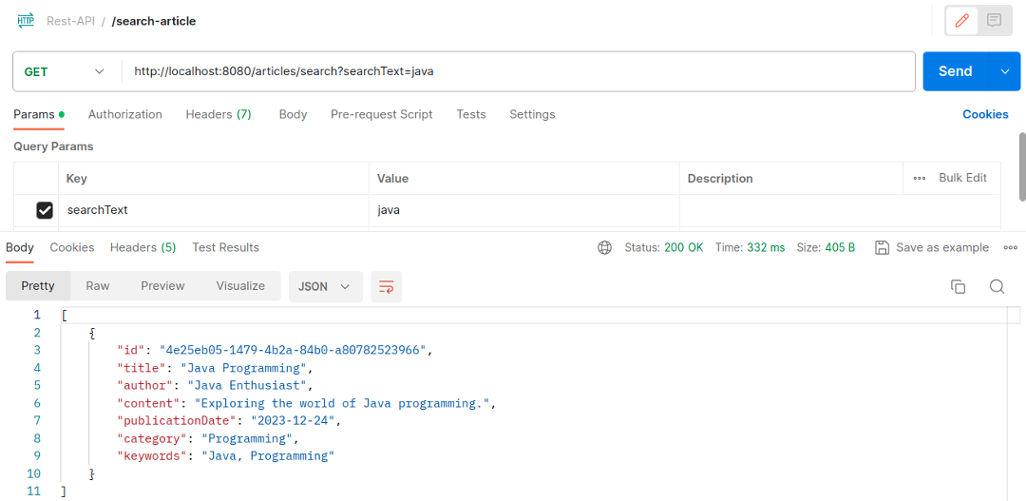
Set up a new request in Postman:Method: GETURL: http://localhost:8080/api/articles/searchParams: Add a key-value pair:Key: searchTextValue: Enter a keyword that matches the article you created (e.g., Sample).Consider below images:
1). When something is found with the searchText
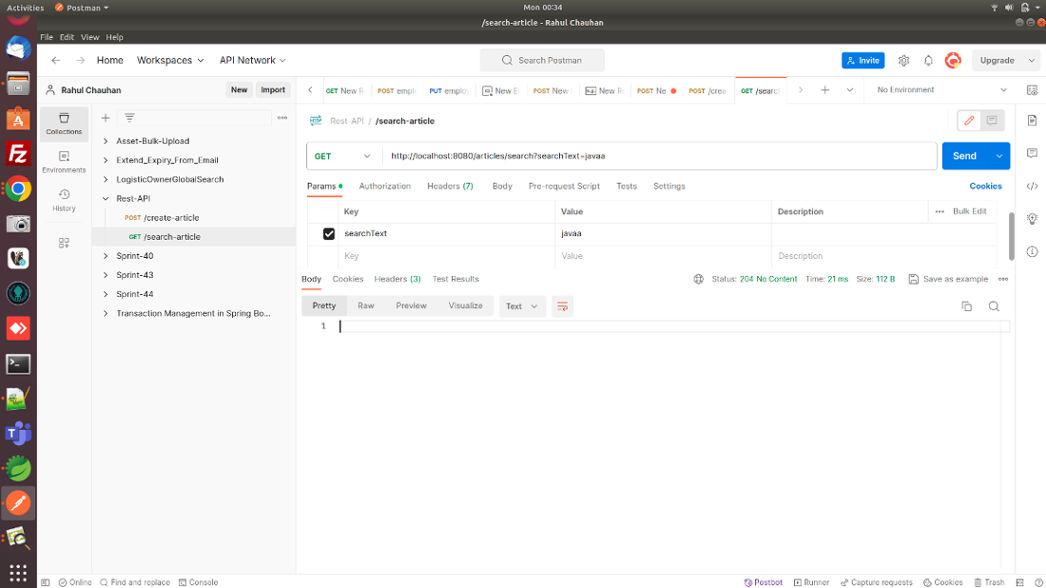
 2). When nothing matched with the given searchText value
Conclusion
We initiated by creating and validating article details in the database. Once ensured, our focus shifted to the search endpoint. If the searchText matched any attribute in our stored articles, a list of matches was promptly delivered. In the absence of matches, a graceful 204 No Content response reassured the absence of results. This concise journey affirms the seamless interplay of article creation and effective global search in our Java and Spring Boot ecosystem.
Share your thoughts in the comments
Please Login to comment...