JPA – One-to-Many Mapping
Last Updated :
23 Apr, 2024
In Java Persistence API(JPA), JPA can serve as the fundamental tool for Java developers to interact with databases in an object-oriented manner. Among the many features it can offer One-to-many mapping is the crucial concept that can used to establish the relationships between the entities in the database.
Understanding the One-to-Many Mapping
One-to-many mapping can represent the relationship where one entity instance is associated with multiple instances of another entity. For instance, consider the scenario where one Department can have multiple Employees. In that case, the Department is the one side and the Employee is the Many side.
Key Terminologies:
- Entity: It is the persistent object in the database and it can typically represented by the java class annotated with @Entity.
- Relationship: It can defined as how entities are related to each other in the database.
- one-to-many mapping: This relationship can define where both sides maintain references to each other. it can allow navigation from both ends.
- Bidirectional Mapping: It can define the relationship where both sides maintain the reference to each other and it can allow the navigation from both sides.
- Unidirectional Mapping: It can define the relationship where the association is defined from one entity to another without explicit from the other side.
- JoinColumn: This annotation can specify the column in the database used for joining the entity to its related entity.
- Cascade Operations: It can determine how changes to the entities propagate to the related entities.
- Fetch Types: it can be used to control how related entities are loaded from the database either eagerly or lazily.
Steps to Implement One-to-Many Mapping
1. Define the Entities:
Start by the creating java classes for the entities involved in the relationship. Here the below example for entity classes for Department and Employee.
// Department Entity
@Entity
public class Department {
    @Id
    @GeneratedValue(strategy = GenerationType.IDENTITY)
    private Long id;

    private String name;

    @OneToMany(mappedBy = "department", cascade = CascadeType.ALL, orphanRemoval = true)
    private List<Employee> employees = new ArrayList<>();

    // Getters and Setters
}

// Employee Entity
@Entity
public class Employee {
    @Id
    @GeneratedValue(strategy = GenerationType.IDENTITY)
    private Long id;

    private String name;

    @ManyToOne
    @JoinColumn(name = "department_id")
    private Department department;

    // Getters and Setters
}
2. Establish Relationship:
We can annotate with the appropriate fields in the entities to establish the one to many relationship. In Department entity, use the @OneToMany can indicates the relationship with the Employee entity and the Employee entity can use the @ManyToOne to indicates the relationship back to Department Entity.
3. Implement Persistence:
We can utilize the JPA annotation and it can configuration to the persist the entites and their relationships. Ensure the proper setup of the database connection and the persistence unit configuration in the persistence.xml file of the JPA application.
4. Test the Mapping:
We can execute the code to verify the correctness of the mapping and the relationships. Below Example can demonstrating the creation of the department and associated with the multiple Employees with it.
// Test class to demonstrate one-to-many mapping
public class Main {
    public static void main(String[] args) {
        EntityManagerFactory emf = Persistence.createEntityManagerFactory("example");
        EntityManager em = emf.createEntityManager();

        em.getTransaction().begin();

        // Creating Department
        Department department = new Department();
        department.setName("Engineering");

        // Creating Employees
        Employee emp1 = new Employee();
        emp1.setName("Mukesh");
        emp1.setDepartment(department);

        Employee emp2 = new Employee();
        emp2.setName("Smith");
        emp2.setDepartment(department);

        department.getEmployees().add(emp1);
        department.getEmployees().add(emp2);

        em.persist(department);

        em.getTransaction().commit();

        em.close();
        emf.close();
    }
}
We can execute the code then creates the Department Engineering and it can associates with two Employees with it. It can demonstrating the functionality of the one to many mapping.
Project to Implement One-to-Many Mapping in JPA
Step 1: Create the new JPA project using the Intellj Idea named as jpa-one-to-many-mapping-demo.
Step 2: Open the open.xml and add the below dependencies into the project.
Dependencies:
<!-- Database Driver (MySQL in this example) -->
<dependency>
            <groupId>org.hibernate.orm</groupId>
            <artifactId>hibernate-core</artifactId>
            <version>6.0.2.Final</version>
        </dependency>
        <dependency>
            <groupId>org.glassfish.jaxb</groupId>
            <artifactId>jaxb-runtime</artifactId>
            <version>3.0.2</version>
        </dependency>
        <dependency>
            <groupId>org.junit.jupiter</groupId>
            <artifactId>junit-jupiter-api</artifactId>
            <version>${junit.version}</version>
            <scope>test</scope>
        </dependency>
        <dependency>
            <groupId>org.junit.jupiter</groupId>
            <artifactId>junit-jupiter-engine</artifactId>
            <version>${junit.version}</version>
            <scope>test</scope>
        </dependency>
        <dependency>
            <groupId>mysql</groupId>
            <artifactId>mysql-connector-java</artifactId>
            <version>8.0.28</version>
        </dependency>
once create the project then the file structure looks like the below image.

Step 3: Open the persistence.xml and put the below code into the project and it can configure the database of the project.
XML
<?xml version="1.0" encoding="UTF-8" standalone="yes"?>
<persistence xmlns="https://jakarta.ee/xml/ns/persistence"
             xmlns:xsi="http://www.w3.org/2001/XMLSchema-instance"
             xsi:schemaLocation="https://jakarta.ee/xml/ns/persistence https://jakarta.ee/xml/ns/persistence/persistence_3_0.xsd"
             version="3.0">
    <persistence-unit name="examplePU">
        <class>model.Student</class>
        <class>model.Employee</class>
        <class>model.Department</class>
        <class>model.Course</class>
        <properties>
            <property name="javax.persistence.jdbc.url" value="jdbc:mysql://localhost:3306/example"/>
            <property name="javax.persistence.jdbc.user" value="root"/>
            <property name="javax.persistence.jdbc.password" value=""/>
            <property name="javax.persistence.jdbc.driver" value="com.mysql.jdbc.Driver"/>
            <property name="hibernate.dialect" value="org.hibernate.dialect.MySQL5Dialect"/>
            <property name="hibernate.hbm2ddl.auto" value="update"/>
        </properties>

    </persistence-unit>
</persistence>
Step 4: Create the new Java package named as model in that package create the new Entity Java class named as the Employee. Go to src > main > java > model > Employee and put the below code.
Java
package model;

import jakarta.persistence.*;

@Entity
public class Employee {
    @Id
    @GeneratedValue(strategy = GenerationType.IDENTITY)
    private Long id;

    private String name;

    @ManyToOne
    @JoinColumn(name = "department_id")
    private Department department;

    // Constructors, getters, and setters


    public Long getId() {
        return id;
    }

    public void setId(Long id) {
        this.id = id;
    }

    public String getName() {
        return name;
    }

    public void setName(String name) {
        this.name = name;
    }

    public Department getDepartment() {
        return department;
    }

    public void setDepartment(Department department) {
        this.department = department;
    }
}
Step 5: create the new Entity Java class named as the Department. Go to src > main > java > model > Department and put the below code.
Java
package model;

import jakarta.persistence.*;

import java.util.ArrayList;
import java.util.List;

@Entity
public class Department {
    @Id
    @GeneratedValue(strategy = GenerationType.IDENTITY)
    private Long id;

    private String name;

    @OneToMany(mappedBy = "department", cascade = CascadeType.ALL, orphanRemoval = true)
    private List<Employee> employees = new ArrayList<>(); // Initialize the list here


    public Long getId() {
        return id;
    }

    public void setId(Long id) {
        this.id = id;
    }

    public String getName() {
        return name;
    }

    public void setName(String name) {
        this.name = name;
    }

    public List<Employee> getEmployees() {
        return employees;
    }

    public void setEmployees(List<Employee> employees) {
        this.employees = employees;
    }
}
Step 6: Create the new Java class named as the JPAUtil. Go to src > main > java > JPAUtil and put the below code.
Java
import jakarta.persistence.EntityManager;
import jakarta.persistence.EntityManagerFactory;
import jakarta.persistence.Persistence;

public class JpaUtil {
    private static final EntityManagerFactory emFactory;

    static {
        emFactory = Persistence.createEntityManagerFactory("persistence-unit-name");
    }

    public static EntityManager getEntityManager() {
        return emFactory.createEntityManager();
    }

    public static void close() {
        emFactory.close();
    }
}
Step 7: Create the new Java class named as the MainApplication. Go to src > main > java > MainApplication and put the below code.
Java
import jakarta.persistence.EntityManager;
import model.Department;
import model.Employee;

public class MainApplication {
    public static void main(String[] args) {
        // Create entities
        Department department = new Department();
        department.setName("Engineering");

        Employee emp1 = new Employee();
        emp1.setName("Raju");

        Employee emp2 = new Employee();
        emp2.setName("Eswar");

        // Associate employees with the department
        emp1.setDepartment(department);
        emp2.setDepartment(department);

        department.getEmployees().add(emp1);
        department.getEmployees().add(emp2);

        // Persist entities
        EntityManager entityManager = JpaUtil.getEntityManager();
        entityManager.getTransaction().begin();

        entityManager.persist(department);
        entityManager.persist(emp1);
        entityManager.persist(emp2);

        entityManager.getTransaction().commit();

        // Close EntityManager
        entityManager.close();

        // Retrieve and print the persisted data
        entityManager = JpaUtil.getEntityManager();
        Department retrievedDepartment = entityManager.find(Department.class, department.getId());
        System.out.println("Department: " + retrievedDepartment.getName());
        System.out.println("Employees:");
        for (Employee employee : retrievedDepartment.getEmployees()) {
            System.out.println("- " + employee.getName());
        }

        // Close EntityManager
        entityManager.close();

        // Close EntityManagerFactory
        JpaUtil.close();
    }
}
pom.xml
Java
<?xml version="1.0" encoding="UTF-8"?>
<project xmlns="http://maven.apache.org/POM/4.0.0"
         xmlns:xsi="http://www.w3.org/2001/XMLSchema-instance"
         xsi:schemaLocation="http://maven.apache.org/POM/4.0.0 https://maven.apache.org/xsd/maven-4.0.0.xsd">
    <modelVersion>4.0.0</modelVersion>

    <groupId>org.example</groupId>
    <artifactId>jpa-one-to-many-mapping-demo</artifactId>
    <version>1.0-SNAPSHOT</version>
    <name>jpa-one-to-many-mapping-demo</name>

    <properties>
        <project.build.sourceEncoding>UTF-8</project.build.sourceEncoding>
        <maven.compiler.target>11</maven.compiler.target>
        <maven.compiler.source>11</maven.compiler.source>
        <junit.version>5.9.2</junit.version>
    </properties>

    <dependencies>
        <dependency>
            <groupId>org.hibernate.orm</groupId>
            <artifactId>hibernate-core</artifactId>
            <version>6.0.2.Final</version>
        </dependency>
        <dependency>
            <groupId>org.glassfish.jaxb</groupId>
            <artifactId>jaxb-runtime</artifactId>
            <version>3.0.2</version>
        </dependency>
        <dependency>
            <groupId>org.junit.jupiter</groupId>
            <artifactId>junit-jupiter-api</artifactId>
            <version>${junit.version}</version>
            <scope>test</scope>
        </dependency>
        <dependency>
            <groupId>org.junit.jupiter</groupId>
            <artifactId>junit-jupiter-engine</artifactId>
            <version>${junit.version}</version>
            <scope>test</scope>
        </dependency>
        <dependency>
            <groupId>mysql</groupId>
            <artifactId>mysql-connector-java</artifactId>
            <version>8.0.28</version>
        </dependency>
    </dependencies>

    <build>
        <plugins>
        </plugins>
    </build>
</project>
Step 8: Once the project is completed, run the application then show the department and employees with departments as output the products as output. Refer the below image for the better understanding of the concept.
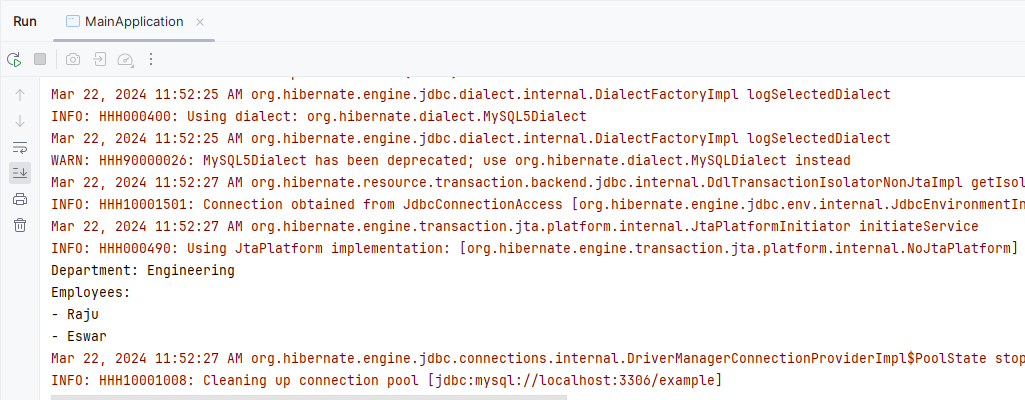
In the above project, Demonstrating the simple JPA application for implementing the one-to-many mapping using the JPA of the project.
Conclusion
One-to-many mapping in the JPA can provides the establishment of the relationships between the entities and it can enabling the efficient data management in the Java applications.
Share your thoughts in the comments
Please Login to comment...