JPA – Criteria GROUP BY Clause
Last Updated :
02 Apr, 2024
JPA in Java can be called the Java Persistence API. It provides the Criteria API as a programming mechanism for creating queries dynamically. One of these important features is the GROUP BY clause which allows developers to group query results based on specific criteria.
GROUP BY Clause
The Group BY clause of the JPA Criteria API is used to create groups of queries based on one or more fields. It can be used with aggregation functions such as COUNT and SUM to calculate aggregate data.
Steps to Implement GROUP BY Clause
- Define the CriteriaQuery object of the JPA application.
- Specify the root entity and select the desired fields.
- Applying the grouping using the groupBy( ) method in the application.
- Optionally, we can apply the aggregate functions using the CriteriaBuilder object.
- After that, we can execute the query and retrieve the grouped results.
Aggregate Functions
The aggregation function can calculate aggregated data, producing a single result for each group. These functions, like COUNT SUM, AVG, MIN, and MAX, can be performed using the GROUP BY clause.
Example: Calculating the total salary and the number of employees per department.
CriteriaBuilder cb = entityManager.getCriteriaBuilder();
CriteriaQuery<Object[]> query = cb.createQuery(Object[].class);
Root<Employee> root = query.from(Employee.class);

// Select department, total salary, average salary, and count of employees
query.multiselect(
    root.get("department"),
    cb.sum(root.get("salary")),
    cb.avg(root.get("salary")),
    cb.count(root)
);

// Group by department
query.groupBy(root.get("department"));

// Execute the query and retrieve results
List<Object[]> results = entityManager.createQuery(query).getResultList();

// Print grouped results
for (Object[] result : results) {
    Department department = (Department) result[0];
    Double totalSalary = (Double) result[1];
    Double avgSalary = (Double) result[2];
    Long employeeCount = (Long) result[3];
    System.out.println("Department: " + department.getName() + ", Total Salary: " + totalSalary + ", Average Salary: " + avgSalary + ", Employee Count: " + employeeCount);
}
Having Clause:
The HAVING clause that can be used to filters the grouped data based on the specified conditions and it is similar to the WHERE clause but the operates on the grouped results rather than the individual rows.
Example: Retrieving the departments with the more than three employees.
CriteriaBuilder cb = entityManager.getCriteriaBuilder();
CriteriaQuery<Object[]> query = cb.createQuery(Object[].class);
Root<Employee> root = query.from(Employee.class);

// Select department and count of employees
query.multiselect(
    root.get("department"),
    cb.count(root)
);

// Group by department
query.groupBy(root.get("department"));

// Apply having clause to filter departments with more than three employees
query.having(cb.gt(cb.count(root), 3L));

// Execute the query and retrieve results
List<Object[]> results = entityManager.createQuery(query).getResultList();

// Print grouped results
for (Object[] result : results) {
    Department department = (Department) result[0];
    Long employeeCount = (Long) result[1];
    System.out.println("Department: " + department.getName() + ", Employee Count: " + employeeCount);
}
Steps to Implement the GROUP BY Clause of JPA
We can develop the simple JPA application that can demonstrate the GROUP BY clause of the application.
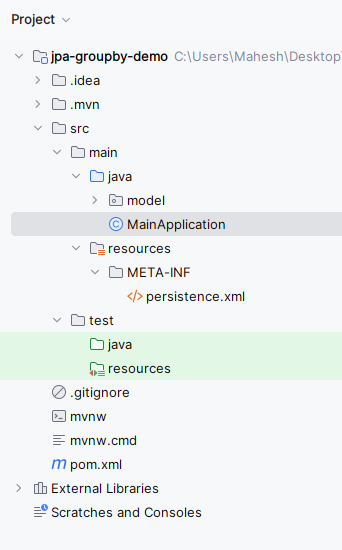
Step 1: Create the new JPA project using the Intellj Idea named as jpa-groupby-demo. Once the project created successfully, the file structure looks like the below image.
Step 2: Open the open.xml and add the below dependencies into the project.
        <dependency>
            <groupId>org.hibernate.orm</groupId>
            <artifactId>hibernate-core</artifactId>
            <version>6.0.2.Final</version>
        </dependency>
        <dependency>
            <groupId>org.glassfish.jaxb</groupId>
            <artifactId>jaxb-runtime</artifactId>
            <version>3.0.2</version>
        </dependency>
        <dependency>
            <groupId>org.junit.jupiter</groupId>
            <artifactId>junit-jupiter-api</artifactId>
            <version>${junit.version}</version>
            <scope>test</scope>
        </dependency>
        <dependency>
            <groupId>org.junit.jupiter</groupId>
            <artifactId>junit-jupiter-engine</artifactId>
            <version>${junit.version}</version>
            <scope>test</scope>
        </dependency>
        <dependency>
            <groupId>mysql</groupId>
            <artifactId>mysql-connector-java</artifactId>
            <version>8.0.28</version>
        </dependency>
Step 3: Open the persistence.xml and put the below code into the project and it can configure the database of the project.
XML
<?xml version="1.0" encoding="UTF-8" standalone="yes"?>
<persistence xmlns="https://jakarta.ee/xml/ns/persistence"
             xmlns:xsi="http://www.w3.org/2001/XMLSchema-instance"
             xsi:schemaLocation="https://jakarta.ee/xml/ns/persistence https://jakarta.ee/xml/ns/persistence/persistence_3_0.xsd"
             version="3.0">
    <persistence-unit name="persistence-unit-group">
        <class>model.Department</class>
        <class>model.Employees</class>
        <properties>
            <property name="javax.persistence.jdbc.url" value="jdbc:mysql://localhost:3306/example"/>
            <property name="javax.persistence.jdbc.user" value="root"/>
            <property name="javax.persistence.jdbc.password" value=""/>
            <property name="javax.persistence.jdbc.driver" value="com.mysql.jdbc.Driver"/>
            <property name="hibernate.dialect" value="org.hibernate.dialect.MySQL5Dialect"/>
            <property name="hibernate.hbm2ddl.auto" value="update"/>
        </properties>
    </persistence-unit>
</persistence>
Step 4: Create the tables in MySQL database using the below SQL query:
Department Table Query:
-- Create 'departments' table
CREATE TABLE departments (
    id BIGINT AUTO_INCREMENT PRIMARY KEY,
    name VARCHAR(255)
);
Employees Table Query:
-- Create 'employees' table with foreign key reference to 'departments' table
CREATE TABLE employees (
    id BIGINT AUTO_INCREMENT PRIMARY KEY,
    first_name VARCHAR(255),
    last_name VARCHAR(255),
    salary DECIMAL(10, 2),
    department_id BIGINT,
    FOREIGN KEY (department_id) REFERENCES departments(id)
);
Step 5: Create the new Java package named as model in that package create the new Entity Java class named as the Employees.
Go to src > main > java > model > Employees and put the below code.
Java
import jakarta.persistence.*;

/**
 * @Entity annotation represents an Employee entity in the application.
 */
@Entity
@Table(name = "employees")
public class Employee {

    @Id
    @GeneratedValue(strategy = GenerationType.IDENTITY)
    private Long id; // Unique identifier for the employee.

    @Column(name = "first_name")
    private String firstName;

    @Column(name = "last_name")
    private String lastName;

    @Column(name = "salary")
    private double salary;

    @Column(name = "department")
    private String department;

    // Constructors, getters, and setters
    public Employee() {
    }

    public Employee(String firstName, String lastName, double salary, String department) {
        this.firstName = firstName;
        this.lastName = lastName;
        this.salary = salary;
        this.department = department;
    }

    public Long getId() {
        return id;
    }

    public void setId(Long id) {
        this.id = id;
    }

    public String getFirstName() {
        return firstName;
    }

    public void setFirstName(String firstName) {
        this.firstName = firstName;
    }

    public String getLastName() {
        return lastName;
    }

    public void setLastName(String lastName) {
        this.lastName = lastName;
    }

    public double getSalary() {
        return salary;
    }

    public void setSalary(double salary) {
        this.salary = salary;
    }

    public String getDepartment() {
        return department;
    }

    public void setDepartment(String department) {
        this.department = department;
    }
}
Step 6: Create the new Java package named as model in that package create the new Entity Java class named as the Department.
Go to src > main > java > model > Department and put the below code.
Java
package model;

import jakarta.persistence.*;

/**
 * Represents an Department entity in the application.
 */

@Entity
@Table(name = "departments")
public class Department {

    @Id
    @GeneratedValue(strategy = GenerationType.IDENTITY)
    private Long id; // Unique identifier for the address.


    @Column(name = "name") //mapping to name column of department table
    private String name;

    public Department() {  // default constructor of the department

    }

    public Long getId() {
        return id;
    }

    public void setId(Long id) {
        this.id = id;
    }

    public String getName() {
        return name;
    }

    public void setName(String name) {
        this.name = name;
    }

  //parameterized constructor with fields of Id and name

    public Department(Long id, String name) {
        this.id = id;
        this.name = name;
    }
}
Step 7: Create the new Java main class named as the MainApplication.
Go to src > main > java > MainApplication and put the below code.
Java
import jakarta.persistence.EntityManager;
import jakarta.persistence.EntityManagerFactory;
import jakarta.persistence.Persistence;
import jakarta.persistence.criteria.CriteriaBuilder;
import jakarta.persistence.criteria.CriteriaQuery;
import jakarta.persistence.criteria.Join;
import jakarta.persistence.criteria.Root;
import model.Department;
import model.Employees;
import java.util.List;

public class MainApplication
{
    public static void main(String[] args)
    {
        // Create an EntityManagerFactory using persistence unit name
        EntityManagerFactory entityManagerFactory = Persistence.createEntityManagerFactory("JpaGroupByExample");

        // Create an EntityManager
        EntityManager entityManager = entityManagerFactory.createEntityManager();

        // Begin a transaction
        entityManager.getTransaction().begin();

        // Example data initialization
        Department itDepartment = new Department();
        itDepartment.setName("IT Department");
        entityManager.persist(itDepartment);

        Department salesDepartment = new Department();
        salesDepartment.setName("Sales Department");
        entityManager.persist(salesDepartment);

        Employees employee1 = new Employees();
        employee1.setFirstName("Mahesh");
        employee1.setLastName("Kadambala");
        employee1.setSalary(80000);
        employee1.setDepartment(itDepartment);
        entityManager.persist(employee1);

        Employees employee2 = new Employees();
        employee2.setFirstName("Eswar");
        employee2.setLastName("Betha");
        employee2.setSalary(75000);
        employee2.setDepartment(salesDepartment);
        entityManager.persist(employee2);

        // Commit the transaction
        entityManager.getTransaction().commit();

        // Use Criteria API to group employees by department and calculate total salary
        CriteriaBuilder cb = entityManager.getCriteriaBuilder();
        CriteriaQuery<Object[]> query = cb.createQuery(Object[].class);
        Root<Employees> root = query.from(Employees.class);
        Join<Employees, Department> departmentJoin = root.join("department");

        query.multiselect(
                departmentJoin,
                cb.sum(root.get("salary"))
        );
        query.groupBy(departmentJoin);

        // Execute the query and retrieve results
        List<Object[]> results = entityManager.createQuery(query).getResultList();

        // Print grouped results
        for (Object[] result : results) {
            Department department = (Department) result[0];
            Double totalSalary = (Double) result[1];
            System.out.println("Department: " + department.getName() + ", Total Salary: " + totalSalary);
        }

        // Close the EntityManager and EntityManagerFactory
        entityManager.close();
        entityManagerFactory.close();
    }
}
pom.xml:
XML
<?xml version="1.0" encoding="UTF-8"?>
<project xmlns="http://maven.apache.org/POM/4.0.0"
         xmlns:xsi="http://www.w3.org/2001/XMLSchema-instance"
         xsi:schemaLocation="http://maven.apache.org/POM/4.0.0 https://maven.apache.org/xsd/maven-4.0.0.xsd">
    <modelVersion>4.0.0</modelVersion>

    <groupId>org.example</groupId>
    <artifactId>jpa-groupby-demo</artifactId>
    <version>1.0-SNAPSHOT</version>
    <name>jpa-groupby-demo</name>

    <properties>
        <project.build.sourceEncoding>UTF-8</project.build.sourceEncoding>
        <maven.compiler.target>11</maven.compiler.target>
        <maven.compiler.source>11</maven.compiler.source>
        <junit.version>5.9.2</junit.version>
    </properties>

    <dependencies>
        <dependency>
            <groupId>org.hibernate.orm</groupId>
            <artifactId>hibernate-core</artifactId>
            <version>6.0.2.Final</version>
        </dependency>
        <dependency>
            <groupId>org.glassfish.jaxb</groupId>
            <artifactId>jaxb-runtime</artifactId>
            <version>3.0.2</version>
        </dependency>
        <dependency>
            <groupId>org.junit.jupiter</groupId>
            <artifactId>junit-jupiter-api</artifactId>
            <version>${junit.version}</version>
            <scope>test</scope>
        </dependency>
        <dependency>
            <groupId>org.junit.jupiter</groupId>
            <artifactId>junit-jupiter-engine</artifactId>
            <version>${junit.version}</version>
            <scope>test</scope>
        </dependency>
        <dependency>
            <groupId>mysql</groupId>
            <artifactId>mysql-connector-java</artifactId>
            <version>8.0.28</version>
        </dependency>
    </dependencies>

    <build>
        <plugins>
        </plugins>
    </build>
</project>
Step 8: Once the project is completed, run the application. It will show the Employee’s department name and salary by the descending order as output. Refer the below output image for the better understanding of the concept.

Share your thoughts in the comments
Please Login to comment...