JPA – Joined strategy
Last Updated :
05 Apr, 2024
In Java, JPA is defined as JavaServer Pages, and JPA Joined Strategy is one of the inheritance mapping strategies, and it can be used to map the inheritance to the database tables. In the Joined strategy, each entity class in the hierarchy is mapped to its database table. It is a separate table that is created for the shared attributes.
Steps to Implement Joined Strategy:
- Define the entity classes that can represent the inheritance hierarchy.
- We can use annotations such as @Entity, @Inheritance, and @JoinColumn to specify the inheritance mapping strategy and the relationship between the tables.
- We can map shared attributes in the superclass entity and it can map specific attributes in the subclass entities.
- Finally, we can access and manipulate the entities using the EntityManager.
Project Implementation of Joined Strategy of JPA
Step 1: Create the new JPA project using the InteljIdea named jpa-joined-strategy-demo.
Step 2: Open the pom.xml and add the below dependencies to the project.
Dependencies:
 <dependency>
            <groupId>org.hibernate.orm</groupId>
            <artifactId>hibernate-core</artifactId>
            <version>6.0.2.Final</version>
        </dependency>
        <dependency>
            <groupId>org.glassfish.jaxb</groupId>
            <artifactId>jaxb-runtime</artifactId>
            <version>3.0.2</version>
        </dependency>
        <dependency>
            <groupId>org.junit.jupiter</groupId>
            <artifactId>junit-jupiter-api</artifactId>
            <version>${junit.version}</version>
            <scope>test</scope>
        </dependency>
        <dependency>
            <groupId>org.junit.jupiter</groupId>
            <artifactId>junit-jupiter-engine</artifactId>
            <version>${junit.version}</version>
            <scope>test</scope>
        </dependency>
        <dependency>
            <groupId>mysql</groupId>
            <artifactId>mysql-connector-java</artifactId>
            <version>8.0.28</version>
        </dependency>
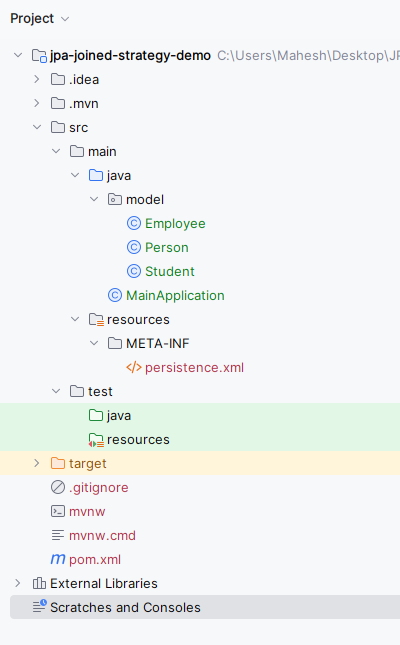
After successful project creation done, the project structure will look like the below image.
Step 3: Open the persistence.xml and paste the below code into the project to configure the project database.
HTML
<?xml version="1.0" encoding="UTF-8" standalone="yes"?>
<persistence xmlns="https://jakarta.ee/xml/ns/persistence"
             xmlns:xsi="http://www.w3.org/2001/XMLSchema-instance"
             xsi:schemaLocation="https://jakarta.ee/xml/ns/persistence https://jakarta.ee/xml/ns/persistence/persistence_3_0.xsd"
             version="3.0">
    <persistence-unit name="jpa-example">
        <class>model.Student</class>
        <class>model.Employee</class>
        <class>model.Person</class>
        <properties>
            <property name="javax.persistence.jdbc.url" value="jdbc:mysql://localhost:3306/example"/>
            <property name="javax.persistence.jdbc.user" value="root"/>
            <property name="javax.persistence.jdbc.password" value=""/>
            <property name="javax.persistence.jdbc.driver" value="com.mysql.jdbc.Driver"/>
            <property name="hibernate.dialect" value="org.hibernate.dialect.MySQL5Dialect"/>
            <property name="hibernate.hbm2ddl.auto" value="update"/>
        </properties>


    </persistence-unit>
</persistence>
Step 4: Create a new Java package named model and create a new Entity Java class named Person inside that package.
Go to src > main > java > model > Person and put the below code.
Java
package model;

import jakarta.persistence.*;

@Entity
@Inheritance(strategy = InheritanceType.JOINED)
public class Person {
    @Id
    @GeneratedValue(strategy = GenerationType.IDENTITY)
    private Long id;

    private String name;

    // Getters and setters
    public Long getId() {
        return id;
    }

    public void setId(Long id) {
        this.id = id;
    }

    public String getName() {
        return name;
    }

    public void setName(String name) {
        this.name = name;
    }
}
Step 5: Inside the model package, create a new Entity Java class named Student.
Go to src > main > java > model > Student and put the below code.
Java
package model;

import jakarta.persistence.Entity;

@Entity
public class Student extends Person {
    private String major;
    //Getters and Setters
    public String getMajor() {
        return major;
    }

    public void setMajor(String major) {
        this.major = major;
    }
}
Step 6: Inside the model package, create the new Entity Java class named as the Employee.
Go to src > main > java > model > Employee and write the below code.
Java
package model;

import jakarta.persistence.Entity;

@Entity
public class Employee extends Person {
    private double salary;
    // Getters and Setters
    public double getSalary() {
        return salary;
    }

    public void setSalary(double salary) {
        this.salary = salary;
    }
}
Step 7: Create the new Java class named as the MainApplication.
Go to src > main > java > MainApplication and write the below code.
Java
import jakarta.persistence.EntityManager;
import jakarta.persistence.EntityManagerFactory;
import jakarta.persistence.EntityTransaction;
import jakarta.persistence.Persistence;
import model.Employee;
import model.Person;
import model.Student;

import java.util.List;

public class MainApplication {
    public static void main(String[] args) {
        EntityManagerFactory entityManagerFactory = Persistence.createEntityManagerFactory("jpa-example");
        EntityManager entityManager = entityManagerFactory.createEntityManager();

        // Persisting entities
        EntityTransaction transaction = entityManager.getTransaction();
        transaction.begin();

        Person person = new Person();
        person.setName("Mahesh Kadambala");

        Employee employee = new Employee();
        employee.setName("Eswar Beta");
        employee.setSalary(50000);

        Student student = new Student();
        student.setName("Jagan");
        student.setMajor("Computer Science");

        entityManager.persist(person);
        entityManager.persist(employee);
        entityManager.persist(student);

        transaction.commit();

        // Retrieving entities
        List<Person> people = entityManager.createQuery("SELECT p FROM Person p", Person.class).getResultList();

        // Printing retrieved entities
        System.out.println("People:");
        for (Person p : people) {
            System.out.println("ID: " + p.getId() + ", Name: " + p.getName());
            if (p instanceof Employee) {
                System.out.println("Employee Salary: " + ((Employee) p).getSalary());
            } else if (p instanceof Student)
            {
                System.out.println("Student Major: " + ((Student) p).getMajor());
            }
        }

        // Close EntityManager and EntityManagerFactory
        entityManager.close();
        entityManagerFactory.close();
    }
}
- This MainApplication utilizes JPA to persist and retrieve entities from a database.
- It creates instances of Person, Employee, and Student classes, persists them using an EntityManager.
- Then retrieves and prints the persisted entities, distinguishing between Employee and Student entities based on their types.
- Finally, it closes the EntityManager and EntityManagerFactory to release resources.
pom.xml:
XML
<?xml version="1.0" encoding="UTF-8"?>
<project xmlns="http://maven.apache.org/POM/4.0.0"
         xmlns:xsi="http://www.w3.org/2001/XMLSchema-instance"
         xsi:schemaLocation="http://maven.apache.org/POM/4.0.0 https://maven.apache.org/xsd/maven-4.0.0.xsd">
    <modelVersion>4.0.0</modelVersion>

    <groupId>org.example</groupId>
    <artifactId>jpa-joined-strategy-demo</artifactId>
    <version>1.0-SNAPSHOT</version>
    <name>jpa-joined-strategy-demo</name>

    <properties>
        <project.build.sourceEncoding>UTF-8</project.build.sourceEncoding>
        <maven.compiler.target>11</maven.compiler.target>
        <maven.compiler.source>11</maven.compiler.source>
        <junit.version>5.9.2</junit.version>
    </properties>

    <dependencies>
        <dependency>
            <groupId>org.hibernate.orm</groupId>
            <artifactId>hibernate-core</artifactId>
            <version>6.0.2.Final</version>
        </dependency>
        <dependency>
            <groupId>org.glassfish.jaxb</groupId>
            <artifactId>jaxb-runtime</artifactId>
            <version>3.0.2</version>
        </dependency>
        <dependency>
            <groupId>org.junit.jupiter</groupId>
            <artifactId>junit-jupiter-api</artifactId>
            <version>${junit.version}</version>
            <scope>test</scope>
        </dependency>
        <dependency>
            <groupId>org.junit.jupiter</groupId>
            <artifactId>junit-jupiter-engine</artifactId>
            <version>${junit.version}</version>
            <scope>test</scope>
        </dependency>
        <dependency>
            <groupId>mysql</groupId>
            <artifactId>mysql-connector-java</artifactId>
            <version>8.0.28</version>
        </dependency>
    </dependencies>

    <build>
        <plugins>
        </plugins>
    </build>
</project>
Step 8: Once the project is completed, run the application.After that it will show the Employee Id, name and salary, Student Id, Name and major as output. Refer the below image for better understanding of the concept.
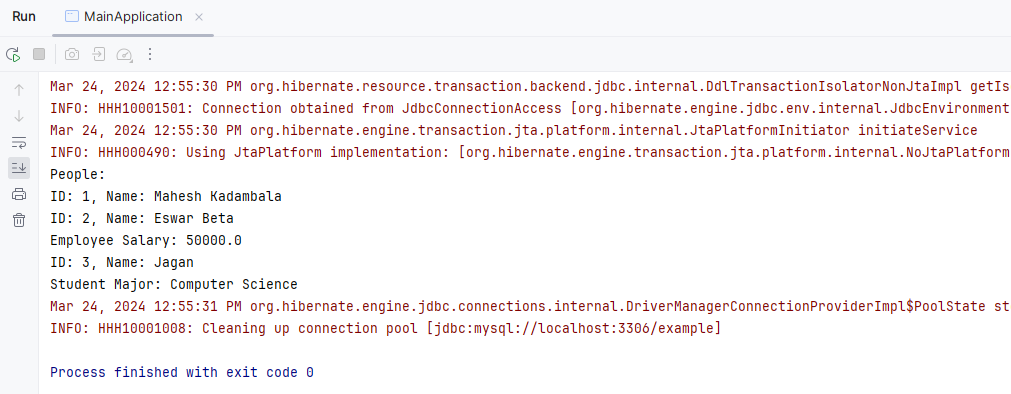
In the above project, we demonstrates the usage of the Joined Strategy in the JPA, where the person is the superclass and the Employee and Student are the subclasses. Entities are persisted into the database and then retrieved and printed as the output.
Share your thoughts in the comments
Please Login to comment...