JPA – Single Table Strategy
Last Updated :
03 Apr, 2024
JPA in Java can be defined as the Java Persistence API. The Single Table Strategy is a property mapping technique that is used to map a class hierarchy to a single database table. This strategy allows all subclasses to store data in a single database table.
Single Table Strategy
In Single Table Strategy, the superclass and all of its subclasses are mapped to the single database table. Discriminator columns are used to differentiate the between types of entities stored in the table.
Steps to Implementation
Step 1: Define the Entity classes.
Define the superclass and its subclasses using @Entity annotation to mark them as JPA entities.
Example:
// Superclass
@Entity
@Inheritance(strategy = InheritanceType.SINGLE_TABLE)
@DiscriminatorColumn(name = "entity_type")
public class Animal {
    @Id
    @GeneratedValue(strategy = GenerationType.IDENTITY)
    private Long id;
    private String name;
    // getters and setters
}

// Subclasses
@Entity
@DiscriminatorValue("dog")
public class Dog extends Animal {
    private String breed;
    // getters and setters
}

@Entity
@DiscriminatorValue("cat")
public class Cat extends Animal {
    private String color;
    // getters and setters
}
Step 2: Configure the Discriminator Column
We can use the @DiscriminatorColumn to the specify the column name that can hold the discriminator values and @DiscriminatorValue can be specify the value for each subclass.
Step 3: Persist Entities
Persist the instance of both superclass and subclasses.
Step 4: Query the Data
We can retrieve the data using the JPQL or the Criteria API.
Project to Implement Single Table Strategy in JPA
We can develop the simple JPA project that can Animal entity, Cat entity and Dog Entity mapped both of the entities that can save the single table strategy into the MYSQL database.
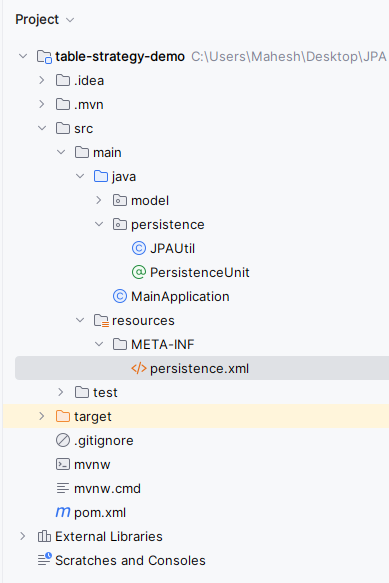
Step 1: Create the new JPA project using the IntelliJ Idea named table-strategy-demo. After creating the project, the file structure looks like the below image.
Step 2: Open the open.xml and add the below dependencies into the project.
        <dependency>
            <groupId>org.hibernate.orm</groupId>
            <artifactId>hibernate-core</artifactId>
            <version>6.0.2.Final</version>
        </dependency>
        <dependency>
            <groupId>org.glassfish.jaxb</groupId>
            <artifactId>jaxb-runtime</artifactId>
            <version>3.0.2</version>
        </dependency>
        <dependency>
            <groupId>org.junit.jupiter</groupId>
            <artifactId>junit-jupiter-api</artifactId>
            <version>${junit.version}</version>
            <scope>test</scope>
        </dependency>
        <dependency>
            <groupId>org.junit.jupiter</groupId>
            <artifactId>junit-jupiter-engine</artifactId>
            <version>${junit.version}</version>
            <scope>test</scope>
        </dependency>
        <dependency>
            <groupId>mysql</groupId>
            <artifactId>mysql-connector-java</artifactId>
            <version>8.0.28</version>
        </dependency>
Step 3: Open the persistence.xml and put the below code into the project and it can configure the database of the project.
XML
<?xml version="1.0" encoding="UTF-8" standalone="yes"?>
<persistence xmlns="https://jakarta.ee/xml/ns/persistence"
             xmlns:xsi="http://www.w3.org/2001/XMLSchema-instance"
             xsi:schemaLocation="https://jakarta.ee/xml/ns/persistence https://jakarta.ee/xml/ns/persistence/persistence_3_0.xsd"
             version="3.0">
    <persistence-unit name="persistence-unit-name">
        <class>model.Animal</class>
        <class>model.Dog</class>
        <class>model.Cat</class>
        <properties>
            <property name="javax.persistence.jdbc.url" value="jdbc:mysql://localhost:3306/example"/>
            <property name="javax.persistence.jdbc.user" value="root"/>
            <property name="javax.persistence.jdbc.password" value=""/>
            <property name="javax.persistence.jdbc.driver" value="com.mysql.jdbc.Driver"/>
            <property name="hibernate.dialect" value="org.hibernate.dialect.MySQL5Dialect"/>
            <property name="hibernate.hbm2ddl.auto" value="update"/>
        </properties>
    </persistence-unit>


</persistence>
Step 4: Create the Java package named as the model in that package create the Java class named as the Animal.
Go to src > main > java > model > Animal and put the below code.
Java
// Animal.java
package model;


import jakarta.persistence.*;

@Entity
@Inheritance(strategy = InheritanceType.SINGLE_TABLE)
@DiscriminatorColumn(name = "entity_type")
public class Animal {
    @Id
    @GeneratedValue(strategy = GenerationType.IDENTITY)
    private Long id;
    private String name;

    // Constructors, getters, and setters
    public Animal() {}

    public Animal(String name) {
        this.name = name;
    }

    public Long getId() {
        return id;
    }

    public void setId(Long id) {
        this.id = id;
    }

    public String getName() {
        return name;
    }

    public void setName(String name) {
        this.name = name;
    }
}
Step 5: Create the Java package named as the model in that package create the Java class named as the Cat.
Go to src > main > java > model > Cat and put the below code.
Java
package model;


import jakarta.persistence.DiscriminatorValue;
import jakarta.persistence.Entity;

@Entity
@DiscriminatorValue("cat")
public class Cat extends Animal {
    private String color;

    // Constructors, getters, and setters
    public Cat() {}

    public Cat(String name, String color) {
        super(name);
        this.color = color;
    }

    public String getColor() {
        return color;
    }

    public void setColor(String color) {
        this.color = color;
    }
}
Step 6: Create the Java package named as the model in that package, create the Java class named Dog.
Go to src > main > java > model > Dog and put the below code.
Java
package model;

import jakarta.persistence.DiscriminatorValue;
import jakarta.persistence.Entity;

@Entity
@DiscriminatorValue("dog")
public class Dog extends Animal {
    private String breed;

    // Constructors, getters, and setters
    public Dog() {}

    public Dog(String name, String breed) {
        super(name);
        this.breed = breed;
    }

    public String getBreed() {
        return breed;
    }

    public void setBreed(String breed) {
        this.breed = breed;
    }
}
Step 7: Create the Java package named as the persistence in that package, create the Java class named JPAUtil .
Go to src > main > java > persistence > JPAUtil and put the below code.
Java
// JPAUtil.java
package persistence;

import jakarta.persistence.EntityManager;
import jakarta.persistence.EntityManagerFactory;
import jakarta.persistence.Persistence;

/**
 * Utility class for managing the EntityManager and EntityManagerFactory.
 */
public class JPAUtil {
    private static final EntityManagerFactory entityManagerFactory;

    static {
        try {
            // Create the EntityManagerFactory using the persistence unit name
            entityManagerFactory = Persistence.createEntityManagerFactory("persistence-unit-name");
        } catch (Throwable ex) {
            // Throw an ExceptionInInitializerError if initialization fails
            throw new ExceptionInInitializerError(ex);
        }
    }

    /**
     * Get an instance of EntityManager from the factory.
     *
     * @return EntityManager instance
     */
    public static EntityManager getEntityManager() {
        return entityManagerFactory.createEntityManager();
    }

    /**
     * Close the EntityManagerFactory.
     */
    public static void close() {
        entityManagerFactory.close();
    }
}
Step 8: Create the Java package named as the persistence in that package, create the Java class named PersistenceUnit.
Go to src > main > java > persistence > PersistenceUnit and put the below code.
Java
package persistence;

import java.lang.annotation.*;

/**
 * Annotation used to mark persistence units.
 */
@Target(ElementType.TYPE)
@Retention(RetentionPolicy.RUNTIME)
public @interface PersistenceUnit {
    String name() default ""; // Default name for the persistence unit
}
Step 9: Create the Java class named as the MainApplication.
Go to src > main > java > MainApplication and put the below code.
Java
import jakarta.persistence.EntityManager;
import model.Animal;
import model.Dog;
import model.Cat;
import persistence.JPAUtil;

public class MainApplication {
    public static void main(String[] args) {
        // Obtain EntityManager instance
        EntityManager entityManager = JPAUtil.getEntityManager();

        // Persist entities
        entityManager.getTransaction().begin();
        Animal dog = new Dog("Buddy", "Labrador");
        entityManager.persist(dog);

        Animal cat = new Cat("Whiskers", "White");
        entityManager.persist(cat);
        entityManager.getTransaction().commit();

        // Query data
        entityManager.getTransaction().begin();
        System.out.println("All animals:");
        entityManager.createQuery("SELECT a FROM Animal a", Animal.class)
                .getResultList()
                .forEach(animal -> {
                    // Print information based on the type of animal
                    if (animal instanceof Dog) {
                        System.out.println("Dog: " + animal.getName() + ", Breed: " + ((Dog) animal).getBreed());
                    } else if (animal instanceof Cat) {
                        System.out.println("Cat: " + animal.getName() + ", Color: " + ((Cat) animal).getColor());
                    }
                });
        entityManager.getTransaction().commit();

        // Close EntityManager and EntityManagerFactory
        entityManager.close();
        JPAUtil.close();
    }
}
pom.xml:
Below is the XML file after adding all dependencies at the time of project creation.
XML
<?xml version="1.0" encoding="UTF-8"?>
<project xmlns="http://maven.apache.org/POM/4.0.0"
         xmlns:xsi="http://www.w3.org/2001/XMLSchema-instance"
         xsi:schemaLocation="http://maven.apache.org/POM/4.0.0 https://maven.apache.org/xsd/maven-4.0.0.xsd">
    <modelVersion>4.0.0</modelVersion>

    <groupId>org.example</groupId>
    <artifactId>table-strategy-demo</artifactId>
    <version>1.0-SNAPSHOT</version>
    <name>table-strategy-demo</name>

    <properties>
        <project.build.sourceEncoding>UTF-8</project.build.sourceEncoding>
        <maven.compiler.target>11</maven.compiler.target>
        <maven.compiler.source>11</maven.compiler.source>
        <junit.version>5.9.2</junit.version>
    </properties>

    <dependencies>
        <dependency>
            <groupId>org.hibernate.orm</groupId>
            <artifactId>hibernate-core</artifactId>
            <version>6.0.2.Final</version>
        </dependency>
        <dependency>
            <groupId>org.glassfish.jaxb</groupId>
            <artifactId>jaxb-runtime</artifactId>
            <version>3.0.2</version>
        </dependency>
        <dependency>
            <groupId>org.junit.jupiter</groupId>
            <artifactId>junit-jupiter-api</artifactId>
            <version>${junit.version}</version>
            <scope>test</scope>
        </dependency>
        <dependency>
            <groupId>org.junit.jupiter</groupId>
            <artifactId>junit-jupiter-engine</artifactId>
            <version>${junit.version}</version>
            <scope>test</scope>
        </dependency>
        <dependency>
            <groupId>mysql</groupId>
            <artifactId>mysql-connector-java</artifactId>
            <version>8.0.28</version>
        </dependency>

    </dependencies>

    <build>
        <plugins>
        </plugins>
    </build>
</project>
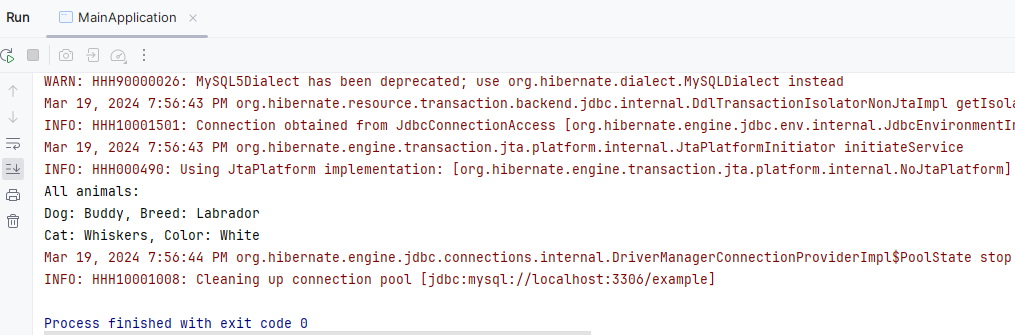
Step 10: Once the project is completed, run the application, it will show all the animals and list of dogs and cats as output. Refer the below output image for the better understanding of the concept.
The Single Table Strategy in the JPA can provide the simple and efficient way to map class hierarchies to the database tables. Understanding these strategies and their implications is the crucial for designing efficient and maintainable JPA applications.
Share your thoughts in the comments
Please Login to comment...