How to upload folders to Google Colab?
Last Updated :
19 Oct, 2023
Google Colab is a service provided by Google for a lot of researchers and developers around the globe. It is a Jupyter Notebook-like environment in one single place without any prerequisites. It is free to use with a limited number of computer resources and engines including free access to GPUs i.e. Graphics Processing Units for accelerated parallel processing of code. It also comes with a premium version with more readily available resources computational resources. It is one of the best platforms for all students interested in the field of computer science especially machine learning, data science, artificial intelligence, etc. Colab provides a free workspace in the form of Python3 or R notebooks. These notebooks can be used to implement various compute-heavy tasks in a very easy manner.
In this article, we will learn to upload folders in our Google Colab notebook. You can also refer to the video solution for this end which is attached at the end of this article.
Prerequisite for the task – A Google Account. Refer to this article which explains how to create a Gmail account, which is equivalent to creating a Google Account.
Let’s start with uploading folders in Google Colab. There are 3 ways in which this task can be achieved:
Upload a zip file of a folder directly on the Colab notebook
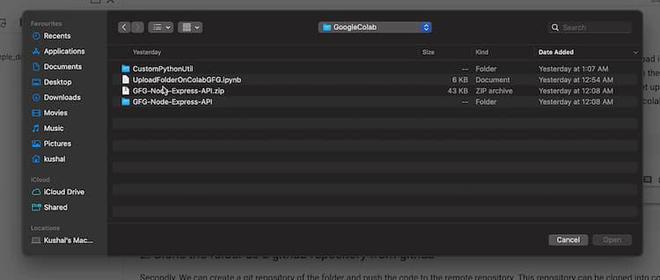
The most simple way to upload a folder onto Google Colab is to create a .zip file of the folder on our local machines and then upload it as a file on Colab. We can create a zip file of the folder and upload it as a file onto Colab using UI.
Step 1: To upload this file, click on the “Files” icon on the left-hand side menu bar, and click on the “Upload to session storage” icon. It will open up a local system dialogue box. Choose the .zip file and it will get uploaded onto colab session.
Step 2: Use the following command to unzip the file and hence, we get all the required files onto the colab session storage. Now, all the files from the folders can be easily accessed from colab notebook.
!unzip <zip-file-name>.zip
%ls
Clone the folder as a github repository from github
Secondly, we can create a git repository of the folder and push the code to the remote repository.
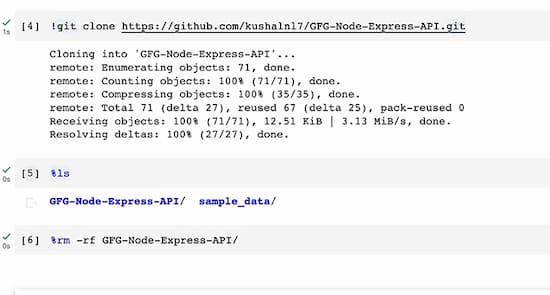
Step 1: The repository can be cloned into colab using the following command to get all the files uploaded onto the colab notebook.
!git clone <repository-link>
%ls
This way we need not directly upload our files on colab notebook, rather we keep all our files on a remote repository and then fetch it into our notebook.
Upload files on Google drive and Mount it on colab
This is one of the most common ways to get the required files into our colab session storage. This way, we need not upload our files everytime onto the colab, rather we would just upload it only once on google drive and then mount the drive storage into our colab notebook any number of times using the following lines of code. In order to mount our drive, we need to give permission to google colab to access the drive storage.
Step 1: Use the following piece of code in order to connect to your google drive using colab notebook.
from google.colab import drive
drive.mount('/content/drive')
%cd path/to/your/folder
%ls
.jpg)
The “%Is” command will be used to unzip the folder once the drive has been mounted successfully. The contents of the folder will be unzipped and available for additional usage or manipulation once this command starts the extraction process.
-660.jpg)
By following the above steps, we can easily upload folders to the colab notebook.
Refer the following video, to get a more detailed idea about the process which showcase all the steps mentioned above.
Share your thoughts in the comments
Please Login to comment...