How to enable custom robots.txt file in Blogger ?
Last Updated :
08 Dec, 2021
robots.txt is a sample txt file where we place a small piece of code to tell search engine crawlers to crawl and index your website pages on search engines. Adding robots.txt will help a website to handle which pages should crawl & index and also to tell which pages should not.
Follow the steps to enable custom robots.txt in Blogger.
Step 1: Log in to your blogger account with your Gmail account.
Step 2: From the left menu click on “Setting”

Now, navigate to Crawlers and indexing section.

Step 3: Enable the Custom robots.txt
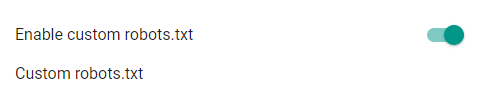
After enabling the toggle button >> Click on “Custom robots.txt”
Add this simple piece of code to “Custom robots.txt” and Click “Save”
User-agent: *
Allow: /
Sitemap: http://<subdomain_name>.<domain_name>.<tld>/sitemap.xml
Example:
User-agent: *
Allow: /
Sitemap: http://www.example.com/sitemap.xml
For Syntax and for adding more advanced features, Refer to the following link:
https://developers.google.com/search/docs/advanced/robots/create-robots-txt

Step 4: Enable custom robots header tags

Step 5: After enabling the toggle button of custom robots header tags >> Click on “Home Page tags” >> Enable “all” and “noodp” toggles and Click on “Save”

Step 6: Then, Click on “Archive and search page tags” >> Enable “noindex” and “noodp” toggles and Click on “Save”.

Then, Click on “Post and page tags” >> Enable “all” and “noodp” toggles and Click on “Save”:

References:
Share your thoughts in the comments
Please Login to comment...