How to configure ChromeDriver to initiate Chrome browser in Headless mode through Selenium?
Last Updated :
12 Dec, 2023
Selenium is one of the most widely used browser automation tools for confirming website functionality, examining website flow, confirming page titles, and fetching huge amounts of data through web scraping. An actual browser without a user interface is the same as a headless browser. Because Selenium renders pages slowly and takes up screen time, QAs frequently run into issues while automating a real browser. You may skip the entire CSS loading time since Selenium, the headless browser, loads content quicker than standard browsers. More importantly, it saves time when executing several intricate test cases with several phases. This article focuses on discussing steps to configure ChromeDriver to initiate the Chrome browser in headless mode through Selenium.
What are Headless Browsers?
Headless Browsers are web browsers, similar to actual browsers, but the only difference between them is that the headless browsers are without a head or GUI (Graphical User Interface), i.e., you cannot see anything or do not get any output on the browser’s screen instead everything is running at the backend.
- That’s why, when Selenium test cases are executed on any of the headless browsers, one won’t observe any output coming on the screen, as everything is happening at the backend.
- Headless Browsers are software programs that access web pages but do not show them to the users.
Why should we use Headless Browsers?
One can use headless browsers in multiple ways. Those are:
- One of the common uses of headless browsers is when you want to run your test cases on a headless system like Linux OS which does not have a UI. As such, you need to use a headless browser.
- It is also used in situations where you want to stimulate multiple browsers’ behavior on a single machine.
- It is also used when you want to use minimal resources (because there is no UI). You do not want to see the UI, but you want to run your tests which should perform all the testing. So, in such cases, headless browsers can be used.
- Also, if you have a need that you want to run your selenium tests, not for actual testing of the application, but just for some data collection or for some bulk data collection, in that case too you can use headless browsers.
When should we not use Headless Browsers?
Headless Browsers should not/cannot be used:
- If you need to visually observe your test on the browser.
- Since everything is going on at the backend, it will not give you exact feedback on what your customers will experience on your website (such as page loading speeds, etc.)
- Headless Browsers sometimes may also throw errors and can cause issues that are not observed on real browsers.
Some of the common examples of headless browsers are HTMLcases Unit Browser, PhantomJS, SlimerJS, Zombie.js, and trifleJS.
NOTE:
Even if you are using headless machine-like Linux, it is not mandatory to use headless browsers. You can actually run your tests on your real browser in a headless mode, on Linux or any other similar operating systems. For this, you should read about ‘Xvfb’, i.e., X virtual frame buffer. It is a display server that performs all graphical operations in memory without showing anything on the screen. Therefore, it does not require the system to have a screen or GUI. That means, you can actually run your test cases on your real browsers like Chrome or Mozilla Firefox in a headless mode.
What is Headless Chrome?
A headless chrome is a non-GUI version of Chrome Browser. A headless chrome is available since Chrome version 59 and, one can use it in Windows, Linux and MacOS (on Windows, it should be available since Chrome version 60+).
- Headless Chrome refers to a command-line interface to the Google Chrome web browser that can be used for various purposes, including web automation, web scraping, and testing.
- What makes it “headless” is that it runs without a graphical user interface (GUI), which means it operates in the background without displaying a browser window.
- This is in contrast to the standard Chrome browser, which has a graphical user interface and is used for manual web browsing.
- Headless Chrome provides all the functionality of a standard web browser, allowing you to interact with web pages, render and manipulate HTML and CSS, execute JavaScript, and more.
- It is often used by developers, testers, and automation engineers to perform tasks like web scrapping, automated testing, server-side rendering, and website performance analysis.
What is ChromeDriver?
ChromeDriver is a separate executable that acts as a bridge between your Selenium test scripts and the Google Chrome browser.
- It allows Selenium WebDriver to interact with the Chrome browser, controlling its actions, and automating web testing or web scraping tasks.
- ChromeDriver enables you to automate and control the behaviour of the Google Chrome browser through your Selenium test scripts, making it an essential component for web automation and testing using Selenium.
- Different versions of ChromeDriver are available, and you should ensure that you have a compatible version installed for your specific Chrome browser version to avoid compatibility issues.
How ChromeDriver Works?
- Your Selenium test script, written in a programming language like Python, Java, or C#, communicates with ChromeDriver using WebDriver API commands.
- ChromeDriver translates these API commands into actions that the Google Chrome browser understands. It sends these actions to the browser for execution.
- The Chrome browser performs the requested actions, such as opening a web page, clicking buttons, filling out forms, and more.
- The results of these actions are communicated back to your Selenium script through ChromeDriver.
What is ChromeOptions?
‘ChromeOptions’ is a class in Selenium that allows you to customize and configure the behaviour of the Google Chrome browser when using Selenium WebDriver. It enables you to set various Chrome-specific options and preferences that affect how the browser operates during automated testing or web scraping. You can use ChromeOptions to modify browser settings, enable features, and tailor the browser’s behaviour to your specific testing or automation needs.
Here are some common tasks and use cases for ChromeOptions:
- Headless Mode: You can use ChromeOptions to configure the Chrome browser to run in headless mode, which means it runs without a graphical user interface. This is useful for running tests or web scraping in the background without displaying a visible browser window.
- Setting the Browser Window Size: You can specify the initial window size for Chrome using the ‘–window-size’ option. This is helpful for ensuring consistent test results across different screen resolutions.
- Custom User Agent: You can set a custom user agent string for your browser using the ‘–user-agent’ option. This is useful for testing how a website behaves with different user agents.
- Handling Downloads: You can set options for managing downloads, including specifying the download directory, allowing or disallowing file downloads, and more.
- Browser Preferences: You can configure various Chrome preferences, such as enabling or disabling JavaScript, pop-up blocking, or allowing or blocking certain types of notifications.
- Handling SSL Certificates: You can control how the browser handles SSL certificate errors using options like ‘–ignore-certificate-errors’.
- Adding Extensions: You can load and use Chrome extensions in your automated tests by specifying the extension file using the ‘–load-extension’ option.
How to Configure ChromeDriver to Initiate Chrome Browser in Headless Mode through Selenium?
Step 1: Install selenium
First, make sure you have the Selenium WebDriver for Python (selenium) library installed. You can install it using ‘pip’.
pip install selenium
Step 2: Import the necessary modules.
Then, import the required libraries necessary for the Python script.
from selenium import webdriver
Step 3: Create a chromeoptions instance and set the headless mode option
In this step, create an instance for ChromOptions in Python script to set the headless mode option.
options = webdriver.ChromeOptions()
options.add_argument(‘–headless’)
Step 4: Create a ChromeDriver instance with the specified options.
Also, create an instance for the ChromeDriver options.
driver = webdriver.Chrome(options=options)
Step 5: Use the ‘Driver’ for your automation tasks
You can use the ‘driver’ instance to navigate to websites, interact with web elements, and perform your automation tasks.
Step 6: Close the Driver
Finally, close the driver.
driver.quit()
Python:
Python
from selenium import webdriver
options = webdriver.ChromeOptions()
options.add_argument('--headless')
driver = webdriver.Chrome(options=options)
print(driver.title)
driver.quit()
|
Output:
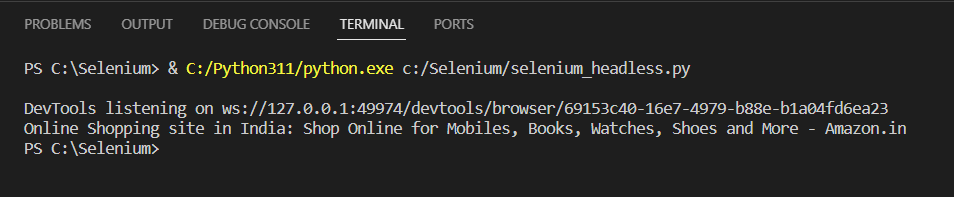
Explanation:
- As shown in the above example, an instance for headless Chrome Browser is created, navigate to “https://www.amazon.in/”, and perform automation tasks.
- On executing, the code should run in headless mode and as a result it will show the title of the Amazon website, as shown above (without being opened in another browser).
Share your thoughts in the comments
Please Login to comment...