Docker Swift Application
Last Updated :
16 Jul, 2023
Swift is a cutting-edge, potent programming language created by Apple. For developers, it is effective and pleasant since it delivers safety, speed, and expressiveness. Common programming errors are reduced by Swift’s capabilities, which include type inference, optional types, and automatic memory management. It is mostly used to create apps for all of Apple’s operating systems, including iOS, macOS, watchOS, and tvOS.
Docker is an open-source platform that enables developers to automate the deployment and management of applications using containerization. It provides a lightweight and isolated environment called a container, which encapsulates an application and its dependencies. With Docker, applications can be quickly packaged, shipped, and run consistently across different domains. It promotes scalability, portability, and efficiency by allowing developers to build, test, and deploy applications seamlessly. Docker has become a popular tool in the software development industry, revolutionizing the way applications are developed and deployed.
Swift With Docker
The containerization of Swift programs using Docker technology is referred to as Swift in Docker. Developers can package Swift apps and their dependencies into portable, separated containers using Docker. Swift programmers may construct uniform and repeatable environments for development and deployment by using Docker. Swift apps can be launched on a variety of platforms thanks to Docker’s lightweight and effective runtime environment. Offering a standardized and self-contained environment makes the process of creating, sharing, and deploying Swift apps simpler. Developers may simply deploy Swift applications across many platforms by using Swift in Docker to improve their development operations.
Installing Docker On Windows
Here are the general steps to install Docker on various Windows:
Windows/macOS:
- Visit the Docker website and download the Docker Desktop installer for Windows.
- Run the installer and follow the on-screen instructions.
- Docker Desktop will automatically install and configure Docker on your Windows machine.
- Once the installation is complete, Docker should be running, and you can access it from the system tray.
Installing Docker On Linux
- Docker documentation has different installation steps for various Linux distributions.
- Update your system’s package manager by running the appropriate command for your distribution (e.g., `sudo apt update` for Ubuntu).
- Install Docker’s dependencies by running the necessary command (e.g., `sudo apt install -y docker.io` for Ubuntu).
- Add your user to the Docker group to run Docker without using `sudo` (e.g., `sudo usermod -aG docker your_username`).
- Start the Docker service (e.g., `sudo systemctl start docker`).
- Verify that Docker is installed correctly by running `docker version` in the terminal.
Docker Swift Application Example
Step 1: Pull the swift image from the docker hub by using the following command. know more about docker file syntax.
docker pull swift
Step 3:Check whether the image is pulled successfully without any errors by using the following command.
docker images
Dockerfile for Swift
Instead of pulling the images from the DockerHub, you can build your own image by using the following dockerfile.
# ================================
# Build image
# ================================
FROM swift:5.8-jammy as build

# Install OS updates and, if needed, sqlite3
RUN export DEBIAN_FRONTEND=noninteractive DEBCONF_NONINTERACTIVE_SEEN=true \
&& apt-get -q update \
&& apt-get -q dist-upgrade -y\
&& rm -rf /var/lib/apt/lists/*

# Set up a build area
WORKDIR /build

# First just resolve dependencies.
# This creates a cached layer that can be reused
# as long as your Package. swift/Package.resolved
# files do not change.
COPY ./Package.* ./
RUN swift package resolve

# Copy the entire repo into the container
COPY . .

# Build everything, with optimizations
RUN swift build -c release --static-swift-stdlib

# Switch to the staging area
WORKDIR /staging

# Copy the main executable to the staging area
RUN cp "$(swift build --package-path /build -c release --show-bin-path)/App" ./

# Copy resources bundled by SPM to the staging area
RUN find -L "$(swift build --package-path /build -c release --show-bin-path)/" -regex '.*\.resources$' -exec cp -Ra {} ./ \;

# Copy any resources from the public directory and views directory if the directories exist
# Ensure that by default, neither the directory nor any of its contents are writable.
RUN [ -d /build/Public ] && { mv /build/Public ./Public && chmod -R a-w ./Public; } || true
RUN [ -d /build/Resources ] && { mv /build/Resources ./Resources && chmod -R a-w ./Resources; } || true

# ================================
# Run image
# ================================
FROM ubuntu:jammy

# Make sure all system packages are up to date, and install only essential packages.
RUN export DEBIAN_FRONTEND=noninteractive DEBCONF_NONINTERACTIVE_SEEN=true \
&& apt-get -q update \
&& apt-get -q dist-upgrade -y \
&& apt-get -q install -y \
ca-certificates \
tzdata \
# If your app or its dependencies import FoundationNetworking, also install `libcurl4`.
# libcurl4 \
# If your app or its dependencies import FoundationXML, also install `libxml2`.
# libxml2 \
&& rm -r /var/lib/apt/lists/*

# Create a vapor user and group with /app as its home directory
RUN useradd --user-group --create-home --system --skel /dev/null --home-dir /app vapor

# Switch to the new home directory
WORKDIR /app

# Copy built executable and any staged resources from builder
COPY --from=build --chown=vapor:vapor /staging /app

# Ensure all further commands run as the vapor user
USER vapor:vapor

# Let Docker bind to port 8080
EXPOSE 8080

# Start the Vapor service when the image is run, default to listening on 8080 in production environment
ENTRYPOINT ["./App"]
CMD ["serve", "--env", "production", "--hostname", "0.0.0.0", "--port", "8080"]
Step 4:Containerize the swift image which we pulled from the DockerHub by using the following command.
docker run --name *container_name* -it -d swift

Run command for swift image
Step 5: Check the status of the container by using the following command.
docker ps
Get Into a Docker Container’s Shell?
Step 1: Get into the docker container shell by using the below command.
docker exec -it <container ID>

Another method
Step 2: Now let’s run the swift bash using the following commands:
docker start *container_name*
docker attach *container_name*
(Or)
You can also use:
docker start *container_name*
docker exec -it <CONTAINER ID> /bin/bash
Dockerizing Swift Using Vapor
Setting up Server-Side-Swift using Vapor, follow the steps:
Step 1: Clone the toolbox repository from GitHub git clone https://github.com/vapor/toolbox.git.
cd toolbox
Step 2: After cloning and moving into the toolbox folder.
make install
Step 3: Check the version.
vapor --version
vapor --help
Step 4: Setting up the project using Vapor.
vapor new *project-name*
Step 5: Switch to the project-name directory and find the folder structure in the below image.
cd *project-name*
Step 6: Analyze the code.
Step 7: Dockerfile for the swift application with vapor.as mentioned above. The complete Dockerfile of the project Hello World is listed above.
Step 8: Build the image of the project.
docker build -t *image-name* *location-of-dockerfile*
Step 9: Check for the Docker Image with the given *image-name* using the command
docker images
Step 10: Run the Docker Image which is built using the above steps
docker run --name *container-name* -p port:port *image-name*
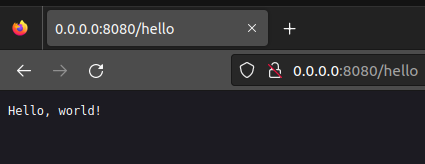
Step 11: Check the port and the associated routes in the application
Share your thoughts in the comments
Please Login to comment...