How to Dockerize a ReactJS App ?
Last Updated :
22 Nov, 2023
Docker is an open-source containerization platform used for building, running, and managing applications in an isolated environment. A container is isolated from another and bundles its software, libraries, and configuration files. Containers share resources with other containers running on the same host OS and provide OS-level isolation that is far more efficient than virtualization. This enables us to manage our infrastructure in the same way as we do our applications. React is a Javascript library created and maintained by Meta Inc. for building user interfaces or UI components. It is free, open-source and one of the most popular Javascript in the world.
This article will discuss how to dockerize a react app for the development and deployment phases.
Prerequisites: Before continuing any further, please ensure that node and docker are installed on your machine. If required visit Node Installation Guide or Docker Installation Guide.
Steps to Dockerize a ReactJS App
Step 1: Create a React application using the following command.
npx create-react-app project_name
Step 2: Move to the project_name folder.
cd project_name
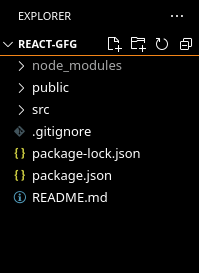
Project Structure: At this point, the project structure should look like this.
Dockerfile for development: At the root of our react project create a Dockerfile for the development phase. Let’s name it Dockerfile.dev.
$ touch Dockerfile.dev
Paste the following commands into the newly created file:
# Fetching the latest node image on alpine linux
FROM node:alpine AS development

# Declaring env
ENV NODE_ENV development

# Setting up the work directory
WORKDIR /react-app

# Installing dependencies
COPY ./package*.json /react-app

RUN npm install

# Copying all the files in our project
COPY . .

# Starting our application
CMD ["npm","start]
Create a .dockerignore file to exclude unnecessary files thus speeding up the build process.
node_modules
npm-debug.log
build
.git
*.md
.gitignore
Now, create a docker image by using the docker build command
$ docker build -f Dockerfile.dev -t <name:tag> .
Here,
- -f: Path to the docker file
- -t: Name and tag for the image
- . : Context for the build process
This process will take some time and in the end, you will receive the id and tag of the newly created image.
Finally, create a docker container by running
$ docker run -d -it –rm -p [host_port]:[container_port] –name [container_name] [image_id/image_tag]
Here,
- -d: Run container in background and print container ID
- -it: Create an interactive container
- -p: Map host port to container port
- –name: Assign a name to the container
- –rm: Automatically remove the container when it exits.
Verify whether the container has been created successfully by running
$ docker container ps
Run the application and navigate to http://localhost:3001/ in your browser to view the dockerized react app:
Dockerfile for production: Now, by looking into docker images you will find that our simple react application is taking up more than 500 MB of space. This is not suitable for deployment. So, we will now serve the react build files via a web server for better performance and load balancing.
We will use Nginx to serve our static files. So, firstly create an Nginx conf file in the root of our react application.
$ touch nginx.conf
Paste the following content into the conf file.
server {
 listen 80;

 location / {
   root /usr/share/nginx/html/;
   include /etc/nginx/mime.types;
   try_files $uri $uri/ /index.html;
 }
}
Here, we are telling our server to serve the index file from the root directory when a request is received on port 80.
Create a new Dockerfile for production mode.
$ touch Dockerfile
Paste the following commands:
# Fetching the latest node image on apline linux
FROM node:alpine AS builder

# Declaring env
ENV NODE_ENV production

# Setting up the work directory
WORKDIR /app

# Installing dependencies
COPY ./package.json ./
RUN npm install

# Copying all the files in our project
COPY . .

# Building our application
RUN npm run build

# Fetching the latest nginx image
FROM nginx

# Copying built assets from builder
COPY --from=builder /app/build /usr/share/nginx/html

# Copying our nginx.conf
COPY nginx.conf /etc/nginx/conf.d/default.conf
Now, repeat the same steps to build an image from our new Dockerfile and create a container out of it.
$ docker build -t [name:tag] .
$ docker run -d -it –rm -p [host_port]:[container_port] –name [container_name] [image_id/image_tag]
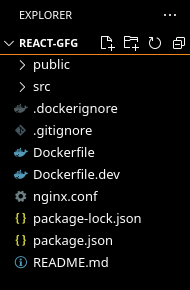
Project Structure: You should have the following structure at the end.
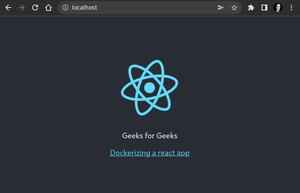
Run the application and navigate to “http://localhost/” to verify the build process:
Now, we can observe that the size of our application has been reduced to less than 150MB
$ docker images

Note: If you are experiencing any difficulties/errors in following the above steps, please have a look at the Dockerfile used in the above tutorial.
Share your thoughts in the comments
Please Login to comment...