Automatic Speech Recognition (ASR) can be simplified as artificial intelligence transforming spoken language into text. Its historical journey dates back to a time when developing ASR posed significant challenges. Addressing diverse factors such as variations in voices, accents, background noise, and speech patterns proved to be formidable obstacles.
How Seq2Seq models do Speech Recognition?
Seq2Seq model consist of two main components encoder and decoder connected through a cross attention mechanism. Here we will discuss how the encoder and decoder with attention mechanism can help us achieve an ASR:
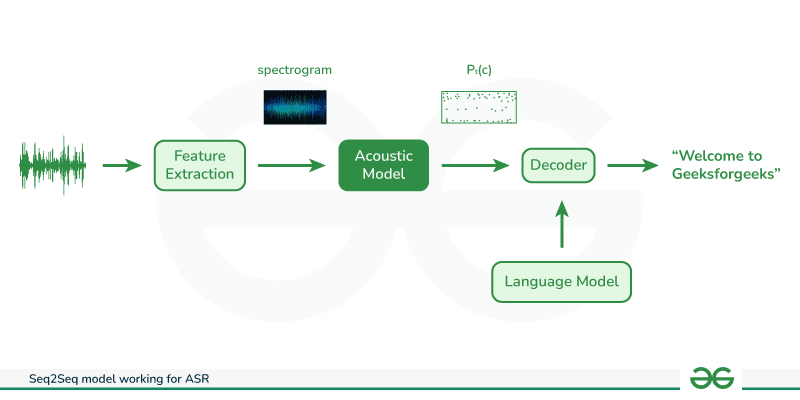
- Encoder Processing and Feature Extraction: The encoder processes raw audio data as its input. As this data is not initially in a machine-understandable format, the encoder transforms it using common techniques like spectrogram representations, Mel-frequency cepstral coefficients (MFCCs), or other time-frequency transformations. Subsequently, it extracts crucial features, such as pitch, intensity, and spectral content, collectively known as the acoustic characteristics of sound. These features play a vital role in comprehending spoken language.
- Sequence-to-Sequence Architecture: The sequence-to-sequence architecture capture the sequential order of words in a sentence. This step ensures that the model understands the significance of word order in language.
- Attention Mechanism: The encoded or extracted features are then fed into an attention mechanism within the model. This attention mechanism focuses on significant parts of the spoken words, aiding in the identification of the words being spoken.
- Data Flow to the Decoder: The processed data is passed to the decoder, responsible for translating the machine-formatted data into human-readable text.
- Language Model Integration: During the decoding process, a language model is utilized. This model contains a vast corpus of data aids in determining the correct placement of words in the transcribed text, ensuring the coherence and accuracy of the final output by calculating word probabilities in text.
- Translation to Human-Readable Text: The decoder, armed with the language model’s knowledge, executes the final translation. It converts the data processed by the machine, enhanced with acoustic features and guided by attention mechanisms, into a meaningful and understandable textual representation for humans.
Popular Pretrained Models for ASR
Pretrained models are typically trained on diverse datasets, making their performance less optimized for specific domain tasks. In such cases, adapting the model to the complications of the target domain through fine-tuning becomes crucial for achieving task-specific proficiency.
|
Model
|
Description
|
|
Whisper
|
Whisper ASR is an automatic speech recognition system developed by OpenAI. It utilizes a Seq2Seq model with a combination of convolutional and recurrent neural network layers.
|
|
Listen, Attend, and Spell (LAS)
|
LAS is a Seq2Seq model with an attention mechanism designed for automatic speech recognition. It has been used successfully in various ASR applications.
|
|
Conformer
|
Conformer is an attention-based sequence-to-sequence model that combines convolutional and transformer layers. It has shown strong performance in various ASR tasks.
|
|
DeepSpeech
|
DeepSpeech, developed by Baidu Research, is an end-to-end automatic speech recognition system based on deep learning. It uses a Seq2Seq model with a Connectionist Temporal Classification (CTC) loss.
|
Fine-tuning Pretrained ASR
Pretrained models may struggle with background noise, especially if the original training data did not adequately represent the noise patterns encountered in the target application. Fine-tuning allows the model to adapt to specific noise characteristics, ensuring better accuracy in real-world scenarios. Furthermore, bias in the original training data of pretrained models can also pose challenges. Fine-tuning becomes a corrective step, helping to remove biases and ensure the model performs well across diverse demographics and characteristics specific to the target dataset.
In this section, we’ll cover a step-by-step guide on fine-tuning Whisper for speech recognition on a Librispeech dataset.
1. Prepare Environment
We need to change the runtime type to GPU and install these dependencies.
!pip install torch torchaudio datasets transformers transformers[torch] evaluate jiwer
While training or fine-tuning a machine learning model its a good practice to have model checkpoints so when unexpected errors occures during fine-tuning or traing the model instead of again starting from sratch we can continue from the previous checkpoint we do this by directly uploading model checkpoints on Huggin Face Hub while training.
2. Load Dataset
LibriSpeech is a corpus of approximately 1000 hours of 16kHz read English speech, we will be using a subset of it for fine-tuning, our approach will involve utilizing Whisper’s extensive multilingual Automatic Speech Recognition (ASR) knowledge acquired during the pre-training phase.
Python3
from datasets import load_dataset, DatasetDict, concatenate_datasets
train = load_dataset("Raziullah/librispeech_small_asr_fine-tune", split="train")
test = load_dataset("Raziullah/librispeech_small_asr_fine-tune", split="test")
librispeech = DatasetDict({"train": train, "test": test})
print(librispeech)
|
Output:
DatasetDict({
    train: Dataset({
        features: ['file', 'audio', 'text', 'speaker_id', 'chapter_id', 'id'],
        num_rows: 5567
    })
    test: Dataset({
        features: ['file', 'audio', 'text', 'speaker_id', 'chapter_id', 'id'],
        num_rows: 2620
    })
})
For ASR fine-tuning, focus on input audio and transcribed text, ignoring additional metadata like speaker_id and chapter_id found in Our datasets.
Python3
selected_data = librispeech.select_columns(["audio", "text"])
print(selected_data)
|
Stages of ASR pipeline:
- The feature extractor, responsible for preprocessing raw audio inputs into spectrograms.
- The model, which carries out the sequence-to-sequence mapping.
- The tokenizer, tasked with post-processing the predicted tokens into text.
We have used the “WhisperProcessor” class from the transformers library. The “WhisperProcessor” is used for preprocessing inputs before feeding them into the model.
Python3
from transformers import WhisperProcessor
whisper_processor = WhisperProcessor.from_pretrained(
"openai/whisper-small", task="transcribe"
)
|
3. Pre-Process the Data:
If we see the dataset features:
Python3
train_dataset_features = librispeech["train"].features
print(train_dataset_features)
|
Output:
{'file': Value(dtype='string', id=None), 'audio': Audio(sampling_rate=16000, mono=True, decode=True, id=None), 'text': Value(dtype='string', id=None), 'speaker_id': Value(dtype='int64', id=None), 'chapter_id': Value(dtype='int64', id=None), 'id': Value(dtype='string', id=None)}
The input audio is initially sampled at 16 kilohertz, so it’s not necessary to any modifications before feeding it into the Whisper feature extractor. This adjustment is required because the whisper model expects an input sampling rate of 16 kilohertz.
The python function ‘prepare_datset’ takes a ‘sample’ as input and extracts the audio data from the input sample. It utilizes the ‘whisper_processor’ to process the audio data.
The function calculates the input length of the audio sample in seconds and divides the length of the audio array by sampling rate to obtain the duration in seconds. The function returns the processed audio data and input length.
Python3
def prepare_dataset(sample):
audio_data = sample["audio"]
processed_example = whisper_processor(
audio=audio_data["array"],
sampling_rate=audio_data["sampling_rate"],
text=sample["text"],
)
processed_example["input_length"] = len(audio_data["array"]) / audio_data["sampling_rate"]
return processed_example
|
The librispeech.map() function is used to process the dataset by transforming the above function. This removes unnecessary columns specified to the training set and process the dataset sequentially.
Python3
librispeech = librispeech.map(
prepare_dataset, remove_columns=librispeech.column_names["train"], num_proc=1
)
|
The ‘is_audio_in_length_range’ function could be useful for filtering or processing audio clips based on their duration, such as ensuring that all clips fed into a model are within a certain length range. Later, the training subset is filtered to retain those examples where the length of the audio clips is within the specific range.
Python3
max_input_length = 30.0
def is_audio_in_length_range(audio_length):
return audio_length < max_input_length
librispeech["train"] = librispeech["train"].filter(
is_audio_in_length_range,
input_columns=["input_length"],
)
librispeech["train"]
|
Output:
Dataset({
    features: ['input_features', 'labels', 'input_length'],
    num_rows: 5551
})
4. Training and Evaluation
The first step of the training will be defining a data collator. The method extracts the input audio features from the provided features and pass them to the maximum length using the feature extractor of the processor and tokenize label sequences and pads them to the maximum length using tokenizer of the processor and replace the padding in the label sequences with -100 to ignore the loss during training.
Python3
import torch
from dataclasses import dataclass
from typing import Any, Dict, List, Union
@dataclass
class DataCollatorSpeechSeq2SeqWithPadding:
processor: Any
def __call__(self, features: List[Dict[str, Union[List[int], torch.Tensor]]]) -> Dict[str, torch.Tensor]:
input_features = [{"input_features": feature["input_features"][0]} for feature in features]
batch = self.processor.feature_extractor.pad(input_features, return_tensors="pt")
label_features = [{"input_ids": feature["labels"]} for feature in features]
labels_batch = self.processor.tokenizer.pad(label_features, return_tensors="pt")
labels = labels_batch["input_ids"].masked_fill(labels_batch.attention_mask.ne(1), -100)
if (labels[:, 0] == self.processor.tokenizer.bos_token_id).all().cpu().item():
labels = labels[:, 1:]
batch["labels"] = labels
return batch
|
Now, we initialize the data collator object, it takes the processor as parameter, that is expected to an instance of a feature extraction and tokenization processor.
Python3
data_collator = DataCollatorSpeechSeq2SeqWithPadding(processor=whisper_processor)
|
Evaluation Metrics:
The provided code evaluates the performance of a speech-to-text model by computing Word Error Rate (WER).
Python3
import evaluate
metric = evaluate.load("wer")
from transformers.models.whisper.english_normalizer import BasicTextNormalizer
normalizer = BasicTextNormalizer()
def compute_metrics(predictions):
pred_ids = predictions.predictions
label_ids = predictions.label_ids
label_ids[label_ids == -100] = whisper_processor.tokenizer.pad_token_id
pred_str = whisper_processor.batch_decode(pred_ids, skip_special_tokens=True)
label_str = whisper_processor.batch_decode(label_ids, skip_special_tokens=True)
wer_ortho = 100 * metric.compute(predictions=pred_str, references=label_str)
pred_str_norm = [normalizer.normalize(pred) for pred in pred_str]
label_str_norm = [normalizer.normalize(label) for label in label_str]
pred_str_norm = [
pred_str_norm[i] for i in range(len(pred_str_norm)) if len(label_str_norm[i]) > 0
]
label_str_norm = [
label_str_norm[i]
for i in range(len(label_str_norm))
if len(label_str_norm[i]) > 0
]
wer = 100 * metric.compute(predictions=pred_str_norm, references=label_str_norm)
return {"wer_ortho": wer_ortho, "wer": wer}
|
Load a Pre-Trained Checkpoint
The following code initializes the instance of the Whisper model by loading the pretrained weights. We can use the model to fine-tune a specific task.
Python3
from transformers import WhisperForConditionalGeneration
whisper_model = WhisperForConditionalGeneration.from_pretrained("openai/whisper-small")
|
Here, we are using conditional generation and we have set the ‘forced_decoder_ids’ to None as we don’t want to force specific tokens during decoding and set the ‘supressed_tokens’ to an empty list that suppress any tokens during generation. This allows the model to generate the outputs without any constraints on specific token generation.
Python3
whisper_model.config.forced_decoder_ids = None
whisper_model.config.suppress_tokens = []
|
Define the Training Configuration
Finally, we will define the training parameters and set the training steps to 500.
Python3
from transformers import Seq2SeqTrainingArguments
training_args = Seq2SeqTrainingArguments(
output_dir="./whisper_small_fine_tuned",
per_device_train_batch_size=16,
gradient_accumulation_steps=1,
learning_rate=1e-5,
lr_scheduler_type="constant_with_warmup",
warmup_steps=50,
max_steps=500,
gradient_checkpointing=True,
fp16=False,
fp16_full_eval=False,
evaluation_strategy="steps",
per_device_eval_batch_size=16,
predict_with_generate=True,
generation_max_length=225,
save_steps=500,
eval_steps=500,
logging_steps=25,
report_to=["tensorboard"],
load_best_model_at_end=True,
metric_for_best_model="wer",
greater_is_better=False,
)
|
Now, we will utilize the “Seq2SeqTraniner” class from the ‘transformers’ library to train the model. The training pipeline uses the provided datasets, model, data collator, evaluation metrics computation function and other necessary configurations for training.
Python
from transformers import Seq2SeqTrainer
train_dataset = librispeech["train"]
test_dataset = librispeech["test"]
trainer = Seq2SeqTrainer(
args=training_args,
model=whisper_model,
train_dataset=train_dataset,
eval_dataset=test_dataset,
data_collator=data_collator,
compute_metrics=compute_metrics,
tokenizer=whisper_processor,
)
|
Training:
Output:
Step    Training Loss    Validation Loss    Wer Ortho    Wer
500    0.122800    0.167780    62.232746    13.022916
Automatic Speech Recognition
Python3
import torchaudio
def asr_pipeline(audio_path):
audio_input, sample_rate = torchaudio.load(audio_path)
resampler = torchaudio.transforms.Resample(orig_freq=sample_rate, new_freq=16000)
preprocessed_audio = resampler(audio_input)
model_output = model(preprocessed_audio.numpy()[0])
text_output = model_output['text']
return text_output
audio_path = '/content/01.wav'
result = asr_pipeline(audio_path)
print("ASR Result:", result)
|
Output:
Special tokens have been added in the vocabulary, make sure the associated word embeddings are fine-tuned or trained.
ASR Result:  He has grave doubts whether Sir Frederick Layton's work is really Greek after all and can discover in it but little of rocky Ithaca.
Conclusion
In conclusion, this article has covered the fundamentals and development of automatic speech recognition (ASR), focusing on the efficacy of sequence-to-sequence models. We explored the significance of pre-trained models, highlighted popular ASR models, and discussed evaluation metrics. The practical insights into fine-tuning pre-trained models provide a valuable resource for optimizing ASR systems. As technology advances, this article serves as a concise guide for enthusiasts and professionals navigating the dynamic landscape of ASR.
Share your thoughts in the comments
Please Login to comment...