Sending Email using FastAPI Framework in Python
Last Updated :
23 Nov, 2021
Before jumping into the topic directly, let’s have a small intro about the technologies we are going to use. As the name suggests, we will be using FastAPI, a Python language framework.
FastAPI:
FastAPI is a python framework to develop REST Apis. It is very easy to build, high performance, easy to learn, and ready to deploy code. Though we are using FastAPI, explaining it would be out of scope for the current article. For more details about FastAPI, refer below resources.
In the current article, we will be covering how to send an email using the FastAPI framework. We will be sending the mail using a fast API-mail library. Fastapi-mail simple lightweight mail system, sending emails and attachments.
Installation
You can install the library using
pip install fastapi-mail
We can use the following article with and without login authentication. We will not be using any signup/authentication process as it is out of the scope of the current article.
Creating the Project
Import the required libraries to send an email
from fastapi import FastAPI
from fastapi_mail import FastMail, MessageSchema,ConnectionConfig
from starlette.requests import Request
from starlette.responses import JSONResponse
from pydantic import EmailStr, BaseModel
from typing import List
app = FastAPI()
Now create a pedantic class to take email as input.
pedantic is a module that helps us to write validations to the inputs/requests.
class EmailSchema(BaseModel):
   email: List[EmailStr]
Setup the configuration to send an email using ConnectionConfig
conf = ConnectionConfig(
   MAIL_USERNAME=from_,
   MAIL_PASSWORD="************",
   MAIL_PORT=587,
   MAIL_SERVER="smtp.gmail.com",
   MAIL_TLS=True,
   MAIL_SSL=False
)
For the MAIL_SERVER argument,
if you would like to use Gmail you can give “smtp.gmail.com” as input.
If you would like to use outlook as the sender, you can give “smtp.office365.com” as input
Let’s set up the Message Schema.
It contains the arguments like what to send and whom to send.
message = MessageSchema(
       subject="Fastapi-Mail module",
       recipients=email.dict().get("email"),  # List of recipients, as many as you can pass
       body=template,
       subtype="html"
       )
After defining the configuration and MessageSchema,
we can send the email.
fm = FastMail(conf)
await fm.send_message(message)
Final Application
The entire code looks like this,
Python3
@app.post("/send_mail")
async def send_mail(email: EmailSchema):
template =
message = MessageSchema(
subject="Fastapi-Mail module",
recipients=email.dict().get("email"),
body=template,
subtype="html"
)
fm = FastMail(conf)
await fm.send_message(message)
print(message)
return JSONResponse(status_code=200, content={"message": "email has been sent"})
|
And finally,
start the application using
uvicorn main:app --reload
After the successful start of the server, use the following link to lookout the list of APIs. In our case, we will have only a sending mail API(a POST request) when you can give input directly from the docs page itself.
http://127.0.0.1:8000/docs
Output –
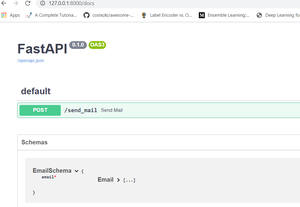
docs page after successful start of the server
Now execute the API by clicking on try it out and entering the desired email as shown below.
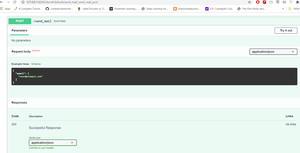
Once the API executes, it will return the success output as mentioned in the return statement of API.
"message": "email has been sent"
And finally, the output in the terminal,
returns the status code(200), if the mail is sent successfully.

The output it is showing is the template we are sending through email.
You can even send the mail with attachments etc., Checkout Documentation for the same – https://pypi.org/project/fastapi-mail/
Share your thoughts in the comments
Please Login to comment...