In this article, we will elaborate on how you can set up an OpenSSH server in WSL. Also, how can we locally connect to Ubuntu via cmd from the Windows OS we are running locally in our system? Use the Windows Powershell here, it would be easy to do the steps.
Users need to have Windows Subsystem for Linux (WSL) installed and setup in their device. The steps and requirements are different for Windows 10 and Windows 11 users, so please keep that in Mind.
Steps to Install WSL/WSL 2 in Windows 10 –
Step – 1: Open Windows PowerShell as Admin (Start menu > PowerShell > right-click > Run as Administrator) and copy paste the following command.
dism.exe /online /enable-feature /featurename:Microsoft-Windows-Subsystem-Linux /all /norestart
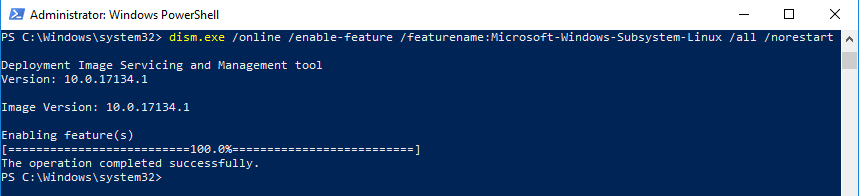
Output of the above command
Step – 2 (Very Important Step): With the release of Windows 11 and so many updates of Windows 10, WSL version 2 is now available for some of the Windows 10 Machines. In the previous step we have installed only WSL but if supported WSL 2 needs to be installed. First check the followings-
- For x64 systems: Version 1903 or later, with Build 18362 or later.
For ARM64 systems: Version 2004 or later, with Build 19041 or later.
To check the Version and Build number press Windows Key + R and type the command winver and press Enter of Click Okay.
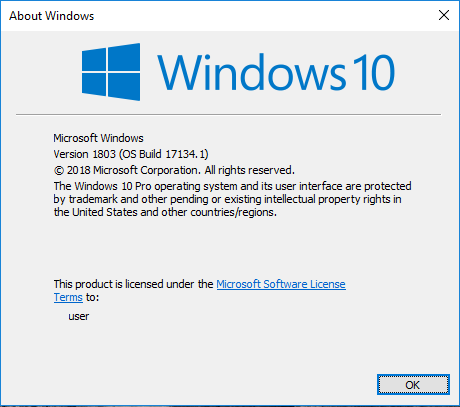
Output
If the version and build number is greater than or equal to as mentioned in step 2 then only follow the below steps, otherwise after step 2 jump to step 6
Step – 3: Open Windows PowerShell as Admin (Start menu > PowerShell > right-click > Run as Administrator) and copy paste the following command. (If powershell is not already opened from Step 1).
dism.exe /online /enable-feature /featurename:VirtualMachinePlatform /all /norestart
Step – 4: We need to download and install the latest Linux Kernel update package. Search for
- WSL2 Linux kernel update package for x64 machines. (For windows 10 64-bit machines)
- WSL2 Linux Kernel update package for ARM64 (For ARM64 machine).
Step – 5: After downloading and installing the above-mentioned packages open PowerShell in Admin mode and run the following command to set WSL 2 as the default version when installing any new Linux distribution.
wsl --set-default-version 2
Step – 6: Open Microsoft Store and search for Ubuntu and download any of the following version (it is always recommended to download the Latest version).
Step – 7: After downloading open that and follow the steps mentioned to install it. Then after installation open the newly created Ubuntu file from the start Menu. user will be asked to create a username and password for the first time, create it and remember it, as user will need the password later while running any command using sudo.

Ubuntu asking for username and password for the first time use
Steps to Install WSL 2 in Windows 11-
Unlike Windows 10, WSL2 for Windows 11 is already available to download from Microsoft Store as an Application. But first check the followings
- Windows 11 (build 22000 or higher).
- Virtual Machine Platform optional feature is enabled.
User can find the build number from the About option from the settings (Settings > System > About) and check the number beside OS build. If the number is not higher or similar of 22000 user can’t install WSL in Windows 11 by following the steps here. Please follow the steps mentioned above.
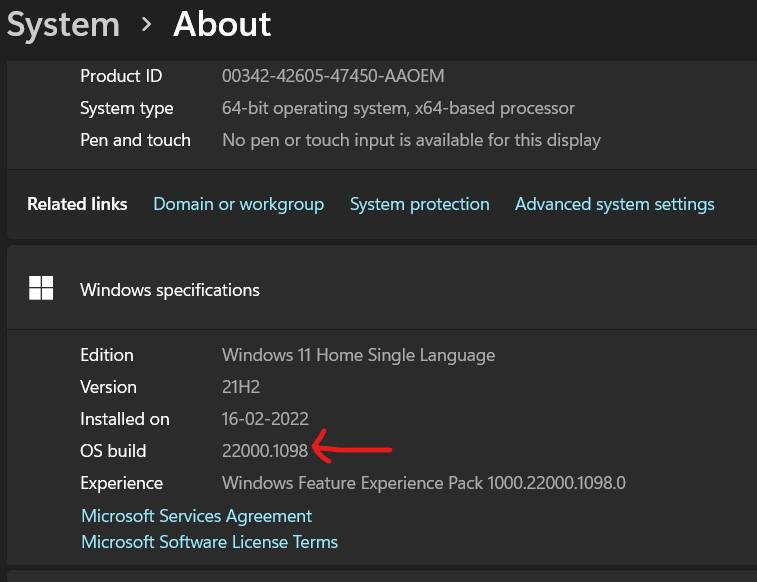
OS build
Step – 1: After checking the OS Build search for Windows Features in the search bar and click Turn windows features on or off (Which is a part of Control Panel). Click that and find Virtual Machine Platform and click the checkbox (Enable it).

Windows Feature

Virtual Machine Platform
Step – 2: Search for Windows Subsystem For Linux in Microsoft Store. Click on the File named Windows Subsystem for Linux Preview and click on Get. Then click install.

WSL for Linux
After installing the WSL downloaded in above step, please follow the Step 6 and Step 7 of Windows 10 installation as both the process are similar from now.
If the user face any issue installing or downloading packages they might refer to the original Ubuntu website where all the packages are mentioned and steps are elaborated.
Stepwise Implementation
Step 1: After installing everything required open the Ubuntu terminal from the start menu then write the following command.
sudo apt install openssh-server
After that, it will ask for your root password which you have set up during the installation. You will see the following output if you haven’t done anything wrong.

openssh-server setup
Step 2: Now we will generate an ssh key. Write the following command in the Ubuntu terminal.
ssh-keygen -A
If you get any ‘Permission denied’ error then just add ‘sudo’ before the command i.e
sudo ssh-keygen -A
Remember the generated host key.
Step 3: Now we will just start the server.Enter the following command
sudo service ssh start
After that, It will require firewall permission which has to be allowed and we will get the following output

Starting SSH server
Step 4: (Optional) Now we need to allow the server to the firewall. For this purpose, we will use the ‘ufw’ command which is also known as Uncomplicated Firewall (ufw) which is used to manage the firewall rules in Linux.
sudo ufw allow ssh
And you will receive an output like this

allowing ssh server
Step 5: Now we will be connecting to the SSH server running using WSL from our local Windows Command Line. First, open the cmd/terminal in windows and write the below command.
ssh-keygen -t rsa
The above command will generate and store the public/private RSA key pair and you will be asked to enter a passphrase (work as a password) to store that if you want you can keep it empty too, just press enter twice.
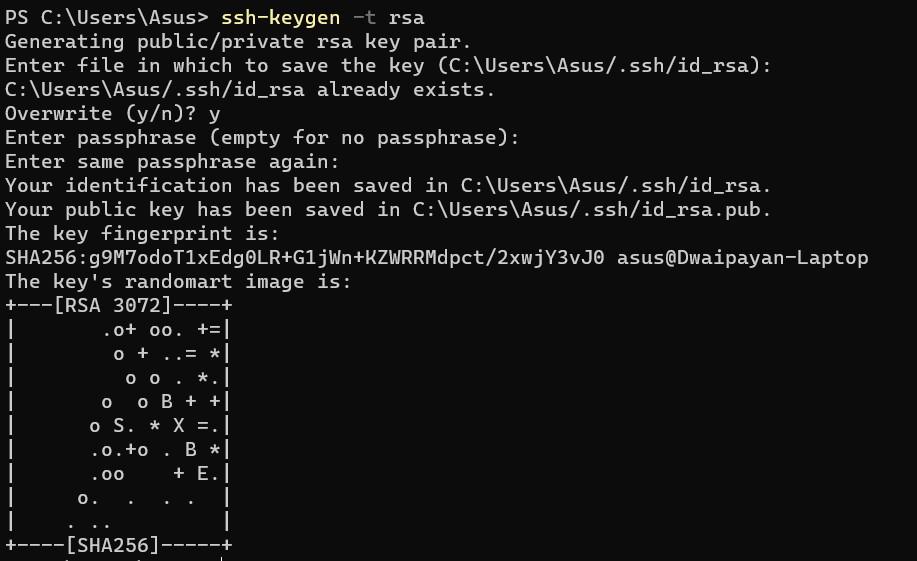
the output of the above command
Step 6: Now we have to navigate to the folder where the last command has saved the key. Use the ‘cd’ command to reach there (The entire path will be shown in the Ubuntu terminal, just type that). Usually, it gets stored in the ‘.ssh‘ folder, to reach there type the following command
cd ~/.ssh #To reach there
ls # To check the contents of that folder if it has the id_rsa.pub file

Checking if id_rsa.pub exists in the correct location
As you can see in the above output, after reaching there you will see there is a file named id_rsa.pub, we need to copy and paste it into a folder that is easily accessible, for now, we are copying it into the desktop using the cmd. Write the following command in cmd
copy id_rsa.pub C:\Users\<your_user_name>\Desktop
The above command also doesn’t return any output, but the user can verify it by checking if the file has been copied into their desktop
Step 7: Now as the id_rsa.pub file is handy we will copy this and save this to the root directory of the Ubuntu. For that, we need to reach the desktop from the Ubuntu terminal. Enter the following command in Ubuntu Terminal.
cd /mnt/c/Users/<your_user_name>/Desktop
After that command type ‘ls’ to recheck whether we are on the Desktop or not.
You will see an output something like this after executing the above command.
Step 8: Now we need to copy and paste the id_rsa.pub file into the ssh folder of the Linux system with a different name. Enter the following command into the PowerShell or command prompt.
cp id_rsa.pub ~/.ssh/authorized_keys
Output: We will get the following output after running above command
Here, we have given the new name ‘authorized_keys’ you can give anything you want. After copying the file we need to go to the ssh folder and check the key using the cat command.
cd ~/.ssh
ls # Optional command , just to see the content of the folder
cat authorized_keys
The last command will give us the output as the public key.
The output of cat authorized_keys and cat id_rsa.pub is the same.
Step 9: As we have copied and saved the file into the Desktop we will just use the cat command to check the key.
cat id_rsa.pub
The output of the above command is the key that we will use while connecting to the WSL server from Windows cmd. The output will be the same as of the previous command i.e cat authorized_keys.
Step 10: Now we need to check the IP address from the Ubuntu terminal. Enter the following command.
ifconfig
If the above command does not work then, enter the below command and then try again.
sudo apt install net-tools
When it gives a successful output copy the IP address from there.
Your IP Address will be written after the first inet.
Step 11: Now from the Windows Terminal we will connect to the Ubuntu via ssh command.
ssh <username_of_your_Ubuntu>@<ip_address_copied_from_ifconfig>
Your windows cmd will look something like this after using the above command. You are now connected to the Ubuntu Terminal of WSL via your local cmd. All the Linux commands will run here and you can access the data of that WSL from here.
Share your thoughts in the comments
Please Login to comment...