How to build a Linux server on a Raspberry Pi from Windows?
Last Updated :
26 Oct, 2022
The Raspberry Pi is a small, inexpensive computer that is of the size of a credit card that connects to a computer monitor or TV and operates with a regular keyboard and mouse. With the help of this competent small gadget, individuals of all ages may learn about computing and how to program in languages like Scratch and Python.
It can be used to set up your own server at a minimal cost. It has all the features of a desktop computer, including the ability to play high-definition video, browse the internet, create spreadsheets, word documents, and play games.
What you’ll have to create a Linux server using a Raspberry Pi is listed below:
- Raspberry Pi
- Ethernet Cable
- A microSD card (minimum 8GB storage capacity)
Steps to build a Linux server on a Raspberry Pi from Windows
Step 1: Get the Raspbian OS for your Raspberry Pi
The original Raspbian operating system image is accessible on their own website. Download the Raspbian zip file that contains the most recent version. Please refer to the link below to get the OS image: https://www.raspberrypi.com/software/operating-systems/
Raspbian is the official operating system for the Raspberry Pi that was adapted from Debian 7.0 (Wheezy) and is customized for the architecture of the device. Although there are numerous ways to run your preferred OS on the Pi, we’ll pick Raspbian OS because of how straightforward it is.

Zip and extract files
On a Raspberry Pi, an operating system can be easily installed. Install the boot image onto a microSD card first using a computer. Simply insert the card further into Raspberry Pi after that to begin booting.
Step 2: Installation of Raspbian OS
Installing the “Raspberry Pi OS with Desktop” image or “Raspberry Pi OS including desktop & recommended applications” will be quite simple. We’ll use “Raspberry Pi OS Lite” since we’re constructing a Linux server. Once the.zip file has finished downloading, you need to extract it.
Step 3: Write Raspbian OS to micro SD card
To write the image to the microSD card(create bootable media), simply download win32 disk imager from the link below: https://sourceforge.net/projects/win32diskimager/
- Choose the Raspbian Operating system image file that you just extracted.
- Choose the SD card that will hold the image.
- And then click on the Write button to get started writing.
Step 4: Booting the Pi
To use the Raspberry Pi, all you need is a computer with a display, a keyboard, and a power source. For network access, we also own an Ethernet cable, which we prefer to WiFi, specifically for just a dedicated server.
- Use HDMI0, the first HDMI port on the Raspberry Pi 4, to connect your display.
- Connect Keyboard and mouse through the USB port.
- Power on the Pi after inserting the microSD card.
Use the default login information when asked:
Username : pi
Password : raspberry
Setting Up Raspbian OS:
There are two possible ways for the initial setup:
1. Booting the Pi with the help of a monitor and keyboard:
For the first setup, you can connect a USB keyboard as well as an HDMI monitor to the Raspberry Pi.
- The Raspberry Pi Operating system desktop will show up after a little while.
- Welcome to the Raspberry Pi program will appear when you turn on your Raspberry Pi computer for the very first time and will walk you through the initial setup.
- In order to begin the setup, click Next.
- Set your time zone, language, and country, then click Next once again.
- Click Next after entering a new password and username for your Raspberry Pi.
- Make sure your screen is configured so that the Desktop takes up the entire display.
- By choosing the name of your wireless network, providing the password, then clicking Next, you can connect to it.
- Click Next to allow the wizard to look for and install any updates to the Raspberry Pi OS.
- When the Pi first starts up, “raspi-config” is immediately launched. To setup the device after the initial boot, you must execute “sudo raspi-config” manually.
- To complete the configuration, click Restart.
2. Booting the Pi using SSH(Secure Shell):
Raspbian is being installed without a display, mouse, or keyboard. SSH is the only way we can interact with the Raspbian OS, which is currently installed on the microSD.
- To allow SSH on boot, you must create an empty document named “ssh” and place it in the microSD.
- Connect your Raspberry Pi with your router using an Ethernet cable (RJ-45), then connect and turn on your power source.
- To get the Raspberry Pi’s local IP address, access the admin page of your router and scroll through the list of connected devices.
- Once you know the device’s IP address, use Putty to connect to it.
- Get putty from this link: https://www.putty.org/
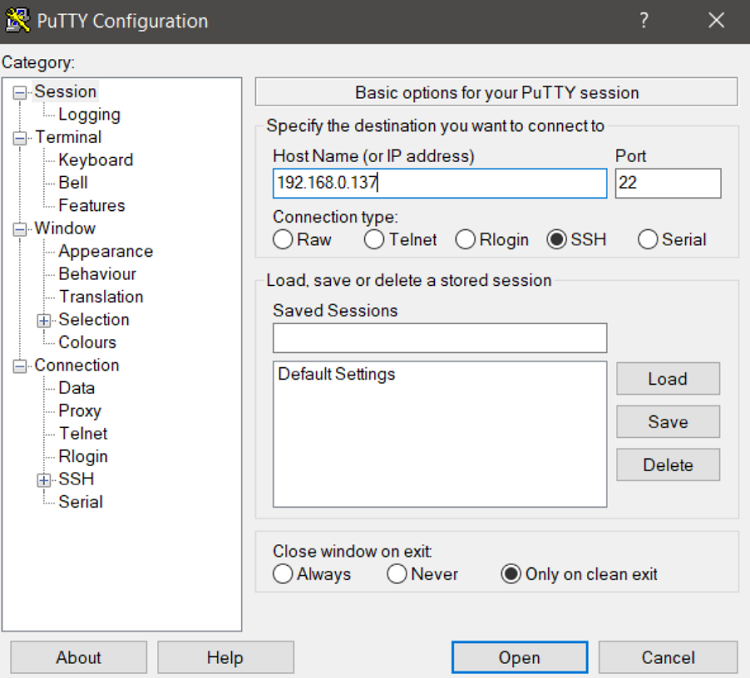
Putty configuration
Logging into OS:
Pi is the default user, while raspberry is the default password. As an illustration, run ssh pi@192.168.0.137 and then enter the password when prompted if the IP address is 192.168.0.37.

Login to raspberry pi
Configuring Raspbian:
Follow these instructions to reduce the amount of installation, storage space, and memory use. It is better to invest time in a thorough study to ensure that each setting is as accurate as feasible. A configuration can be applied in a variety of ways, and files and directives may become obsolete. To be sure you are not using an out-of-date setup, always read the product documentation.
Run raspi-config:
Run “sudo raspi-config” once you are connected and logged in.
sudo raspi-config

raspi-config script window
- Go to Advanced Options and press Enter.
Update apt Repository:
Use these commands to update the repositories, and type your password when asked after executing the first command.
sudo apt-get update
Again, when asked type Y then Enter:
sudo apt-get upgrade

Updating apt repository
Installing NGINX Server:
Run this below command to install the NGINX in your Pi OS:
sudo apt-get install nginx

ngnix install
Start NGINX:
Run the command below to start Nginx server:
sudo /etc/init.d/nginx start

nginx start
Check NGINX running status:
1. Using IP address:
Enter the IP address of your Raspberry Pi inside the URL bar of your web browser.

Welcome Page – Ngnix
2. Using the command:
Additionally, you can use the systemctl command from the console to see whether the NGINX service still is active.
sudo systemctl status nginx
Hooray, you have made your own Linux server using Raspberry Pi. Deploy your apps or websites on your own server.
Like Article
Suggest improvement
Share your thoughts in the comments
Please Login to comment...