Working of Convolutional Neural Network (CNN) in Tensorflow
Last Updated :
22 Feb, 2023
In this article, we are going to see the working of convolution neural networks with TensorFlow a powerful machine learning library to create neural networks.
Now to know, how a convolution neural network lets break it into parts. the 3 most important parts of this convolution neural networks are,
- Convolution
- Pooling
- Flattening
These 3 actions are the very special things that make convolution neural networks perform way better compared with other artificial neural networks. Now, let’s discuss them in detail,
Convolution
Think about a 28*28 image like a MINST dataset which is basically a handwritten digits recognition. To build a model to recognize the digits with a simple artificial neural network we will feed each pixels value individually as a feature input inside the model and that is 784 input nodes and you will have a couple of hidden layers and the model may perform well but the problem here is the model will not be able to recognize the important features in the image. It will blindly read the pixels and split the output.
But an image that is so small in size like this MINST dataset (28 by 28 image) which will give the model 784 inputs each node should divide into hidden layers and there will be a lot of weight assigned and obviously there will be a tremendous amount of calculation. Now think of an image in the size of 1920 by 1080 an Ultra HD, If we follow the same method, practically there will be 2 million input nodes and even we take a hidden layer of 64 nodes which is not at all enough for this large input we will have 130 million weights and there will be an insane amount of calculation and your machine cannot even think of managing that much calculations at a time.
So for this, we first need to find the important features of an image,
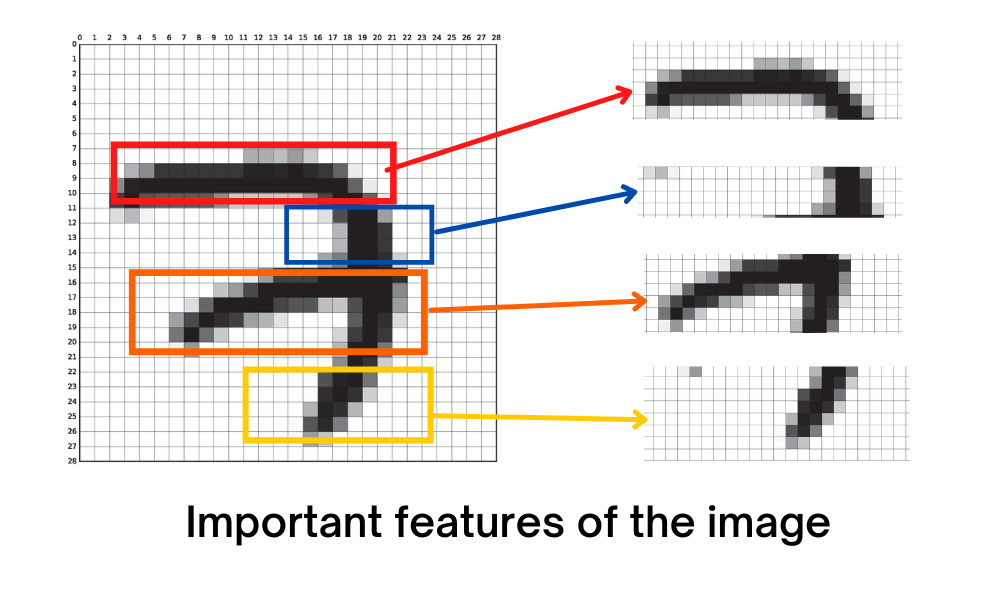
By finding these important features we can leave some unwanted pixels back without compromising our output quality. With this method, we can give the model a human level of image recognition in the real world. So for this, we have convolution.
Convolution is the most confused and hardest topic over the internet, but simply it is just searching the image by sliding a filter (kernel) across the image to find different features of the image. Kernels are just 2D matrices with different weights in them. Basically, this kernel will pass over the image replacing the pixel values with the average of the sum of its weight on the respective part of the image. These kernels are an amazing way to find the most important features in the image.
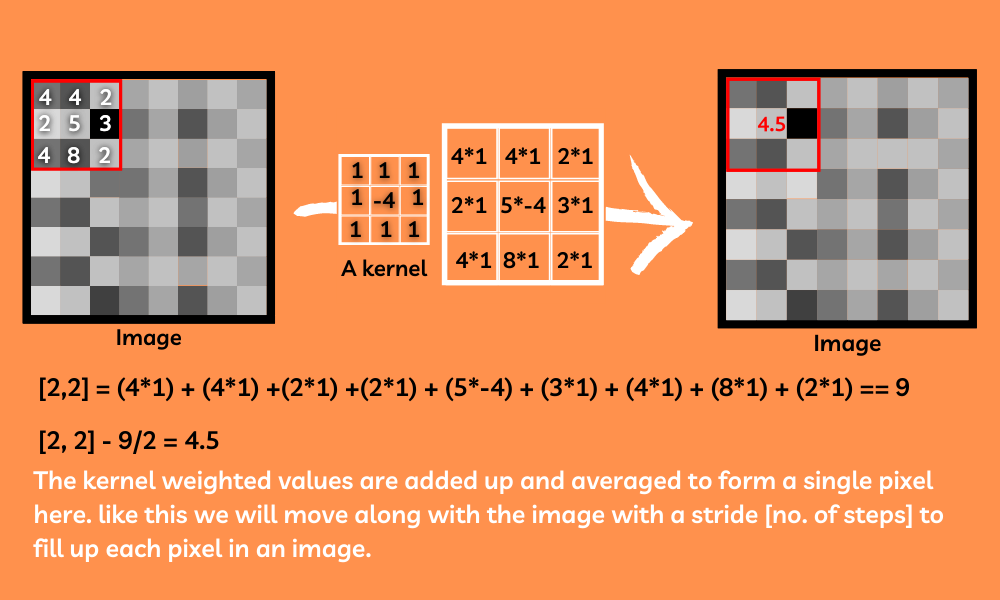
We will apply a number of randomly generated kernels to the image for finding many different features of the images
So after applying this convolution layer to our model we need to pool the features.
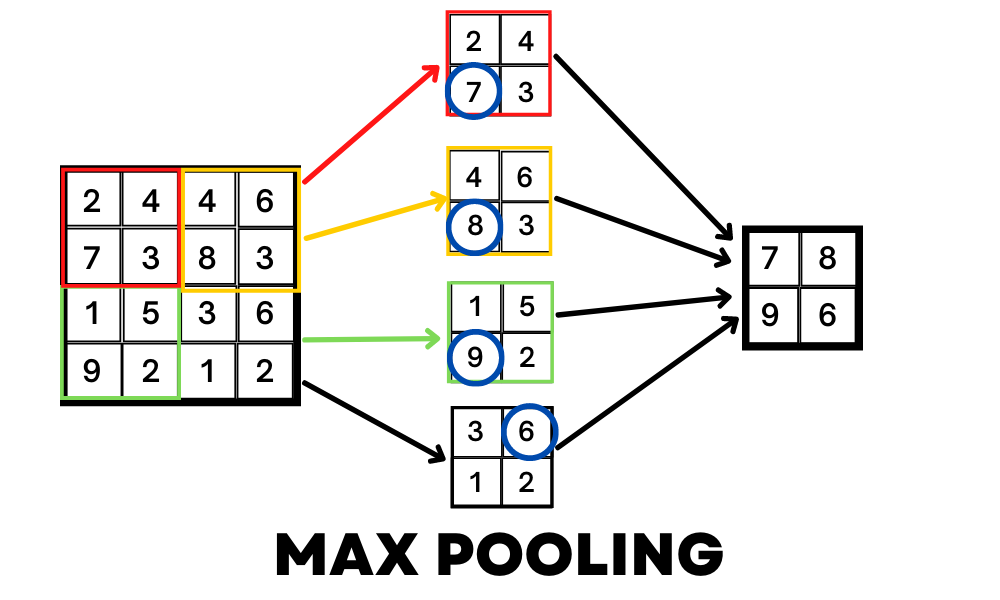
Pooling
Now that you have found the important features of the image, still, the amount of input is very large and our machine could not be able to handle this amount of inputs. So here is where pooling comes.
Pooling is just reducing the size of the image without losing the features that we found with convolution. For example, a MaxPooling method will take in a shape of a matrix and return the larger value in that range. By doing this we can compress the image without losing the important features of this image.
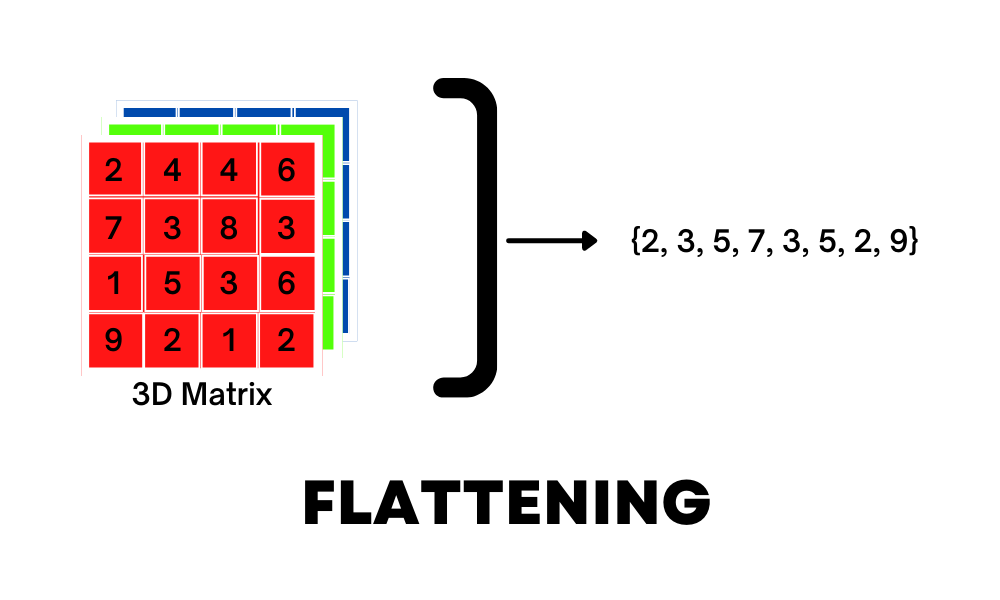
Flattening
Flattening is nothing but converting a 3D or 2D matrix into a 1D input for the model this will be our last step to process the image and connect the inputs to a fully connected dense layer for further classification.
To sum up, The way a convolution neural network works is:
- Applying convolution to find different importand features inside the image
syntax: model.add(layers.Conv2D(no. of kernels, size of the kernel, activation=’relu’, input_shape)
- Applying pooling to compress the image without losing its features
syntax: model.add(layers.MaxPooling2D((size of the kernel)))
- FLattening it to a 1-dimensional input from a 3D[color images] or 2D [Black and white images] to pass into the model
syntax: model.add(layers.Flatten()
- Fully connected input and hidden layers to play with weights and biases and activation functions and optimizers.
- Wola! You have built the best image classifier.
A typical CNN model will look like:
Python
import tensorflow as tf
from tensorflow import keras
model = tf.keras.models.Sequential([
tf.keras.layers.Conv2D(
32, (3, 3), activation='relu', input_shape=(32, 32, 3))
tf.keras.layers.MaxPooling2D((2, 2))
tf.keras.layers.Conv2D(64, (3, 3), activation='relu')
tf.keras.layers.MaxPooling2D((2, 2))
tf.keras.layers.Conv2D(64, (3, 3), activation='relu')
tf.keras.layers.MaxPooling2D((2, 2))
tf.keras.layers.Flatten(),
tf.keras.layers.Dense(128, activation='relu'),
tf.keras.layers.Dense(256, activation='relu'),
tf.keras.layers.Dense(10, activation='softmax')
])
model.compile(optimizer='adam',
loss=tf.keras.losses.SparseCategoricalCrossentropy(
from_logits=True),
metrics=['accuracy'])
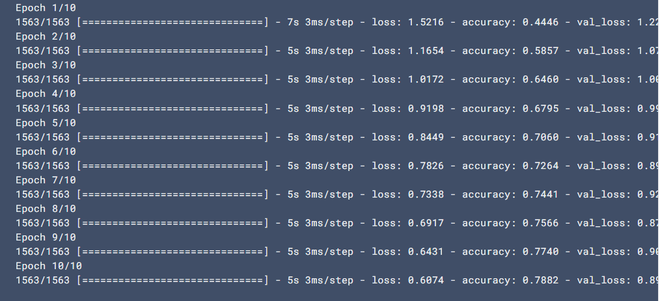
history = model.fit(train_images, train_labels, epochs=10,
validation_data=(test_images, test_labels))
|
Output:
Share your thoughts in the comments
Please Login to comment...