For a cybersecurity enthusiast or professional, mastering network scanning tools is very important to comprehend and assess the security position of networks and systems. Nmap, an influential and versatile Network Mapper, is the network reconnaissance and vulnerability detection go-to tool. As you begin your journey in ethical hacking or work towards developing your penetration testing skills, it is imperative to learn the key Nmap commands. The following 30 Nmap basic commands will provide a good starting point for scanning networks efficiently, finding live hosts, discovering opened ports, as well as obtaining useful details on services hosted on those machines. With Nmap in your toolbox, you will be armed with the necessary tools not just to understand the intricacies of network exploration but also to uncover any possible vulnerabilities that could breach security within the digital landscape.
What is NMAP ?
Nmap (Network Mapper) is a powerful tool that helps you discover and gather information about devices and services running on a network. In simple terms, Nmap is like a special tool that lets you see which computers or devices are connected to a network and what programs or applications are running on them. It’s like having a special pair of glasses that can see which houses have people living in them and what kinds of activities are happening inside each house.
Nmap allows you to:
- 1. Find live devices on a network.
- 2. Check which ports or doors are open on those devices.
- 3. Identify the services or applications running on those open ports.
It’s an essential tool for network administrators, cybersecurity professionals, and ethical hackers to understand and test the security of networks and systems they have permission to access.
Top 30 Basic NMAP Commands for Beginners
The following command is used to perform a basic TCP scan on the specified target using the Nmap tool. When you run this command, Nmap will scan the most common 1,000 TCP ports on the specified target(s) to see which ones are open and accepting connections.
Command :
nmap <target>
Output :

The following command is used to perform a ping scan on a target system or network. This type of scan is often referred to as a “host discovery” or “ping sweep” scan. When you run this command Nmap will sends ICMP echo request packets (commonly known as “pings“) to the specified target IP address(es) or network range, and identifies which hosts are alive (responding to the ping requests) and which hosts are not responding.
Command :
nmap -sn <target>
Output :

3. Probe open ports to determine service/version info
The following command is used to perform a version detection scan on the specified target system(s). When you run this command, nmap will first scan the target system(s) for open ports. For any open ports found, it will then try to determine the version of the service or application running on that port.
Command :
nmap -sV <target>
Output :

The following command is used to perform a ping scan or host discovery scan on the specified target system(s) or network range. When you run this command will list the IP addresses of the hosts that responded to the various packets sent by nmap, indicating that they are active and reachable on the network.
Command :
nmap -sP <target>
Output :

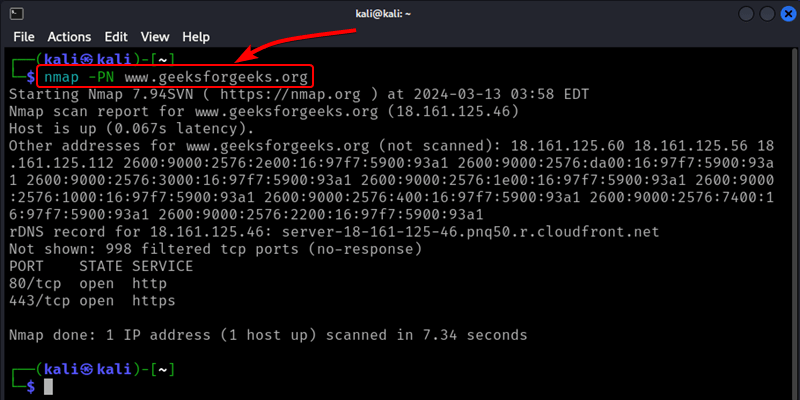
The following command is used to perform a TCP connect scan on the specified target system(s) or network range, without sending any ICMP echo requests (pings) beforehand. When you run this command, nmap will attempt to establish a full TCP connection with the target system(s) on various ports, without first checking if the host is alive using pings. If a connection is successfully established, it means that the port is open on the target system.
Command :
nmap -PN <target>
Output :
6. Scan only the specified port or port range
The following command is used to perform a TCP port scan on the specified target system(s) or network range, but only for the specified port(s). When you run this command, nmap will scan the specified port(s) on the target system(s) to determine if they are open (listening for incoming connections) or closed (not listening).
Command :
nmap -p<port> <target>
The following command is used to perform a SYN scan, also known as a “stealth” or “half-open” scan, on the specified target system(s). When you run this command, nmap will send a SYN packet (the first step in establishing a TCP connection) to the target system(s) on various ports. If the target system responds with a SYN-ACK packet (indicating the port is open), nmap will immediately send a RST (reset) packet to tear down the connection, without completing the full handshake.
Command :
nmap -sS <target>
8. Try to detect the target operating system
The following command is used to perform remote operating system detection on the specified target system(s). When you run this command, nmap will scan the target system(s) and analyze various characteristics, such as the TCP/IP stack behavior, open ports and services, and other network traffic patterns. It then compares these observations against its database of known operating system fingerprints to determine the most likely operating system running on the target.
Command :
nmap -O <target>
9. Enable OS detection, version detection, script scanning, and traceroute
The following command is used to perform an aggressive scan on the specified target system(s). When you run this command The output of this command will provide a comprehensive report including the detected operating system, open ports, service versions, script scan results, and any other relevant information gathered during the scan.
Command :
nmap -A <target
10. Use default Nmap scripts for deeper probing
The following command is used to perform a script scan on the specified target system(s) using the default set of Nmap scripts. When you run this command, nmap will first scan the target system(s) for open ports and services. Then, for each open port or service, it will run the relevant scripts from the default script databases.
Command :
nmap -sC <target>
11. Run a specific Nmap script
The following command is used to run a specific Nmap script or a set of scripts against the specified target system(s). When you run this command, Nmap will first scan the target system(s) for open ports and services. Then, for each open port or service, it will run the specified script(s) against the target.
Command :
nmap --script=<script> <target>
12. Save output to a text file
The following command is used to save the output of an Nmap scan to a plain text file. When you run this command, Nmap will perform the specified scan (e.g., TCP connect scan, SYN scan, version detection, etc.) on the target system(s) or network range. Instead of displaying the scan output in the terminal, it will save the entire output in the specified text file.
Command :
nmap -oN <output.txt> <target>
The following command is used to save the output of an Nmap scan in an XML (Extensible Markup Language) format. When you run this command, Nmap will perform the specified scan (e.g., TCP connect scan, SYN scan, version detection, etc.) on the target system(s) or network range. Instead of displaying the scan output in plain text format, it will save the entire output in an XML file with the specified filename.
Command :
nmap -oX <output.xml> <target>
14. Scan targets from a list and save output
The following command is used to perform an Nmap scan on a list of targets specified in a text file, and save the output of the scan to another text file. When you run this command, Nmap will perform its default TCP connect scan on each target listed in the hosts.txt file. The scan results for all targets will be saved in the output.txt file, with each target’s scan output separated by a line break or other delimiter.
Command :
nmap -iL <hosts.txt> -oN <output.txt>
15. Scan ports 1 through 100
The following command is used to perform a TCP port scan on the specified target system(s), but only for ports in the range of 1 to 100. When you run this command, nmap will scan the specified port range (1-100) on the target system(s) to determine if any of those ports are open (listening for incoming connections) or closed (not listening).
Command :
nmap -p1-100 <target>
16. Fast scan mode (only scans 100 most common ports)
The following command is used to perform a fast scan on the specified target system(s) or network range. When you run this command, nmap will scan a predefined set of approximately 100 commonly used ports on the target system(s). These ports are associated with popular services like HTTP, HTTPS, FTP, SSH, SMTP, and others.
Command :
nmap -F <target>
17. Scan ports consecutively instead of randomly
The following command is used to perform a sequential port scan on the specified target system(s). When you run this command, nmap will scan the ports on the target system(s) in the order of port 1, port 2, port 3, and so on, until the highest port number is reached (typically 65535 for TCP ports).
Command :
nmap -r <target>
18. Ping scan using ICMP echo requests
The following command is used to perform a ping scan with host discovery using ICMP echo requests (pings) and TCP SYN packets on the specified target system(s) or network range. When you run this command, nmap will send both ICMP echo requests (pings) and TCP SYN packets to the specified target IP addresses. If a target system responds to either type of packet, it is considered alive and reachable on the network.
Command :
nmap -sn -PE <target>
19. Ping scan using TCP timestamp requests
The following command is used to perform a ping scan with host discovery using TCP SYN packets on the specified target system(s) or network range. When you run this command, nmap will send TCP SYN packets to the specified target IP addresses. If a target system responds to the TCP SYN packets, it is considered alive and reachable on the network.
Command :
nmap -sn -PP <target>
20. Ping scan using TCP netmask requests
The following command is used to perform a ping scan with host discovery using ICMP netmask request packets on the specified target system(s) or network range. When you run this command, nmap will send ICMP netmask request packets to the specified target IP addresses. If a target system responds to these packets, it is considered alive and reachable on the network.
nmap -sn -PM <target>
21. TCP Window scan to bypass some packet filters
The following command is used to perform a Windows scan on the specified target system(s). When you run this command, nmap will send specially crafted packets and analyze the responses from the target system(s) to determine which ports are open. The Windows scan leverages the fact that the Windows TCP/IP stack and network services have certain unique behaviors and responses when handling certain types of packets or connection requests.
Command :
nmap -sW <target>
22. Xmas scan to map out firewall rulesets
The following command is used to perform an idle/zombie scan on the specified target system(s). When you run this command, Nmap first identifies an idle system on the network that meets certain criteria. Then, it spoofs packets from the idle system to scan the target system(s). The responses from the target system(s) are sent back to the idle system, allowing Nmap to infer which ports are open or closed based on the changes in the idle system’s behavior.
Command :
nmap -sX <target>
23. TCP NULL scan to map out firewall rulesets
The following command is used to perform a TCP NULL scan on the specified target system(s). When you run this command, Nmap will send TCP packets with no flags set (NULL packets) to various ports on the target system(s). The responses from the target system(s) are then analyzed to determine which ports are open, closed, or filtered.
Command :
nmap -sN <target>
24. TCP FIN scan to map out firewall rulesets
The following command is used to perform a TCP FIN scan on the specified target system(s). When you run this command, Nmap will send TCP packets with the FIN flag set to various ports on the target system(s). The responses from the target system(s) are then analyzed to determine which ports are open, closed, or filtered.
Command :
nmap -sF <target>
25. Idle/bounced scan to disguise source
The following command is used to perform an idle/zombie scan on the specified target system(s) using the provided zombie host. When you run this command, Nmap first verifies that the specified <zombie host> meets the criteria for an idle system (i.e., it has no active connections and has not sent any packets recently). Then, it spoofs packets from the idle system to scan the target system(s). The responses from the target system(s) are sent back to the idle system, allowing Nmap to infer which ports are open or closed based on the changes in the idle system’s behavior.
Command :
nmap -sI <zombie host> <target>
26. Scan using tiny fragmented IP packets
The following command is used to instruct Nmap to fragment the packets during a TCP connect scan on the specified target system(s). When you run this command, Nmap will fragment the TCP packets it sends during the scan into smaller pieces. This can help bypass certain firewalls or intrusion detection/prevention systems (IDS/IPS) that may be configured to block or filter out larger packets.
Command :
nmap -f <target>
27. Use decoy IP addresses to obscure the source
The following command is used to perform a decoy scan on the specified target system(s) using the provided decoy IP addresses. When you run this command, Nmap will send spoofed packets from the specified decoy IP addresses along with the real scan packets. This can make it more difficult for the target system(s) or network devices (such as firewalls or intrusion detection systems) to determine the true source of the scan, as they will see traffic coming from multiple IP addresses.
Command :
nmap -D <decoy1,decoy2,...> <target>
28. Display the reason why a port is in a particular state
The following command is used to display the reason codes for the port states reported by Nmap during a scan on the specified target system(s). When you run this command, Nmap will perform its default TCP connect scan on the target system(s). However, in addition to the standard output displaying open, closed, and filtered ports, it will also include a reason code for each port state.
Command :
nmap --reason <target>
The following command is used to display a detailed trace of the packets sent and received by Nmap during a scan on the specified target system(s). When you run this command, Nmap will perform its default TCP connect scan on the target system(s). However, instead of just displaying the standard output of open, closed, and filtered ports, it will also print a detailed trace of the packets sent and received during the scan.
Command :
nmap --packet-trace <target>
30. Set the intensity level for version detection
The following command is used to set the intensity level for version detection when scanning the specified target using Nmap. When you run this command, Nmap will scan the target(s) and attempt to determine the versions of services or applications running on any open ports it finds. The <intensity> level you set will determine how much effort Nmap puts into trying to accurately identify the service versions.
Command :
nmap --version-intensity <intensity> <target>
Conclusion
As a beginner in cybersecurity or ethical hacking, mastering Nmap is crucial for understanding and assessing networks and systems. Nmap allows you to discover live devices, open ports, and services running on a network, providing valuable information for identifying potential security vulnerabilities. With practice and understanding of these fundamental commands, you’ll be well-equipped to perform effective network reconnaissance and uncover potential vulnerabilities, ultimately enhancing your cybersecurity skills as a beginner.
Share your thoughts in the comments
Please Login to comment...