Spring Boot is the most popular Java framework for building stand-alone Java-based applications quickly and with minimal configuration. WebFlux is a responsive operating system provided by the Spring framework for running non-blocking, asynchronous, and event-driven applications. On the other hand, MongoDB is a popular NoSQL database that is widely used for its flexibility and scalability. In this article, we are going to build REST APIs using Spring Boot WebFlux and MongoDB. Using an API call, we will perform a Create, Read, Update, and Delete (CRUD) operation.
Steps to Implement CRUD Operation using MongoDB in Spring WebFlux
Below are the steps to implement CRUD REST API using the MongoDB database in Spring WebFlux.
Step 1. Create a Spring Boot Project
To start with the process of creating REST APIs, let’s first create a Spring Boot project. Open any web browser and navigate to start.spring.io and create a Spring Boot project with the following configurations.
- Project: Maven
- Language: Java
- Spring Boot: 3.2.3
- Packaging: Jar
- Java: 17
Dependencies:
- Lombok (Provides the Java annotation library)
- Spring Reactive Web (For building Reactive web applications)
- Spring Data Reactive MongoDB (For asynchronous stream processing in MongoDB)
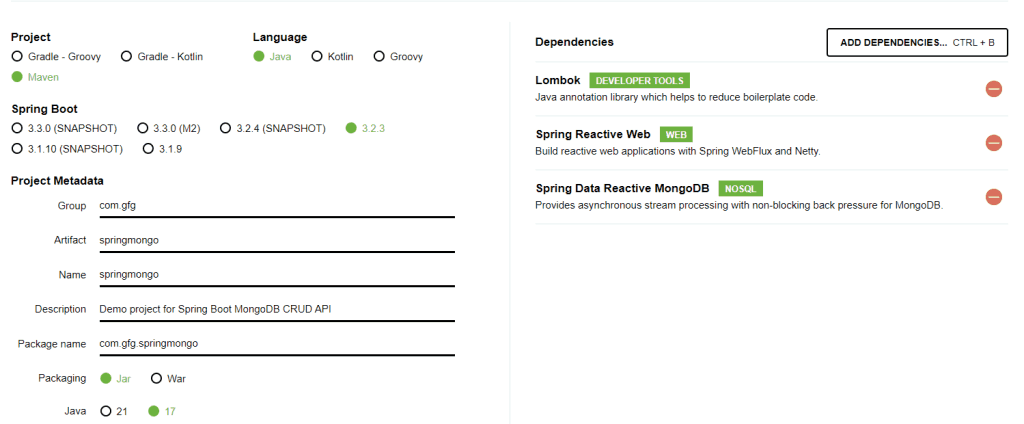
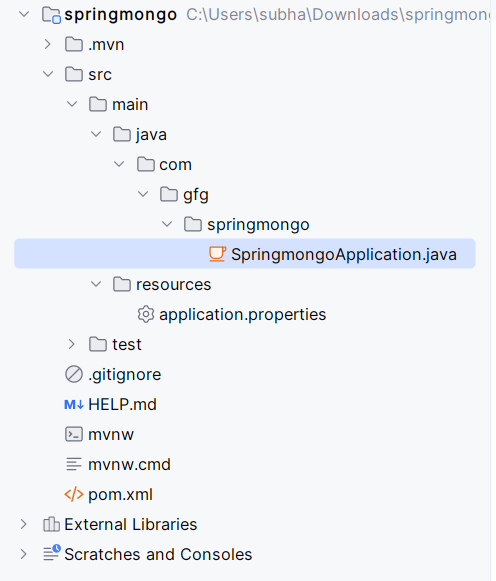
Click on Generate and it will download a .zip file in our system. Unzip the project and open it with any of your IDE available. Wait for few seconds for the IDE to resolve the dependencies and index the project. Once done, we can explore the project.
pom.xml File:
Below is the pom.xml file for reference.
XML
<?xml version="1.0" encoding="UTF-8"?>
<project xmlns="http://maven.apache.org/POM/4.0.0" xmlns:xsi="http://www.w3.org/2001/XMLSchema-instance"
    xsi:schemaLocation="http://maven.apache.org/POM/4.0.0 https://maven.apache.org/xsd/maven-4.0.0.xsd">
    <modelVersion>4.0.0</modelVersion>
    <parent>
        <groupId>org.springframework.boot</groupId>
        <artifactId>spring-boot-starter-parent</artifactId>
        <version>3.2.3</version>
        <relativePath/> <!-- lookup parent from repository -->
    </parent>
    <groupId>com.gfg</groupId>
    <artifactId>springmongo</artifactId>
    <version>0.0.1-SNAPSHOT</version>
    <name>springmongo</name>
    <description>Demo project for Spring Boot MongoDB CRUD API</description>
    <properties>
        <java.version>17</java.version>
    </properties>
    <dependencies>
        <dependency>
            <groupId>org.springframework.boot</groupId>
            <artifactId>spring-boot-starter-data-mongodb-reactive</artifactId>
        </dependency>
        <dependency>
            <groupId>org.springframework.boot</groupId>
            <artifactId>spring-boot-starter-webflux</artifactId>
        </dependency>

        <dependency>
            <groupId>org.projectlombok</groupId>
            <artifactId>lombok</artifactId>
            <optional>true</optional>
        </dependency>
        <dependency>
            <groupId>org.springframework.boot</groupId>
            <artifactId>spring-boot-starter-test</artifactId>
            <scope>test</scope>
        </dependency>
        <dependency>
            <groupId>io.projectreactor</groupId>
            <artifactId>reactor-test</artifactId>
            <scope>test</scope>
        </dependency>
    </dependencies>

    <build>
        <plugins>
            <plugin>
                <groupId>org.springframework.boot</groupId>
                <artifactId>spring-boot-maven-plugin</artifactId>
                <configuration>
                    <excludes>
                        <exclude>
                            <groupId>org.projectlombok</groupId>
                            <artifactId>lombok</artifactId>
                        </exclude>
                    </excludes>
                </configuration>
            </plugin>
        </plugins>
    </build>

</project>
Step 2: Configure MongoDB
For this project, we are going to use MongoDB which is locally installed in our system. Let’s describe the details in application.properties file in the Spring Boot Project.
spring.data.mongodb.host=localhost
spring.data.mongodb.port=27017
spring.data.mongodb.database=mydb
Here we have defined the source of MongoDB and the respective port number to use the database. We have also defined the database schema to use.
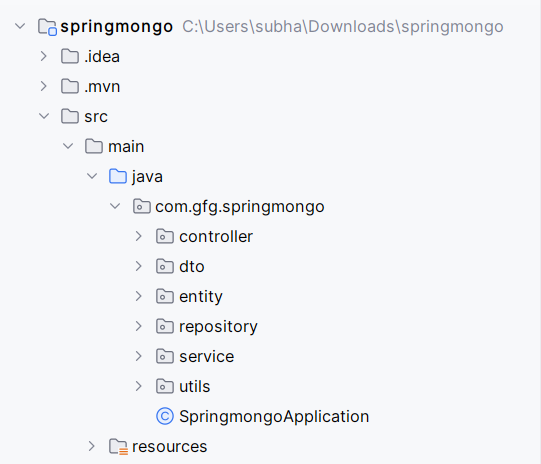
Step 3. Create necessary Packages
Let’s create the necessary packages we will require in our project, so we can get a clear idea about the structure of this project. Right Click on the com.gfg.springmongo package and then click on New and then select Package to create new package.

Create the following packages for now, and we will discuss the usage of these packages as we move forward.
- controller
- dto
- entity
- repository
- service
- utils
Step 4. Create Entity
- In the Entity package we will be creating a Product class which will be the MongoDB document.
- We will add required attributes in the document and configure constructors and getters and setters for the class.
- For constructors and getter and setters we will use lombok annotations. Declare the id as @Id to set it as the primary key.
Product.java:
Java
package com.gfg.springmongo.entity;

import lombok.AllArgsConstructor;
import lombok.Data;
import lombok.NoArgsConstructor;
import org.springframework.data.annotation.Id;
import org.springframework.data.mongodb.core.mapping.Document;

// An entity class representing a product
@Data
@AllArgsConstructor
@NoArgsConstructor
@Document(collection = "products")
public class Product {
    // The ID of the product
    @Id
    private String id;
    // The name of the product
    private String name;
    // The quantity of the product
    private int qty;
    // The price of the product
    private double price;
}
Step 5. Create Dto Class
- Dto (Data Transfer Object) is a design pattern that allows for exchange of data between software application layers, business logic layer and presentation layer.
- The primary goal of Dto is to reduce the number of function calls between the layers.
- Here we will create a Dto class for Product class and use it to encapsulate data transfer between controller and service layer.
- This will help us maintain the modularity of the system.
ProductDto.java:
Java
package com.gfg.springmongo.dto;

import lombok.AllArgsConstructor;
import lombok.Data;
import lombok.NoArgsConstructor;

// A data transfer object (DTO) representing a product
@Data
@AllArgsConstructor
@NoArgsConstructor
public class ProductDto {

    // The ID of the product
    private String id;
    // The name of the product
    private String name;
    // The quantity of the product
    private int qty;
    // The price of the product
    private double price;
}
Step 6. Create Repository
- Now, we will create the repository interface to use as data access layer.
- It will be used to access MongoDB database. Here instead of defining all the methods for CRUD operations, we will extend the ReactiveMongoRepository provided by Spring Data MongoDB.
- This interface will provide CRUD operations to our Entity class. We will annotate this interface with @Repository annotation.
ProductRepository.java:
Java
package com.gfg.springmongo.repository;

import com.gfg.springmongo.Product;
import org.springframework.data.mongodb.repository.ReactiveMongoRepository;
import org.springframework.stereotype.Repository;

// Repository interface for managing Product entities
@Repository
public interface ProductRepository extends ReactiveMongoRepository<Product, String> {

}
Step 7. Create Service
Now we will create a service class and implement all necessary methods required for CRUD operations.
- Here we will be using provided functionalities of the repository interface.
- As we are using Reactive programing, we will be using Mono and Flux types to represent asynchronous sequence of elements.
- Where Mono represents a stream of 0 or 1 element and Flux is for a stream of 0 to N elements.
- Here we will be using the ProductDto class to get data from the client and also use Dto to show data.
- By implementing this, we will not expose our entity class. We will be using DtoToEntity mapping and vice-versa whenever required.
ProductService.java:
Java
package com.gfg.springmongo.service;

import com.gfg.springmongo.dto.ProductDto;
import com.gfg.springmongo.entity.Product;
import com.gfg.springmongo.repository.ProductRepository;
import com.gfg.springmongo.utils.AppUtils;
import org.springframework.beans.factory.annotation.Autowired;
import org.springframework.data.domain.Range;
import org.springframework.stereotype.Service;
import reactor.core.publisher.Flux;
import reactor.core.publisher.Mono;

// Service class for managing Product-related operations
@Service
public class ProductService {

    @Autowired
    private ProductRepository repository;

    // Get all products
    public Flux<ProductDto> getProducts(){
        return repository.findAll().map(AppUtils::entityToDto);
    }

    // Get product using Id
    public Mono<ProductDto> getProduct(String id){
        return repository.findById(id).map(AppUtils::entityToDto);
    }

    // Create Product
    public Mono<ProductDto> saveProduct(Mono<ProductDto> productDtoMono){
        return  productDtoMono.map(AppUtils::dtoToEntity)
                .flatMap(repository::insert)
                .map(AppUtils::entityToDto);
    }

    // Update Product
    public Mono<ProductDto> updateProduct(Mono<ProductDto> productDtoMono, String id){
        return repository.findById(id)
                .flatMap(p -> productDtoMono.map(AppUtils::dtoToEntity)
                        .doOnNext(e -> e.setId(id)))
                .flatMap(repository::save)
                .map(AppUtils::entityToDto);
    }

    // Delete Product
    public Mono<Void> deleteProduct(String id){
        return repository.deleteById(id);
    }
}
Step 8: Create Mapping between Entity and Dto
As we mentioned in the previous step, we will use the Dto class for data collection and sending data to client, we need to map the entity class and the Dto class with each other.
- For this let’s create a AppUtils class in the utils package and write the following logic.
- We will be using BeanUtils.copyProperties method of Spring framework to map the classes.
Java
package com.gfg.springmongo.utils;

import com.gfg.springmongo.dto.ProductDto;
import com.gfg.springmongo.entity.Product;
import org.springframework.beans.BeanUtils;

// Utility class for converting between Product and ProductDto objects
public class AppUtils {

    // Convert Product entity to ProductDto
    public static ProductDto entityToDto(Product product) {
        ProductDto productDto = new ProductDto();
        BeanUtils.copyProperties(product, productDto);
        return productDto;
    }

    // Convert ProductDto to Product entity
    public static Product dtoToEntity(ProductDto productDto) {
        Product product = new Product();
        BeanUtils.copyProperties(productDto, product);
        return product;
    }
}
Step 9: Create Controller
Once we have completed all of the above steps it’s time to create the REST APIs that will be exposed to the clients.
- The APIs will be responsible to handle HTTP requests.
- We will be using GET mapping to retrieve data, POST Mapping to insert data in the database, Put mapping for update and Delete mapping to delete a record.
- We will be using reactive programming concepts to define data operations.
ProductController.java:
Java
package com.gfg.springmongo.controller;

import com.gfg.springmongo.dto.ProductDto;
import com.gfg.springmongo.service.ProductService;
import org.springframework.beans.factory.annotation.Autowired;
import org.springframework.web.bind.annotation.*;
import reactor.core.publisher.Flux;
import reactor.core.publisher.Mono;

// Controller class for managing Product-related HTTP requests
@RestController
@RequestMapping("/products")
public class ProductController {

    @Autowired
    private ProductService service;

    // Get all products
    @GetMapping
    public Flux<ProductDto> getProducts(){
        return service.getProducts();
    }

    // GET product using Id
    @GetMapping("/{id}")
    public Mono<ProductDto> getProduct(@PathVariable String id){
        return service.getProduct(id);
    }

    // Create new Product
    @PostMapping
    public Mono<ProductDto> saveProduct(@RequestBody Mono<ProductDto> productDtoMono){
        return service.saveProduct(productDtoMono);
    }

    // Update product using Id
    @PutMapping("/update/{id}")
    public Mono<ProductDto> updateProduct(@RequestBody Mono<ProductDto> productDtoMono, @PathVariable String id){
        return service.updateProduct(productDtoMono, id);
    }

    // Delete Product using Id
    @DeleteMapping("/delete/{id}")
    public Mono<Void> deleteProduct(@PathVariable String id){
        return service.deleteProduct(id);
    }
}
Step 10. Run the Application
Now it’s the time to run our spring application to use the Rest APIs to perform CRUD operations. But before we run our spring application, we need to make sure thatyour database server is running. To do so, Go to,
C:\Program Files\MongoDB\Server\7.0\bin
And open Terminal in this location and execute the following command to start the MongoDB server.
mongod
Now in our Spring application, go to the SpringmongoApplication.java file and run it.
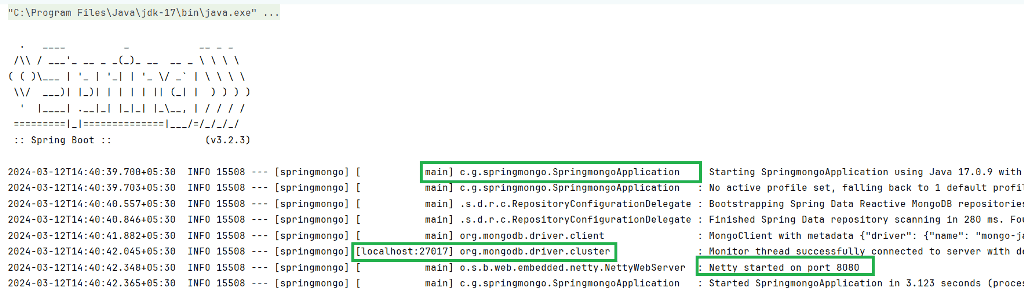
As we can see, our Spring Boot WebFlux application is successfully running on port no, 8080 and using MongoDB database which is running on port 27017. Thus, we have successfully created a Spring Boot WebFlux application with MongoDB database having CRUD operations Rest APIs.
Testing the APIs
Once we have created and run our application, now it’s time to check if the REST APIs are performing their tasks properly or not. To check this, open Postman application in your computer and let the spring application active on port no 8080. We have defined the controller mapping as “/products”, hence the API to access the products will be
localhost:8080/products
1. Create Operation
As of now, our database is empty and holds no record. Let’s send a POST request and insert a product details.
{
    "name":"DSA Couse",
    "qty":1,
    "price":999
}
Output:
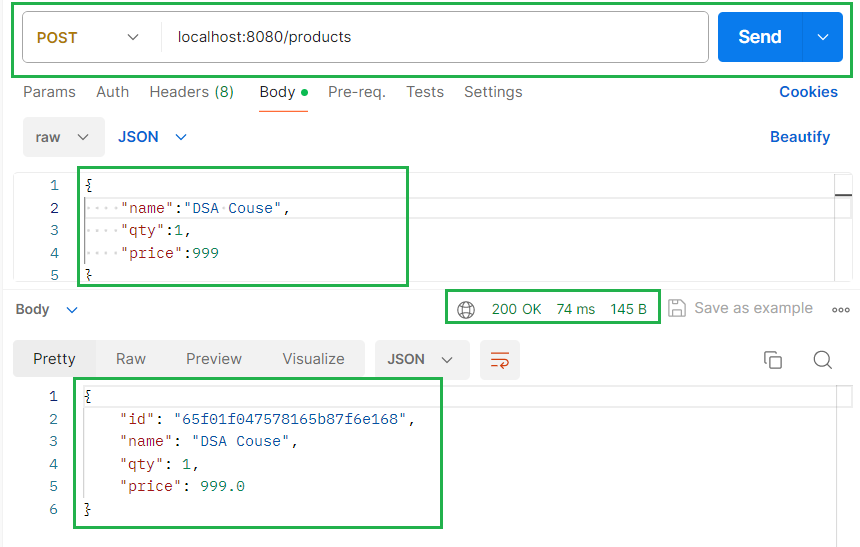
We can observe from the above picture that we made a POST request to the server and gave the data to insert into the database. The server responded with response code 200 and showed us the inserted record. We can also see that we didn’t provide the id attribute which is generated by the MongoDB.
2. Read Operation
We have inserted few more records in the database and now let’s use a GET request to get all the products details form the server.
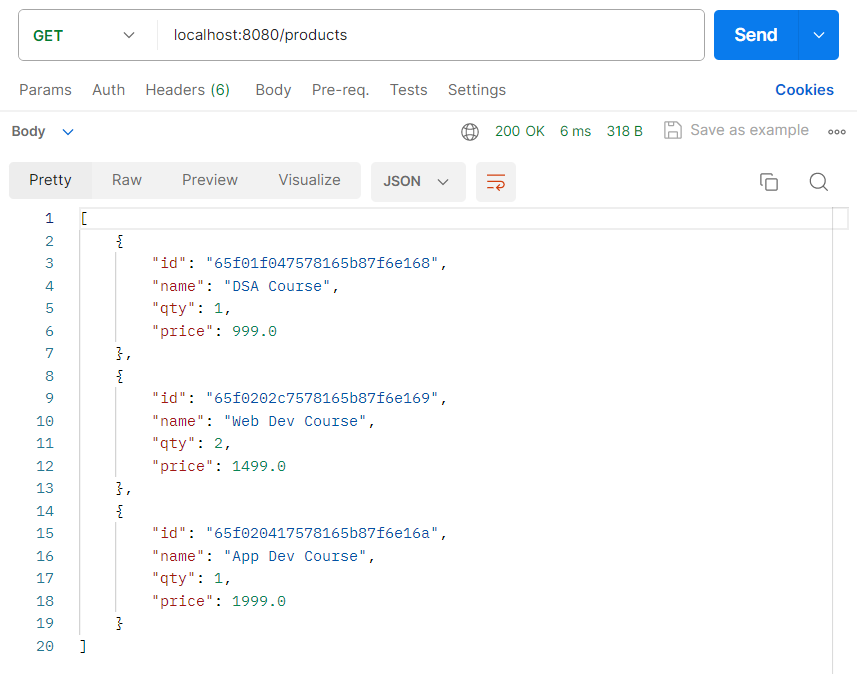
We can see that we got all the records which are there in our database.
Now, let’s try requesting a single product using Id.
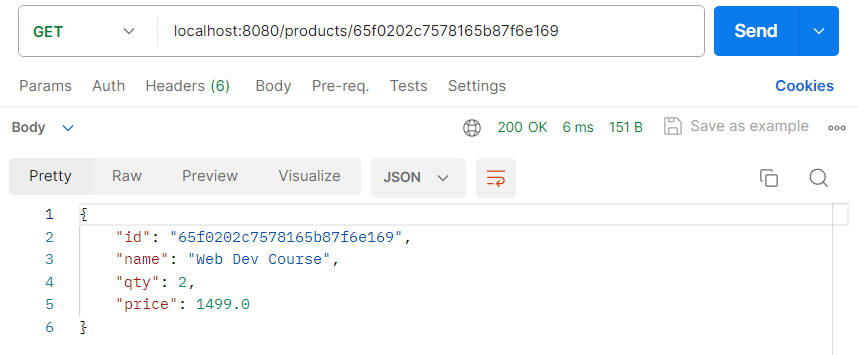
We have requested the details by using the Id of Web Dev Course and we got all details of this product.
3. Update Operation
Let’s suppose update the Web Dev Course‘s details and change it’s price to 799 and qty to 1. To do so we will be using PUT request.
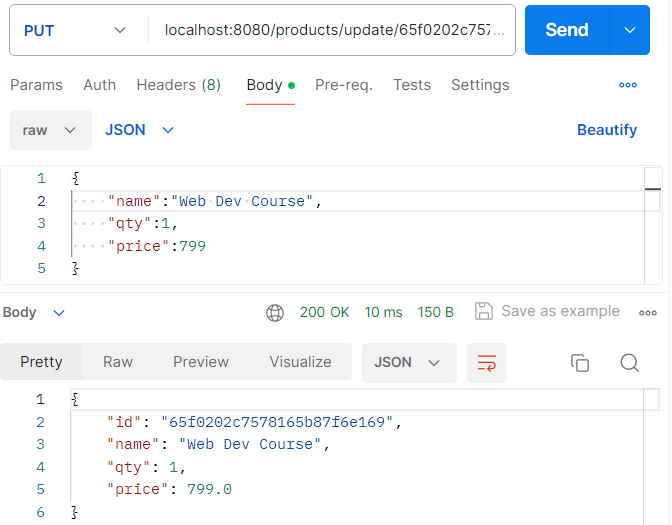
And we can see that the required changes are made that means we have successfully updated the product details.
4. Delete Operation
Now let’s delete a record from the server. Suppose we want to delete the the App Dev Course, so make a Delete request to the server using it’s Id.
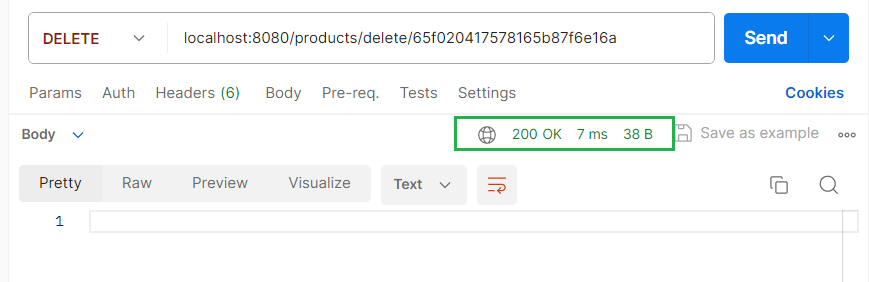
As there is no response set to the delete request we are not getting any output but the server response code is 200 OK, which means we have successfully deleted the product. Now to re-verify we can make a GET request to get all products details and see if App Dev Course is there or not.
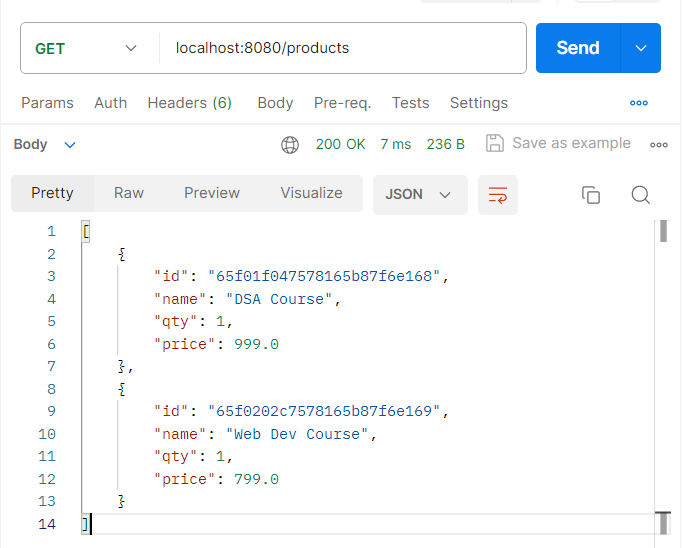
We can see, we only have two records left and there is no App Dev Course in the database. We can also observe that the Web Dev Course present here is also of updated values. Thus, all the REST APIs for CRUD operations are usable and performing perfectly.
Share your thoughts in the comments
Please Login to comment...