Spring WebFlux Reactive CRUD REST API Example
Last Updated :
07 Mar, 2024
Spring WebFlux can be defined as the reactive programming framework provided by the Spring ecosystem for the building of asynchronous, non-blocking, and event-driven applications and it can be designed to handle a large number of concurrent connections while consuming less resources.
Key Terminologies:
- Mono and Flux: Mono can represent the publisher that can emit at most one item, and it can emit either a single value or an error. Flux can represent the publisher that emits zero or more items, and it can emit the streams of the data asynchronously.
- Router Function: A router function can be defined as the mapping between request paths and handler functions, and it can allow us to define routes programmatically, mapping incoming requests to appropriate the handler functions.
Steps to Implement Spring WebFlux Reactive CRUD REST API
We can develop the simple Spring WebFlux reactive application that can save the user data after that we can retrieve, update, and delete the data of the user into the Spring WebFlux application.
Step 1: Create the spring project using spring initializer on creating the project add the below dependencies into the project.
Dependencies:
- Spring Reactive Web
- Spring Data Reactive MongoDB
- Spring Dev Tools
- Lombok
Once Create the spring project then the file structure looks like the below image.

Step 2: open the application.properties file and put the below code for the server port and mongodb database configuration to the project.
server.port= 8085
spring.data.mongodb.uri= mongodb://localhost:27017/springreactive
Step 3: Create the new package and it named as the model in that package create the new Java class and it named as User.
Go to src > com.gfg.springreactivecrudapp > model > User and put the below code.
Java
package com.gfg.springreactivecrudapp.model;
import lombok.AllArgsConstructor;
import lombok.Data;
import lombok.NoArgsConstructor;
import org.springframework.data.annotation.Id;
import org.springframework.data.mongodb.core.mapping.Document;
/**
* Represents a User entity.
*/
@Data
@AllArgsConstructor
@NoArgsConstructor
@Document
public class User {
@Id
private String id;
private String name;
private String qualification;
private String gender;
private int age;
}
|
Step 4: Create a new package and named it as the repository. In that package, create the new Java interface and named it as UserRepository.
Go to src > com.gfg.springreactivecrudapp > repository > UserRepository and put the below code.
Java
package com.gfg.springreactivecrudapp.repository;
import com.gfg.springreactivecrudapp.model.User;
import org.springframework.data.repository.reactive.ReactiveCrudRepository;
import org.springframework.stereotype.Repository;
/**
* Repository interface for User entities.
*/
@Repository
public interface UserRepository extends ReactiveCrudRepository<User, String> {
}
|
Step 5: Create the new package and it named as the configuration in that package create the new Java class and it named as UserHandler.
Go to src > com.gfg.springreactivecrudapp > configuration > UserHandler and put the below code.
Java
package com.gfg.springreactivecrudapp.configuration;
import com.gfg.springreactivecrudapp.model.User;
import com.gfg.springreactivecrudapp.repository.UserRepository;
import org.springframework.beans.factory.annotation.Autowired;
import org.springframework.stereotype.Component;
import org.springframework.web.reactive.function.server.ServerRequest;
import org.springframework.web.reactive.function.server.ServerResponse;
import reactor.core.publisher.Flux;
import reactor.core.publisher.Mono;
@Component
public class UserHandler {
@Autowired
private UserRepository userRepository;
/**
* Retrieve all users.
*/
public Mono<ServerResponse> getAllUsers(ServerRequest request) {
Flux<User> users = userRepository.findAll();
return ServerResponse.ok().body(users, User.class);
}
public Mono<ServerResponse> getUserById(ServerRequest request) {
String userId = request.pathVariable("id");
Mono<User> userMono = userRepository.findById(userId);
return userMono.flatMap(user -> ServerResponse.ok().bodyValue(user))
.switchIfEmpty(ServerResponse.notFound().build());
}
/**
* Create a new user.
*/
public Mono<ServerResponse> createUser(ServerRequest request) {
Mono<User> userMono = request.bodyToMono(User.class);
return userMono.flatMap(user -> userRepository.save(user))
.flatMap(savedUser -> ServerResponse.ok().bodyValue(savedUser));
}
/**
* Update an existing user.
*/
public Mono<ServerResponse> updateUser(ServerRequest request) {
String userId = request.pathVariable("id");
Mono<User> userMono = request.bodyToMono(User.class);
return userMono.flatMap(user -> {
user.setId(userId);
return userRepository.save(user);
}).flatMap(savedUser -> ServerResponse.ok().bodyValue(savedUser))
.switchIfEmpty(ServerResponse.notFound().build());
}
/**
* Delete a user by ID.
*/
public Mono<ServerResponse> deleteUser(ServerRequest request) {
String userId = request.pathVariable("id");
return userRepository.deleteById(userId)
.then(ServerResponse.ok().build())
.switchIfEmpty(ServerResponse.notFound().build());
}
}
|
Step 6: Create the new package and it named as the configuration in that package create the new Java class and it named as UserRouter.
Go to src > com.gfg.springreactivecrudapp > configuration > UserRouter and put the below code.
Java
package com.gfg.springreactivecrudapp.configuration;
import org.springframework.beans.factory.annotation.Autowired;
import org.springframework.context.annotation.Bean;
import org.springframework.context.annotation.Configuration;
import org.springframework.web.reactive.function.server.RouterFunction;
import org.springframework.web.reactive.function.server.RouterFunctions;
import org.springframework.web.reactive.function.server.ServerResponse;
import static org.springframework.web.reactive.function.server.RequestPredicates.*;
@Configuration
public class UserRouter {
@Autowired
private UserHandler userHandler;
/**
* Defines the routes for handling user-related HTTP requests.
*/
@Bean
public RouterFunction<ServerResponse> userRoutes() {
return RouterFunctions
.route(GET("/users"), userHandler::getAllUsers)
.andRoute(GET("/users/{id}"), userHandler::getUserById)
.andRoute(POST("/users"), userHandler::createUser)
.andRoute(PUT("/users/{id}"), userHandler::updateUser)
.andRoute(DELETE("/users/{id}"), userHandler::deleteUser);
}
}
|
Step 7: Open the main class and add the @EnableReactiveMongoRepositories into it.
Java
package com.gfg.springreactivecrudapp;
import org.springframework.boot.SpringApplication;
import org.springframework.boot.autoconfigure.SpringBootApplication;
import org.springframework.data.mongodb.repository.config.EnableReactiveMongoRepositories;
/**
* Main class to start the Spring Reactive CRUD application.
*/
@SpringBootApplication
@EnableReactiveMongoRepositories
public class SpringReactiveCrudAppApplication {
public static void main(String[] args) {
SpringApplication.run(SpringReactiveCrudAppApplication.class, args);
}
}
|
Step 8: Once complete the spring project and it run as spring application once it runs successful then it starts at port 8085.

Endpoints Outputs:
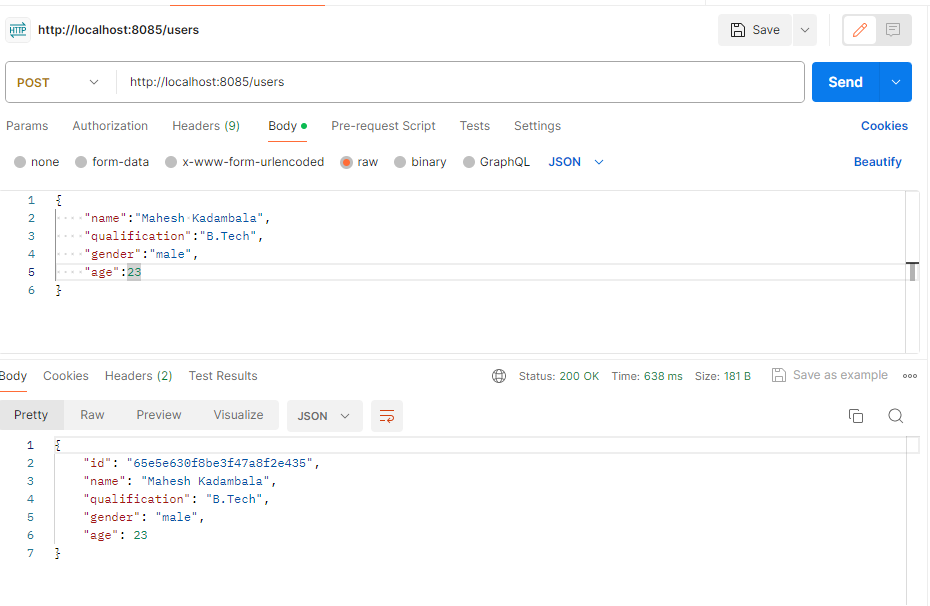
Create the User:
POST http://localhost:8085/users
Update the User:
PUT http://localhost:8085/users/{userid}

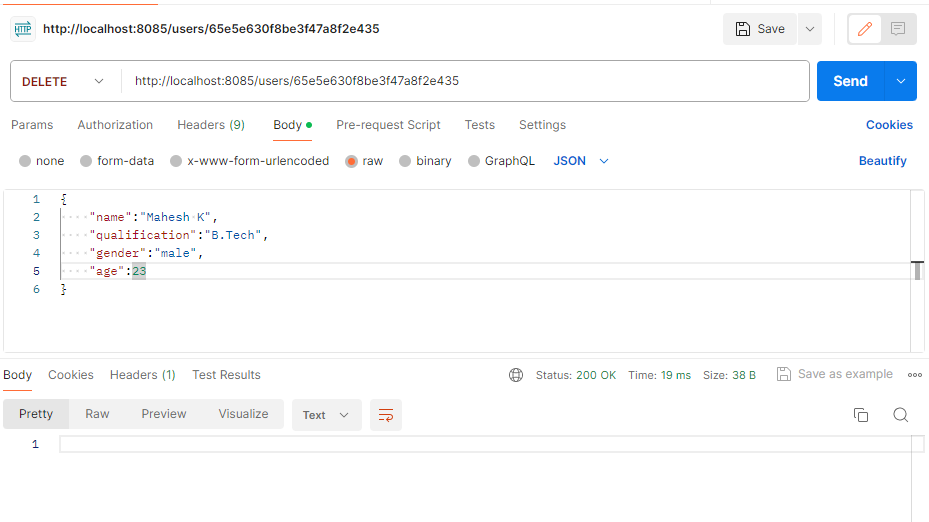
Delete the User:
DELETE http://localhost:8085/users/{userid}
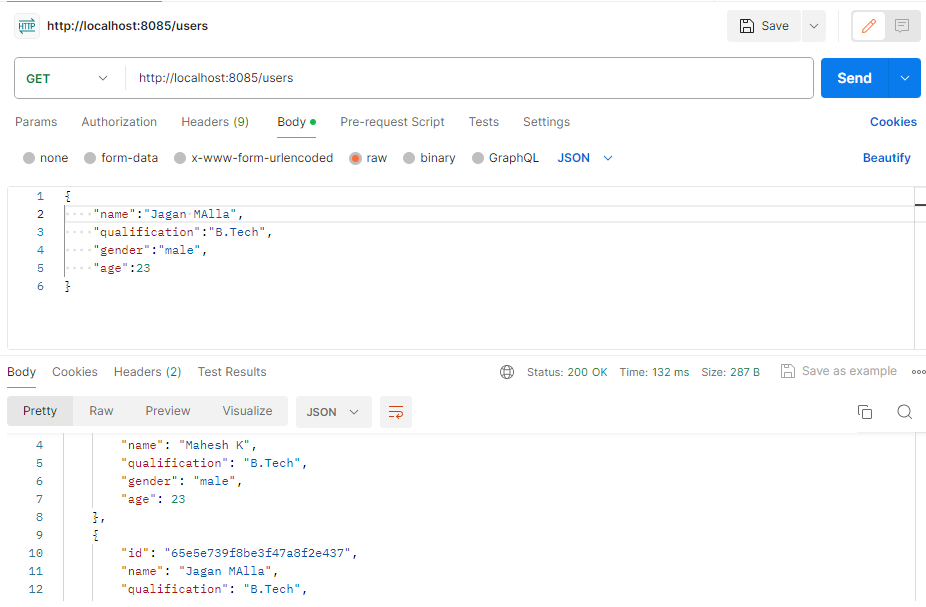
Get all Users:
GET http://localhost:8085/users
Get UserById:
GET http://localhost:8085/users/{userid}

We the follow the above steps and can successfully build the spring WebFlux reactive crud application and test the endpoints using postman.
Share your thoughts in the comments
Please Login to comment...