Spring Cloud Connectors and Heroku
Last Updated :
27 Mar, 2024
Spring boot includes Spring Cloud Connectors, a component of the Spring cloud framework that can facilitate the integration of Spring applications with various cloud services such as databases, messaging systems, and caching services. Connecting Spring applications to Heroku using Spring Cloud Connectors simplifies cloud resource planning and management.
Prerequisites:
- Basic knowledge of Spring Boot and Spring Cloud
- Basic Knowledge of Cloud Concepts and the Heroku platform
- Must have a Heroku account
Key Terminologies:
- Heroku: It is a cloud platform as a service (PaaS) that can enable developers to build, deploy, and scale applications without maintaining infrastructure and can support a wide range of programming languages and frameworks including Java and Spring Boot.
- Heroku Connect: This is a service that can synchronize data between Heroku Postgres databases and Salesforce orgs, and can enable developers to create applications that can interact with Salesforce data using the same tools and frameworks.
- Deployment: It can refer to the process of uploading the application code to the Heroku cloud platform and making it available to run and it can support the various deployment methods including Git-based deployments.
- Heroku Postgres: It can offer the managing of the PostSQL database services called the Heroku, and it can provide features such as automatic backup scaling and high availability and making it easy to integrate with the spring applications deployed on the Heroku.
Step-by-Step Implementation of Spring Cloud Connectors and Heroku
We develop the simple spring project after that it can deploy into the Heroku Cloud platform.
Step 1: Create the spring project using the spring intializr including the project including below dependencies into the project.
Dependencies:
- Spring Web
- Lombok
- Spring Dev Tools
- Postgres SQL Drivers
External Depedency:
<dependency>
    <groupId>org.springframework.cloud</groupId>
    <artifactId>spring-cloud-spring-service-connector</artifactId>
    <version>3.0.3</version>
</dependency>
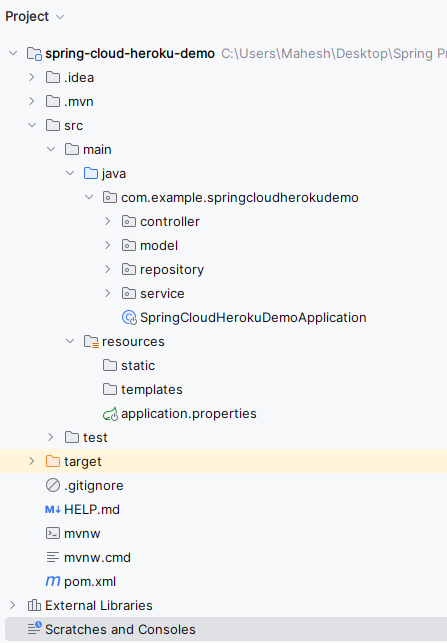
Once the project created, then the file structure looks like the below image.
Step 2: Open the application.properties file and put the below code for the configuration of the PostgreSQL database into the project.
spring.application.name=spring-cloud-heroku-demo
spring.datasource.url=jdbc:postgresql://localhost:5432/postgres
spring.datasource.username=localhost
spring.datasource.password=mahesh
spring.datasource.driver-class-name=org.postgresql.Driver
spring.jpa.database-platform=org.hibernate.dialect.PostgreSQLDialect
Step 3: Create the User class and put the below code.
Java
// Importing required classes and annotations
package com.example.springcloudherokudemo.model;

import jakarta.persistence.Entity;
import jakarta.persistence.GeneratedValue;
import jakarta.persistence.GenerationType;
import jakarta.persistence.Id;
import lombok.AllArgsConstructor;
import lombok.Data;
import lombok.NoArgsConstructor;

// Entity class representing a user
@Entity
@Data
@AllArgsConstructor
@NoArgsConstructor
public class User {

    @Id
    @GeneratedValue(strategy = GenerationType.IDENTITY)
    private Long id;
    private String username;
    private String email;

    // Getters and setters
}
Step 4: Create the UserRepository class and put the below code.
Java
package com.example.springcloudherokudemo.repository;

import com.example.springcloudherokudemo.model.User;
import org.springframework.data.jpa.repository.JpaRepository;

// Repository interface for User entity
public interface UserRepository extends JpaRepository<User, Long> {
}
Step 5: Create the UserService class and put the below code.
Java
package com.example.springcloudherokudemo.service;

import com.example.springcloudherokudemo.model.User;
import com.example.springcloudherokudemo.repository.UserRepository;
import org.springframework.beans.factory.annotation.Autowired;
import org.springframework.stereotype.Service;

import java.util.List;
import java.util.Optional;

// Service class for user-related operations
@Service
public class UserService {

    @Autowired
    private UserRepository userRepository;

    // Retrieve all users
    public List<User> getAllUsers() {
        return userRepository.findAll();
    }

    // Retrieve a user by ID
    public User getUserById(Long id) {
        Optional<User> optionalUser = userRepository.findById(id);
        return optionalUser.orElse(null);
    }

    // Create a new user
    public User createUser(User user) {
        return userRepository.save(user);
    }

    // Update an existing user
    public User updateUser(Long id, User user) {
        Optional<User> optionalExistingUser = userRepository.findById(id);
        if (optionalExistingUser.isPresent()) {
            User existingUser = optionalExistingUser.get();
            existingUser.setUsername(user.getUsername());
            existingUser.setEmail(user.getEmail());
            return userRepository.save(existingUser);
        }
        return null;
    }

    // Delete a user
    public boolean deleteUser(Long id) {
        Optional<User> optionalUser = userRepository.findById(id);
        if (optionalUser.isPresent()) {
            userRepository.deleteById(id);
            return true;
        }
        return false;
    }
}
Step 6: Create the UserController class and put the below code.
Java
package com.example.springcloudherokudemo.controller;

import com.example.springcloudherokudemo.model.User;
import com.example.springcloudherokudemo.service.UserService;
import org.springframework.beans.factory.annotation.Autowired;
import org.springframework.http.HttpStatus;
import org.springframework.http.ResponseEntity;
import org.springframework.web.bind.annotation.*;

import java.util.List;

// Controller class for managing user-related endpoints
@RestController
@RequestMapping("/users")
public class UserController {

    @Autowired
    private UserService userService;

    // Endpoint to retrieve all users
    @GetMapping("/")
    public ResponseEntity<List<User>> getAllUsers() {
        List<User> users = userService.getAllUsers();
        return ResponseEntity.ok(users);
    }

    // Endpoint to retrieve a user by ID
    @GetMapping("/{id}")
    public ResponseEntity<User> getUserById(@PathVariable Long id) {
        User user = userService.getUserById(id);
        if (user != null) {
            return ResponseEntity.ok(user);
        } else {
            return ResponseEntity.notFound().build();
        }
    }

    // Endpoint to create a new user
    @PostMapping("/")
    public ResponseEntity<User> createUser(@RequestBody User user) {
        User newUser = userService.createUser(user);
        return ResponseEntity.status(HttpStatus.CREATED).body(newUser);
    }

    // Endpoint to update an existing user
    @PutMapping("/{id}")
    public ResponseEntity<User> updateUser(@PathVariable Long id, @RequestBody User user) {
        User updatedUser = userService.updateUser(id, user);
        if (updatedUser != null) {
            return ResponseEntity.ok(updatedUser);
        } else {
            return ResponseEntity.notFound().build();
        }
    }

    // Endpoint to delete a user by ID
    @DeleteMapping("/{id}")
    public ResponseEntity<Void> deleteUser(@PathVariable Long id) {
        boolean deleted = userService.deleteUser(id);
        if (deleted) {
            return ResponseEntity.noContent().build();
        } else {
            return ResponseEntity.notFound().build();
        }
    }
}
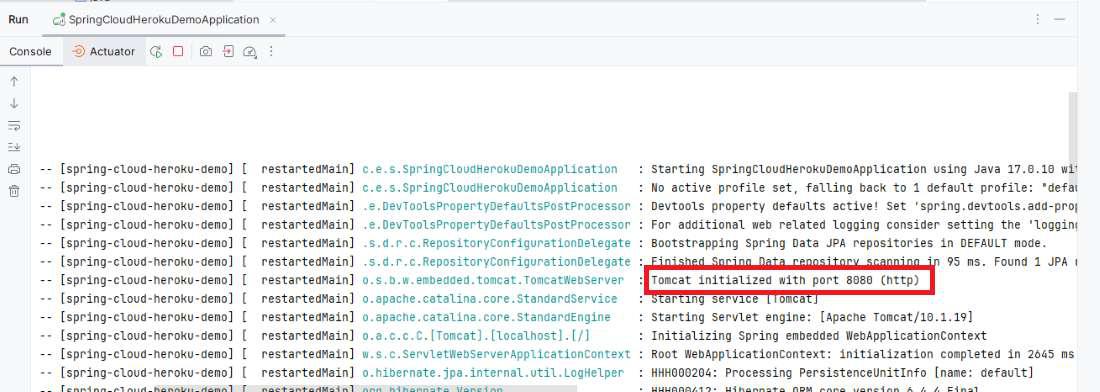
Step 7: Once the project completes, run the application and it will start at port 8080. Refer the below image for the better understanding.
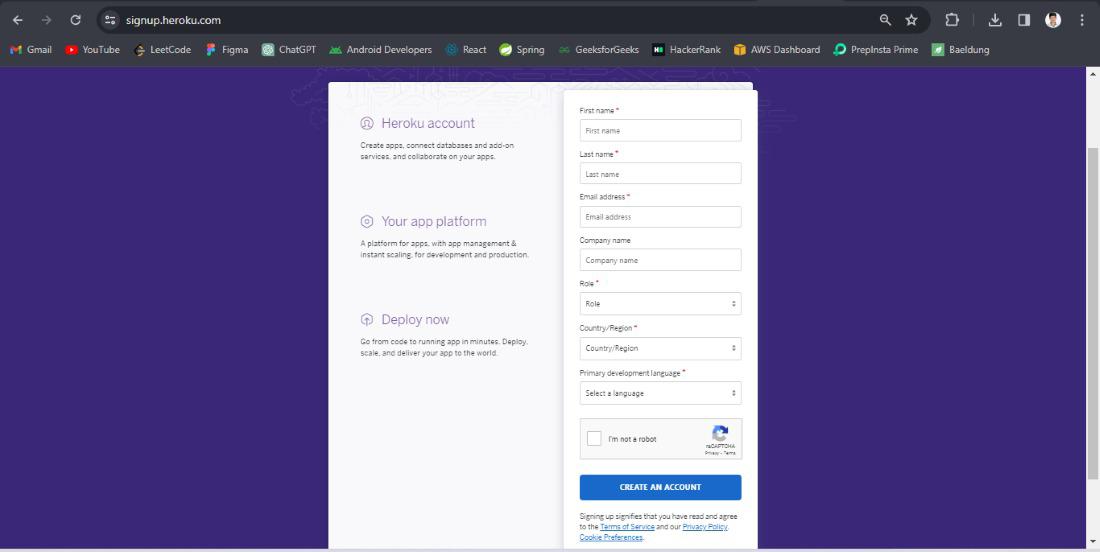
Step 8: Create the heroku account and deploy the spring project into the Heroku cloud platform. Open the link and create the heroku account. Refer the image for better understanding of heroku account creation.
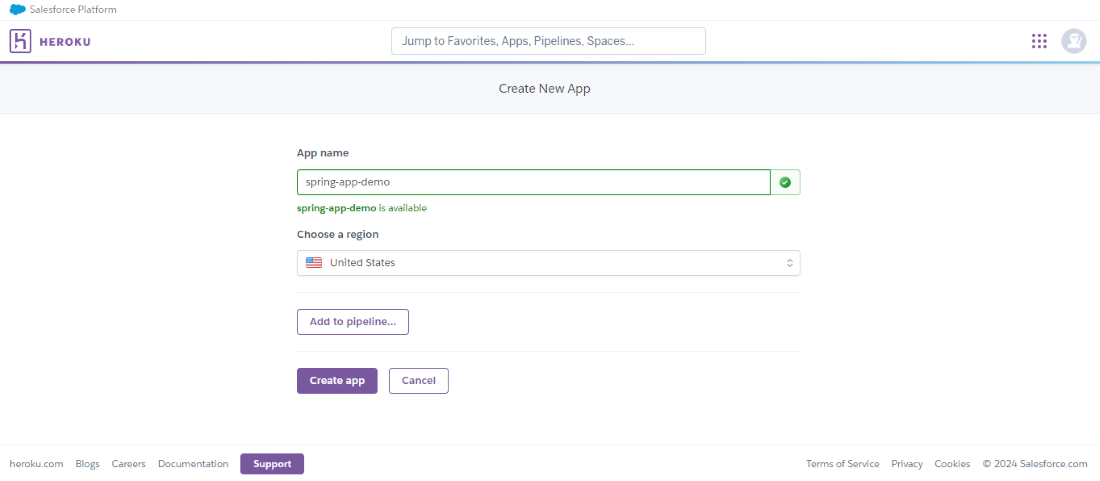
Step 9: Once the account created, click on the create button and create the app of the Heroku platform.
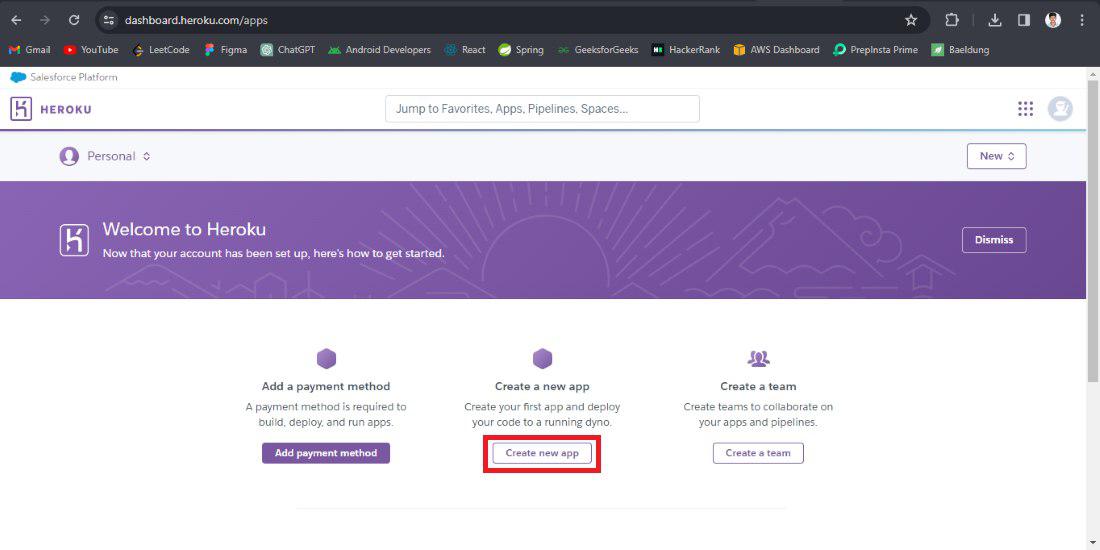
Create the app with require details.
Step 10: Once create the app into the Heroku platfrom after that connect to the github platform for deploying the spring application through the github repository.
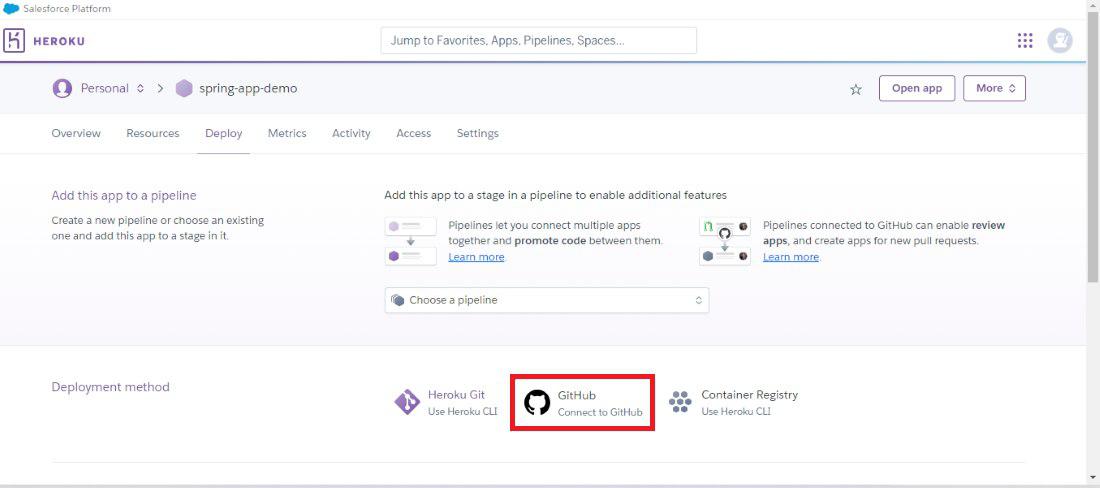
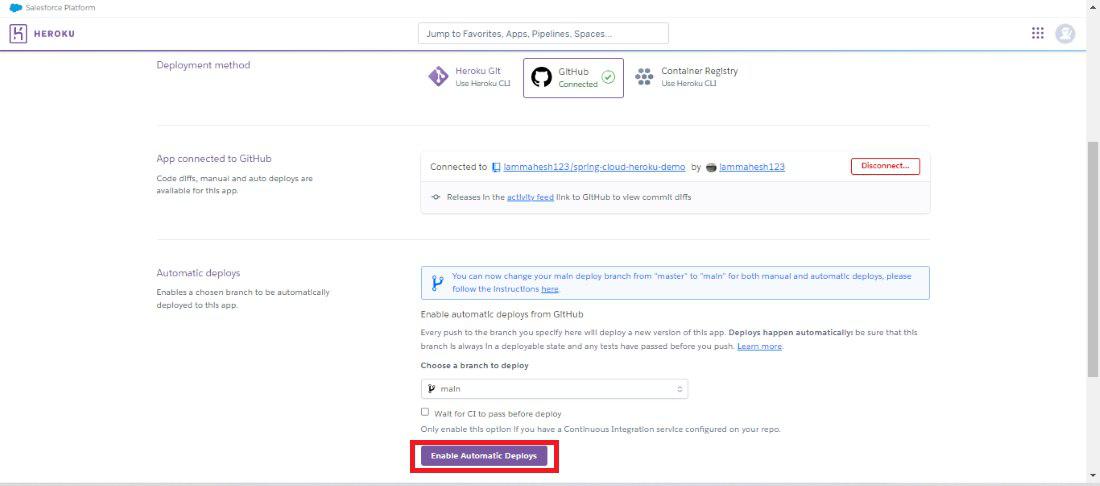
Step 11: Once connect the github then deploy the require spring project into the heroku platform. Refer the below image for the better understanding of the concept of the deployment.
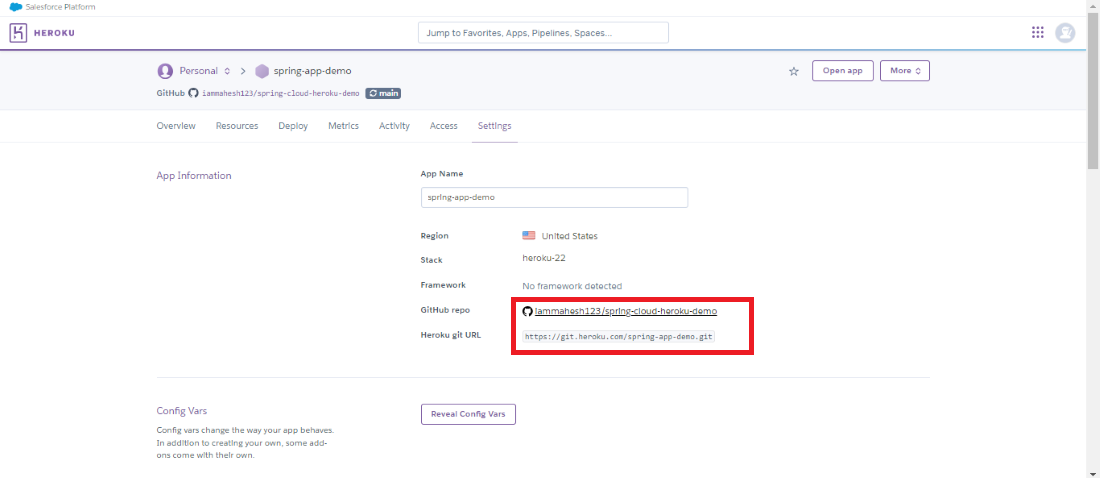
Step 12: After the completion of the deployment of the spring project, the dashbaord looks like the below image and it can show the github repository details heroku depolyment details of the project.
If we follow the above steps, then we can delpoy the spring application in the Heroku Cloud Platform.
Share your thoughts in the comments
Please Login to comment...