Simple chat Application using Websockets with FastAPI
Last Updated :
11 Dec, 2023
In this article, we’ll delve into the concept of WebSockets and their role in facilitating bidirectional communication between clients and servers. Subsequently, we’ll embark on the journey of building a real-time multi-client chat application. This application will empower numerous users to connect to the server via the WebSocket protocol, fostering seamless message exchange between them.
What is FastAPI?
FastAPI, a Python web framework, has garnered substantial acclaim for its contemporary approach to API development. It’s distinguished by its outstanding performance, user-friendly design, and automatic creation of interactive API documentation. Compatible with Python 3.6 and later, FastAPI employs Python’s type hinting system to validate, serialize, and document data. Notably, it provides robust support for asynchronous programming, enabling the creation of high-performance, non-blocking APIs.
What is WebSocket?
WebSocket facilitates bidirectional communication between a client and a server via a single TCP connection. It is primarily employed for real-time server communication. For instance, in a web application featuring a user leaderboard, users typically need to repeatedly request the latest leaderboard data from the server. To address this, users can connect to the server using the WebSocket protocol, enabling the server to transmit the most recent leaderboard information to the client without necessitating frequent HTTP requests.
Chat Applications with FastAPI and WebSocket
We are creating a simple chat application that will allow multiple users to send messages to each other. For this purpose, we are going to create a ConnectionManager class, which will be responsible for accepting WebSocket requests from clients and sending messages to single users, and groups of connected users. The ConnectionManager class will maintain a list of WebSocket connections.
Step 1: To install FastAPI and WebSockets, use the following commands:
pip install fastapi
pip install websockets
Step 2: To set up the project structure, create a folder named gfg_realtime_application. Inside this folder, create another folder templates, and within the templates folder, create a file named index.html and copy the following content into it. We will need FastAPI and WebSockets to create the real-time chat application.
File Structure:
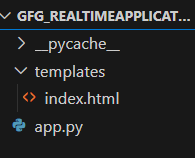
File Strucutre
Step 3: index.html
This code creates a basic WebSocket client that connects to a WebSocket server, displays messages received from the server, and allows users to send messages to the server through a simple web interface.
- HTML Structure: The HTML structure sets up a simple webpage with a title, heading, input field, a submit button, and a container div. The purpose of this webpage is to send and receive WebSocket messages.
- WebSocket Connection: JavaScript code in the
<script> section creates a WebSocket connection to the server using the WebSocket constructor. It uses the address ws://127.0.0.1:8000/ws/ and appends a random id to the URL.
- Message Handling: There’s a
showMessage function that appends messages to the container div on the webpage. It’s used to display messages received from the WebSocket server.
- Event Listeners: Event listeners are set up to handle different WebSocket events. When the connection is established (
'open' event), it displays a “Connected to server” message. When a message is received from the server ('message' event), it displays the received message in the container. When the connection is closed ('close' event), it shows a “Connection closed” message.
- User Interaction: Users can input text into the input field and click the “Submit” button. When the button is clicked, the content of the input field is sent as a WebSocket message to the server using the
socket.send(inputValue) method. This allows users to send messages to the WebSocket server.
HTML
<!DOCTYPE html>
<html lang="en">
<head>
<meta charset="UTF-8">
<meta name="viewport" content="width=device-width, initial-scale=1.0">
<title>WebSocket Example</title>
</head>
<body>
<h1>GFG WebSocket Example</h1>
<input type="text" id="inputText" placeholder="Type something...">
<button id="submitButton">Submit</button>
<div id="container"></div>
<script>
function getRandomInt(min, max) {
return Math.floor(Math.random() * (max - min + 1)) + min;
}
// Example: Generate a random number between 1 and 100
const id = getRandomInt(1, 1000);
// Create a WebSocket connection to the server
// Function to display messages on the web page
function showMessage(message) {
const messageContainer = document.getElementById('container');
const messageElement = document.createElement('div');
messageElement.textContent = message;
messageContainer.appendChild(messageElement);
}
// Event handler for when the connection is established
socket.addEventListener('open', (event) => {
showMessage('Connected to server.');
});
// Event handler for receiving messages from the server
socket.onmessage = (event) => {
showMessage("You sent : " + event.data)
}
// Event handler for when the connection is closed
socket.addEventListener('close', (event) => {
showMessage('Connection closed.');
});
const inputText = document.getElementById("inputText");
const submitButton = document.getElementById("submitButton");
submitButton.addEventListener("click", function () {
const inputValue = inputText.value;
socket.send(inputValue)
});
</script>
</body>
</html>
|
Output:
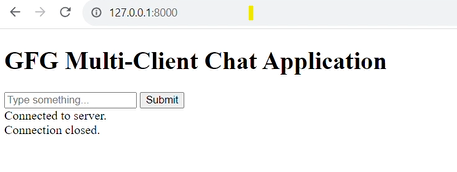
index.html
Step 4: app.py
In the above code:
- ConnectionManager Class: This class,
ConnectionManager, is responsible for managing WebSocket connections. It maintains a list of active WebSocket connections (self.active_connections). It has methods to connect, disconnect, send personal messages, and broadcast messages to all connected clients.
- Websocket Endpoint: The
/ws/{client_id} endpoint is where WebSocket connections are handled. When a client connects, it calls the connectionmanager.connect(websocket) to accept and add the connection to the list. It then enters a loop to receive messages from the client, sending personal messages back to the sender and broadcasting messages to all connected clients.
- HTML Template: The
/ endpoint renders an HTML template using Jinja2 templates. This template is typically used to serve the web interface for the chat application. It allows users to input text and send messages.
- WebSocketDisconnect Exception: Inside the WebSocket loop, there’s an exception handler for
WebSocketDisconnect. When a client disconnects, this exception is raised, and it calls connectionmanager.disconnect(websocket) to remove the disconnected client from the list and broadcasts a message to inform others about the departure.
- Overall Flow: The FastAPI application initializes a
ConnectionManager instance (connectionmanager) to handle WebSocket connections. Clients can access the chat interface via a web page served at the root URL (/). When a client connects via a WebSocket to the /ws/{client_id} endpoint, they can send and receive messages to and from other clients. The ConnectionManager helps manage these WebSocket connections and messaging.
Python3
from typing import List
from fastapi.templating import Jinja2Templates
from fastapi.responses import HTMLResponse
from fastapi import FastAPI, WebSocket, Request, WebSocketDisconnect
app = FastAPI()
templates = Jinja2Templates(directory="templates")
class ConnectionManager:
def __init__(self):
self.active_connections: List[WebSocket] = []
async def connect(self, websocket: WebSocket):
await websocket.accept()
self.active_connections.append(websocket)
def disconnect(self, websocket: WebSocket):
self.active_connections.remove(websocket)
async def send_personal_message(self, message: str, websocket: WebSocket):
await websocket.send_text(message)
async def broadcast(self, message: str, websocket: WebSocket):
for connection in self.active_connections:
if(connection == websocket):
continue
await connection.send_text(message)
connectionmanager = ConnectionManager()
@app.get("/", response_class=HTMLResponse)
def read_index(request: Request):
return templates.TemplateResponse("index.html", {"request" : request})
@app.websocket("/ws/{client_id}")
async def websocket_endpoint(websocket: WebSocket, client_id: int):
await connectionmanager.connect(websocket)
try:
while True:
data = await websocket.receive_text()
await connectionmanager.send_personal_message(f"You : {data}", websocket)
await connectionmanager.broadcast(f"Client #{client_id}: {data}", websocket)
except WebSocketDisconnect:
connectionmanager.disconnect(websocket)
await connectionmanager.broadcast(f"Client #{client_id} left the chat")
|
Step 5: Run the below command in your terminal and open the browser .
python -m uvicorn app:app --reload
The above command will start the server on localhost port 8000.
Output
Share your thoughts in the comments
Please Login to comment...