Building a Simple Application using KivyMD in Python
Last Updated :
07 Jun, 2022
KivyMD is an extension of the Kivy framework. KivyMD is a collection of Material Design widgets for use with Kivy, a GUI framework for making mobile applications. It is similar to the Kivy framework but provides a more attractive GUI. In this article, we will see how to make a simple application in KivyMD using Screen, Label, TextFieldInput, and Button.
Installation:
In order to start KivyMD, you must first install the Kivy framework on your computer. It can be installed using the below command:
pip install kivymd
Widgets Used:
We need to import the below widgets using kivyMD.uix library:
- MDLabel(): This widget is used in KivyMD applications to add a label or to display texts as a label.
MDLabel(text, halign, theme_text_color, text_color, font_style)
Parameters:
- text- The text we want to put on the label.
- halign- The position where we want to put the label.
- theme_text_color- The theme for text colors like custom, primary, secondary, hint, or error.
- text_color- If theme_text_color is custom we can assign text color to an RGB tuple.
- font_style- Like caption, headings.
- MDTextField(): This widget is used to add buttons in the KivyMD window.
MDTextField(text, pos_hint)
- text- The text we want to put in the TextField.
- pos_hint- A dictionary having the position with respect to x-axis and y-axis.
- MDRectangleFlatButton(): This widget is used to add rectangular-shaped buttons to a KivyMD application.
MDRectangleFlatButton(text, pos_hint, on_release)
- text- The text we want to put on the button.
- pos_hint- A dictionary having the position with respect to the x-axis and y-axis.
- on_release- It is a function that has the properties that we want to call on clicking the button.
Let’s see the code for creating the simple app using the above-stated widgets and then we will discuss the code in detail.
Python3
from kivymd.app import MDApp
from kivymd.uix.label import MDLabel
from kivymd.uix.screen import Screen
from kivymd.uix.textfield import MDTextField
from kivymd.uix.button import MDRectangleFlatButton
class Demo(MDApp):
def build(self):
screen = Screen()
l = MDLabel(text="HI PEOPLE!", halign='center',
theme_text_color="Custom",
text_color=(0.5, 0, 0.5, 1),
font_style='Caption')
name = MDTextField(text="Enter name", pos_hint={
'center_x': 0.8, 'center_y': 0.8},
size_hint_x=None, width=100)
btn = MDRectangleFlatButton(text="Submit", pos_hint={
'center_x': 0.5, 'center_y': 0.3},
on_release=self.btnfunc)
screen.add_widget(name)
screen.add_widget(btn)
screen.add_widget(l)
return screen
def btnfunc(self, obj):
print("button is pressed!!")
if __name__ == "__main__":
Demo().run()
|
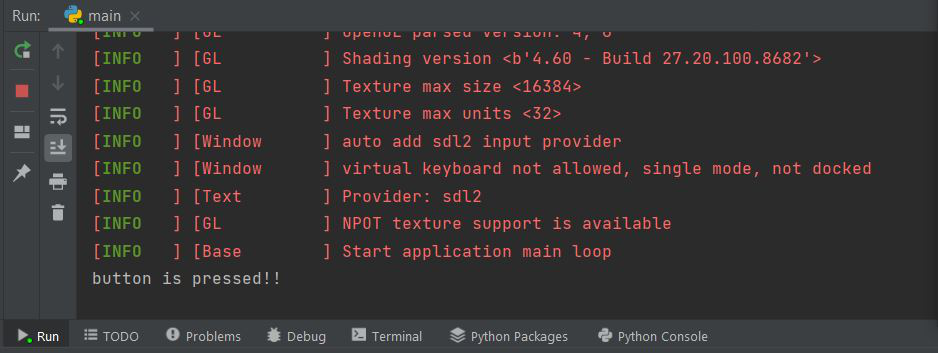
Output:

When the button is pressed it displays the following output in the command prompt:
Explanation:
- This class Demo is derived from the App() class of the kivymd.app. This class is the base class for creating the kivyMD Application. It is basically the main entry point into the kivyMD run loop.
- Here the build() method “Initializes the application; it will be called only once. If this method returns a widget (tree), it will be used as the root widget and added to the window.
- Here in the build method firstly we define a screen for the widgets to be shown on it. Then we add the widgets one by one
- Label for the title or heading of the page.
- A text field for user input. You can add more text fields.
- A button for submitting or performing any function. Here on clicking submit button, a message is getting printed in console. We have made the function btnfunc() for the same.
- The Demo.run() is the run() method that launches the app in standalone mode and calls the class Demo which returns the screen.
Like Article
Suggest improvement
Share your thoughts in the comments
Please Login to comment...