Building Real-Time Applications with Java Spring Boot and WebSocket
Last Updated :
21 Mar, 2024
Real-time applications are those that require immediate response and interaction with the users and they can often involve data updates or notifications without requiring the page refresh. Java Spring Boot along with the WebSocket can provide a powerful framework for building such applications. WebSocket is the communication channel over a single TCP connection, and it can enable real-time, bidirectional communication between the client and the server. WebSocket can allow both the client and server to initiate communication at any time and also enable instant data exchange without the need for continuous pooling or long-lived connections.
Prerequisites:
- Basic Knowledge of Java
- Familiarity with Spring Boot
- Good Understanding of the Web Development
- Basic knowledge of JavaScript
Key Terminologies:
- WebSocket: It is the communication protocol that can provide full-duplex communication channels over a single TCP connection, and it can be enables the real time bidirectional communication between the client and server. It can allow for the instant data exchange without the continuous polling.
- Full-Duplex Communication: It can be referring to the ability to the send and receive data simultaneously between the client and server and in context of the web socket and it can both the client and server can initiate the communication at any time without the waiting for the response.
- HTTP Handshake: It can be defined as the initial communication between the client and server to the establish the webSocket connection and it can be involving the upgrading the HTTP connection to the webSocket connection using the special upgrade request and response mechanism.
- Client-Side WebSocket Connection: It can refer to the WebSocket connection establishment from the client browsers to the server and it can be allowing the client to the send and receive the real time messages to and from the server.
- Server-Side WebSocket Endpoint: It can be referring to the specific URL or the endpoint on the server that can be handles the WebSocket connections and the incoming message from the clients. The WebSocket endpoints are the typically implemented as the annotated by the controller methods.
Implementation of Java Spring Boot and WebSocket
We can develop the simple real-time chat application using Java Spring Boot and WebSocket of the project.
Step 1: Create the spring project using spring initializr on creating the spring project including the below dependencies into the project.
Dependencies:
- Spring Reactive
- Spring Websocket
- Spring Web
- Lombok
- Thymeleaf
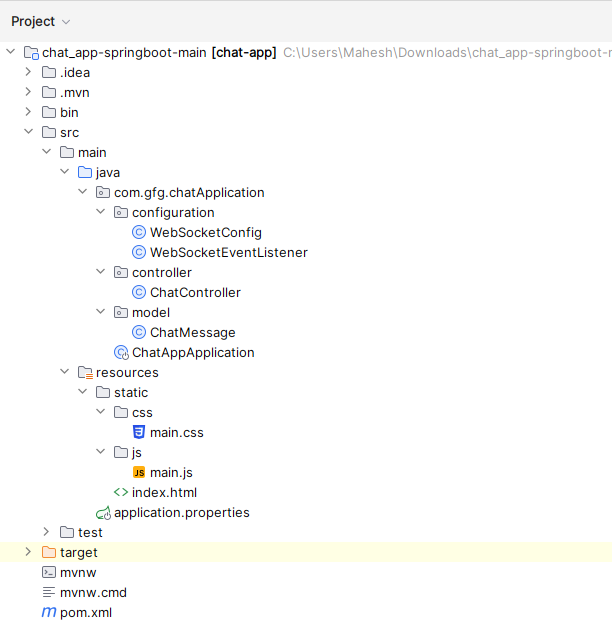
After creating the spring project, the file structure looks like the below image.
Step 2: Create the new package and it named as model in that package create the new Java class and it named as the ChatMessage.
Go to src > java > main > com.gfg.chatApplication > model > ChatMessage and put the below code.
Java
package com.gfg.chatApplication.model;

import lombok.*;

@Data
@AllArgsConstructor
@NoArgsConstructor
@Builder
public class ChatMessage {
    private String content;
    private String sender;
    private MessageType type;

    /**
     * Enum representing the type of message.
     */
    public enum MessageType {
        CHAT, LEAVE, JOIN
    }
}
Step 3: Create the new package and it named as configuration in that package create the new Java class and it named as the WebSocketConfig.
Go to src > java > main > com.gfg.chatApplication > configuration > WebSocketConfig and put the below code.
Java
package com.gfg.chatApplication.configuration;

import org.springframework.context.annotation.Configuration;
import org.springframework.messaging.simp.config.MessageBrokerRegistry;
import org.springframework.web.socket.config.annotation.EnableWebSocketMessageBroker;
import org.springframework.web.socket.config.annotation.StompEndpointRegistry;
import org.springframework.web.socket.config.annotation.WebSocketMessageBrokerConfigurer;

@Configuration
@EnableWebSocketMessageBroker
public class WebSocketConfig implements WebSocketMessageBrokerConfigurer {

    /**
     * Registers STOMP endpoints mapping each to a specific URL and enabling SockJS fallback options.
     */
    @Override
    public void registerStompEndpoints(StompEndpointRegistry registry) {
        registry.addEndpoint("/websocket").withSockJS();
    }

    /**
     * Configures the message broker to use a simple broker with the specified destination prefixes.
     */
    @Override
    public void configureMessageBroker(MessageBrokerRegistry registry) {
        registry.enableSimpleBroker("/topic");
        registry.setApplicationDestinationPrefixes("/app");
    }
}
Step 4: Create the new package and it named as configuration in that package create the new Java class and it named as the WebSocketEventListener.
Go to src > java > main > com.gfg.chatApplication > configuration > WebSocketEventListener and put the below code.
Java
package com.gfg.chatApplication.configuration;

import com.gfg.chatApplication.model.ChatMessage;
import lombok.RequiredArgsConstructor;
import lombok.extern.slf4j.Slf4j;
import org.springframework.context.event.EventListener;
import org.springframework.messaging.simp.SimpMessageSendingOperations;
import org.springframework.messaging.simp.stomp.StompHeaderAccessor;
import org.springframework.stereotype.Component;
import org.springframework.web.socket.messaging.SessionDisconnectEvent;

@Component
@Slf4j
@RequiredArgsConstructor
public class WebSocketEventListener {

    private final SimpMessageSendingOperations messagingTemplate;

    /**
     * Handles WebSocket disconnect events by retrieving the username from the session attributes,
     * logging the disconnection, and broadcasting a LEAVE message to the "/topic/public" destination.
     */
    @EventListener
    public void handleWebSocketDisconnectListener(SessionDisconnectEvent event) {
        StompHeaderAccessor headerAccessor = StompHeaderAccessor.wrap(event.getMessage());
        String username = (String) headerAccessor.getSessionAttributes().get("username");
        if (username != null) {
            log.info("User disconnected: {}", username);
            ChatMessage chatMessage = ChatMessage.builder()
                    .type(ChatMessage.MessageType.LEAVE)
                    .sender(username)
                    .build();
            messagingTemplate.convertAndSend("/topic/public", chatMessage);
        }
    }
}
Step 5: Create the new package and it named as controller in that package create the new Java class and it named as the ChatController.
Go to src > java > main > com.gfg.chatApplication > controller > ChatController and put the below code.
Java
package com.gfg.chatApplication.controller;

import com.gfg.chatApplication.model.ChatMessage;
import org.springframework.messaging.handler.annotation.MessageMapping;
import org.springframework.messaging.handler.annotation.Payload;
import org.springframework.messaging.handler.annotation.SendTo;
import org.springframework.messaging.simp.SimpMessageHeaderAccessor;
import org.springframework.stereotype.Controller;

@Controller
public class ChatController {

    /**
     * Handles the "/chat.register" message mapping by setting the username in the session attributes
     * and returning the received ChatMessage object.
     */
    @MessageMapping("/chat.register")
    @SendTo("/topic/public")
    public ChatMessage register(@Payload ChatMessage chatMessage, SimpMessageHeaderAccessor headerAccessor) {
        headerAccessor.getSessionAttributes().put("username", chatMessage.getSender());
        return chatMessage;
    }

    /**
     * Handles the "/chat.send" message mapping by simply returning the received ChatMessage object,
     * which will then be sent to all subscribers of the "/topic/public" destination.
     */
    @MessageMapping("/chat.send")
    @SendTo("/topic/public")
    public ChatMessage sendMessage(@Payload ChatMessage chatMessage) {
        return chatMessage;
    }
}
Step 6: create the new HTML file and it named as the index.html for the frontend of the chat application.
Go to src > java > resources > static > index.html and put the below code.
HTML
<!DOCTYPE html>
<html>
<head>
  <meta
          name="viewport"
          content="width=device-width, initial-scale=1.0, minimum-scale=1.0"
  />
  <title>Chat App | Spring Boot + WebSocket</title>
  <link rel="stylesheet" href="/css/main.css" />
  <link
          rel="stylesheet"
          href="https://cdnjs.cloudflare.com/ajax/libs/font-awesome/6.4.0/css/all.min.css"
          integrity="sha512-iecdLmaskl7CVkqkXNQ/ZH/XLlvWZOJyj7Yy7tcenmpD1ypASozpmT/E0iPtmFIB46ZmdtAc9eNBvH0H/ZpiBw=="
          crossorigin="anonymous"
          referrerpolicy="no-referrer"
  />
</head>
<body
        style="
      background-position: center;
      background-repeat: no-repeat;
      background-size: cover;
      background-color: #f0f0f0; /* Changed background color */
    "
>
<noscript>
  <h2>Please enable JavaScript in your browser!!!</h2>
</noscript>

<div id="username-page">
  <div class="username-page-container">
    <h1 class="title">Enter your name</h1>
    <form id="usernameForm" name="usernameForm">
      <div class="form-group">
        <input
                type="text"
                id="name"
                placeholder="Name"
                autocomplete="off"
                class="form-control"
                autofocus
        />
        <input
                type="password"
                id="password"
                placeholder="Password"
                autocomplete="off"
                class="form-control"
        />
        <span id="mes" style="color: #ff0000"></span>
      </div>
      <div class="form-group">
        <button
                type="submit"
                class="username-submit"
                style="color: #ffffff; background-color: #007bff; /* Changed background color */"
        >
          <i class="fa-solid fa-right-to-bracket"></i> Enter
        </button>
      </div>
    </form>
  </div>
</div>

<div id="chat-page" class="hidden">
  <button
          onclick="location.href = location.href;"
          style="
          position: absolute;
          top: 0;
          right: 0;
          background-color: #dc3545; /* Changed background color */
          z-index: 999;
        "
  >
    Logout
  </button>
  <div class="chat-container">
    <div class="chat-header" style="background-color: #007bff; /* Changed background color */">
      <h2 style="color: #ffffff;">Group Chat</h2> <!-- Changed text color -->
    </div>
    <div class="connecting">Connecting to the chat...</div>
    <ul
            id="messageArea"
            style="
            background-color: #e9ecef; /* Changed background color */
            backdrop-filter: blur(10px);
            color: #333; /* Changed text color */
          "
    ></ul>
    <form id="messageForm" name="messageForm" nameForm="messageForm">
      <div class="form-group">
        <div class="input-group clearfix">
          <input
                  type="text"
                  id="message"
                  placeholder="Message"
                  autocomplete="off"
                  autofocus
                  class="form-control"
                  style="
                  background-color: transparent;
                  backdrop-filter: blur(24px);
                  color: #333; /* Changed text color */
                "
          />
          <button type="submit" class="btn" style="color: #ffffff; background-color: #007bff;"> <!-- Changed button color -->
            <i class="fa-solid fa-paper-plane"></i> Send
          </button>
        </div>
      </div>
    </form>
  </div>
</div>

<script src="https://cdnjs.cloudflare.com/ajax/libs/sockjs-client/1.6.1/sockjs.min.js"></script>
<script src="https://cdnjs.cloudflare.com/ajax/libs/stomp.js/2.3.3/stomp.min.js"></script>
<script src="/js/main.js"></script>
<script type="text/javascript">
  window.onbeforeunload = function () {
    return "Dude, are you sure you want to leave? Think of the kittens!";
  };
</script>
</body>
</html>
Step 7: Create the new JavaScript file and it named as the main.js for the scripting of the chat application.
Go to src > java > resources > static > js > main.js and put the below code.
Javascript
"use strict";

var usernamePage = document.querySelector("#username-page");
var chatPage = document.querySelector("#chat-page");
var usernameForm = document.querySelector("#usernameForm");
var messageForm = document.querySelector("#messageForm");
var messageInput = document.querySelector("#message");
var messageArea = document.querySelector("#messageArea");
var connectingElement = document.querySelector(".connecting");

var stompClient = null;
var username = null;
//mycode
var password = null;

var colors = [
  "#2196F3",
  "#32c787",
  "#00BCD4",
  "#ff5652",
  "#ffc107",
  "#ff85af",
  "#FF9800",
  "#39bbb0",
  "#fcba03",
  "#fc0303",
  "#de5454",
  "#b9de54",
  "#54ded7",
  "#54ded7",
  "#1358d6",
  "#d611c6",
];

function connect(event) {
  username = document.querySelector("#name").value.trim();
  password = document.querySelector("#password").value;
  if (username) {
    //Enter your password
    if (password == "chat") {
      usernamePage.classList.add("hidden");
      chatPage.classList.remove("hidden");

      var socket = new SockJS("/websocket");
      stompClient = Stomp.over(socket);

      stompClient.connect({}, onConnected, onError);
    } else {
      let mes = document.getElementById("mes");
      mes.innerText = "Wrong password";
    }
  }
  event.preventDefault();
}

function onConnected() {
  // Subscribe to the Public Topic
  stompClient.subscribe("/topic/public", onMessageReceived);

  // Tell your username to the server
  stompClient.send(
    "/app/chat.register",
    {},
    JSON.stringify({ sender: username, type: "JOIN" })
  );

  connectingElement.classList.add("hidden");
}

function onError(error) {
  connectingElement.textContent =
    "Could not connect to WebSocket! Please refresh the page and try again or contact your administrator.";
  connectingElement.style.color = "red";
}

function send(event) {
  var messageContent = messageInput.value.trim();

  if (messageContent && stompClient) {
    var chatMessage = {
      sender: username,
      content: messageInput.value,
      type: "CHAT",
    };

    stompClient.send("/app/chat.send", {}, JSON.stringify(chatMessage));
    messageInput.value = "";
  }
  event.preventDefault();
}

function onMessageReceived(payload) {
  var message = JSON.parse(payload.body);

  var messageElement = document.createElement("li");

  if (message.type === "JOIN") {
    messageElement.classList.add("event-message");
    message.content = message.sender + " joined!";
  } else if (message.type === "LEAVE") {
    messageElement.classList.add("event-message");
    message.content = message.sender + " left!";
  } else {
    messageElement.classList.add("chat-message");

    var avatarElement = document.createElement("i");
    var avatarText = document.createTextNode(message.sender[0]);
    avatarElement.appendChild(avatarText);
    avatarElement.style["background-color"] = getAvatarColor(message.sender);

    messageElement.appendChild(avatarElement);

    var usernameElement = document.createElement("span");
    var usernameText = document.createTextNode(message.sender);
    usernameElement.appendChild(usernameText);
    messageElement.appendChild(usernameElement);
    // * update
    usernameElement.style["color"] = getAvatarColor(message.sender);
    //* update end
  }

  var textElement = document.createElement("p");
  var messageText = document.createTextNode(message.content);
  textElement.appendChild(messageText);

  messageElement.appendChild(textElement);
  // * update
  if (message.sender === username) {
    // Add a class to float the message to the right
    messageElement.classList.add("own-message");
  } // * update end
  messageArea.appendChild(messageElement);
  messageArea.scrollTop = messageArea.scrollHeight;
}

function getAvatarColor(messageSender) {
  var hash = 0;
  for (var i = 0; i < messageSender.length; i++) {
    hash = 31 * hash + messageSender.charCodeAt(i);
  }

  var index = Math.abs(hash % colors.length);
  return colors[index];
}

usernameForm.addEventListener("submit", connect, true);
messageForm.addEventListener("submit", send, true);
Step 8: Create the new CSS file and it named as the main.css for the styling of the chat application.
Go to src > java > resources > static > css > main.css and put the below code.
CSS
* {
    -webkit-box-sizing: border-box;
    -moz-box-sizing: border-box;
    box-sizing: border-box;
}

html,body {
    height: 100%;
    overflow: hidden;
}

body {
    margin: 0;
    padding: 0;
    font-weight: 400;
    font-family: "Helvetica Neue", Helvetica, Arial, sans-serif;
    font-size: 1rem;
    line-height: 1.58;
    color: #333;
    /*  background-color: #f4f4f4; */
    height: 100%;

    /* Center and scale the image nicely */
    background-position: center;
    background-repeat: no-repeat;
    background-size: cover;
}

body:before {
    height: 50%;
    width: 100%;
    position: absolute;
    top: 0;
    left: 0;
    content: "";
    z-index: 0;
}

.clearfix:after {
    display: block;
    content: "";
    clear: both;
}

.hidden {
    display: none;
}

.form-control {
    width: 100%;
    min-height: 38px;
    font-size: 15px;
    border: 1px solid #c8c8c8;
    color: #333; /* Changed color for better visibility */
}

.form-group {
    margin-bottom: 15px;
}

input {
    padding-left: 10px;
    outline: none;
}

h1, h2, h3, h4, h5, h6 {
    margin-top: 20px;
    margin-bottom: 20px;
}

h1 {
    font-size: 1.7em;
}

a {
    color: #128ff2;
}

button {
    border:none;
    background:transparent;
    color:#333; /* Changed color for better visibility */
    outline: none;
    vertical-align: middle;
    padding: 0.6rem 1rem;
    border-radius: 5px;
    transition: all 0.2s ease-in-out;
    cursor: pointer;
}

button.default {
    background-color: transparent;
    color: #333;
    box-shadow: 0 2px 2px 0 rgba(0, 0, 0, 0.12);
}

button.primary {
    background-color: transparent;
    box-shadow: 0 2px 2px 0 rgba(0, 0, 0, 0.12);
    color: #333;
}

button.accent {
    background-color: transparent;
    box-shadow: 0 2px 2px 0 rgba(0, 0, 0, 0.12);
    color: #333;
}

#username-page {
    text-align: center;
}

.username-page-container {
    background: #fff;
    box-shadow: 0 1px 11px rgba(0, 0, 0, 0.27);
    border-radius: 2px;
    width: 100%;
    max-width: 500px;
    display: inline-block;
    margin-top: 42px;
    vertical-align: middle;
    position: relative;
    padding: 35px 55px 35px;
    min-height: 250px;
    position: absolute;
    top: 50%;
    left: 0;
    right: 0;
    margin: 0 auto;
    margin-top: -160px;
}

.username-page-container .username-submit {
    margin-top: 10px;
}

#chat-page {
    position: relative;
    height: 100%;
}

.chat-container {
    max-width: 900px;
    margin-left: auto;
    margin-right: auto;
    box-shadow: 0 1px 11px rgb(255, 255, 255); /* Changed shadow color */
    border-radius:5px;
    margin-top: 30px;
    height: calc(100% - 60px);
    max-height: 600px;
    position: relative;
}

#chat-page ul {
    list-style-type: none;
    margin: 0;
    overflow: auto;
    overflow-y: scroll;
    padding: 0 20px 0px 20px;
    height: calc(100% - 150px);
}

#chat-page #messageForm {
    padding: 20px;
}
#messageArea {
    color: black;
}

#chat-page ul li {
    line-height: 1.5rem;
    padding: 10px 20px;
    margin: 0;
}

#chat-page ul li p {
    margin: 0;
}

#chat-page .event-message {
    width: 100%;
    text-align: center;
    clear: both;
}

#chat-page .event-message p {
    color: #ffffff;
    font-size: 14px;
    word-wrap: break-word;
}

#chat-page .chat-message {
    padding-left: 68px;
    position: relative;
}

#chat-page .chat-message i {
    position: absolute;
    width: 42px;
    height: 42px;
    overflow: hidden;
    left: 10px;
    display: inline-block;
    vertical-align: middle;
    font-size: 18px;
    line-height: 42px;
    color: #064bfa;
    text-align: center;
    border-radius: 50%;
    font-style: normal;
    text-transform: uppercase;
}

#chat-page .chat-message span {
    color: #000; /* Changed color for better visibility */
    font-weight: 600;
}

#chat-page .chat-message p {
    color: #000; /* Changed color for better visibility */
}

#messageForm .input-group input {
    float: left;
    width: calc(100% - 85px);
}

#messageForm .input-group button {
    float: left;
    width: 80px;
    height: 38px;
    margin-left: 5px;
}

.chat-header {
    text-align: center;
    padding: 15px;
    border-bottom: 1px solid #333; /* Changed color for better visibility */
}

.chat-header h2 {
    margin: 0;
    font-weight: 500;
    color:#333; /* Changed color for better visibility */
}

.connecting {
    padding-top: 5px;
    text-align: center;
    color: #777;
    position: absolute;
    top: 65px;
    width: 100%;
}

/* update */
li span {
    padding:5px 0;
    border-radius: 5px;
    drop-shadow:5px;
}

.own-message {
    text-align: right;
}

.own-message i {
    visibility:hidden !important;
}
/* update end  */

@media screen and (max-width: 730px) {
    .chat-container {
        margin-left: 10px;
        margin-right: 10px;
        margin-top: 10px;
    }
}

@media screen and (max-width: 480px) {
    .chat-container {
        height: calc(100% - 30px);
    }

    .username-page-container {
        width: auto;
        margin-left: 15px;
        margin-right: 15px;
        padding: 25px;
    }

    #chat-page ul {
        height: calc(100% - 120px);
    }

    #messageForm .input-group button {
        width: 65px;
    }

    #messageForm .input-group input {
        width: calc(100% - 70px);
    }

    .chat-header {
        padding: 10px;
    }

    .connecting {
        top: 60px;
    }

    .chat-header h2 {
        font-size: 1.1em;
    }
}
Step 9: Once completed the Spring project, run it as the Spring application and it will start at port 8080. Refer the below Output image for the better understanding.
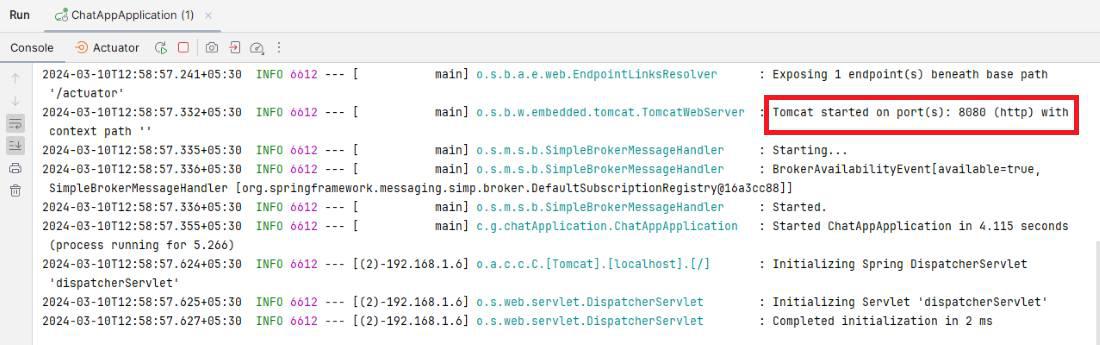
Final Output:
We can refer the below Video for detail flow of the Application.
Share your thoughts in the comments
Please Login to comment...