In this article, we will look into the process of launching instances that is through AWS CLI(Command Line Interface).
AWS CLI is a unified tool for running and managing your various AWS services. Just download and install the tool and you will be able to control multiple AWS services from the command line. For Developers, it is a great tool for managing AWS services.
So, let’s begin with AWS CLI by launching an EC2 Instance using it. Creating an instance with AWS CLI is the same as launching one with AWS console. Open your command prompt as administrator by right-clicking on it.
Creating a VPC
The first thing to do is to create a VPC(virtual private cloud) under which an EC2 instance will be launched. For creating a VPC in CLI type the given command on the cmd.
aws ec2 create-vpc --cidr-block 10.0.0.0/16
Here the CIDR block I have taken is 10.0.0.0/16, you can change it as per your need. After running this command following output will be given in a JSON format. Note the vpcId .

Creating Subnets
Next, create two subnets and make one as public to make it accessible from the internet. To do so use the below command:
aws ec2 create-subnet --vpc-id <vpcId> --cidr-block 10.0.1.0/24
Note the SubnetId generated here, so that this subnet can be made as public later on. The CIDR block we have used here is 10.0.1.0/24.
Now create a second subnet with CIDR block 10.0.0.0/24. (CIDR block values can be changed as per user needs):
aws ec2 create-subnet --vpc-id <vpcId> --cidr-block 10.0.0.0/24

Creating Internet Gateway
Internet gateway is used by the private subnet to access the internet for its updates and other packages installations. Create an internet gateway by using the following command:
aws ec2 create-internet-gateway
After the internet gateway is created, note the InternetGatewayId and to attach this internet gateway to the already created VPC. To do so use the below command:
aws ec2 attach-internet-gateway --vpc-id <vpcId> --internet-gateway-id <InternetGatewayId>
Here type the noted vpcId (in place of <vpcId>) and InternetGatewayId (in place of <InternetGatewayId>)
Creating Route Table
The next step is to create a route table and assigning it to the already created VPC. After creating the route table assign the route to this route table. Commands for the same are as given.
aws ec2 create-route-table --vpc-id <vpcId>
Now, use the RouteTableId and use it in the next step:
aws ec2 create-route --route-table-id <RouteTableId>
              --destination-cidr-block 0.0.0.0/0 --gateway-id <nternetGatewayI>
Here we have used the 0.0.0.0/0 as destination CIDR block.


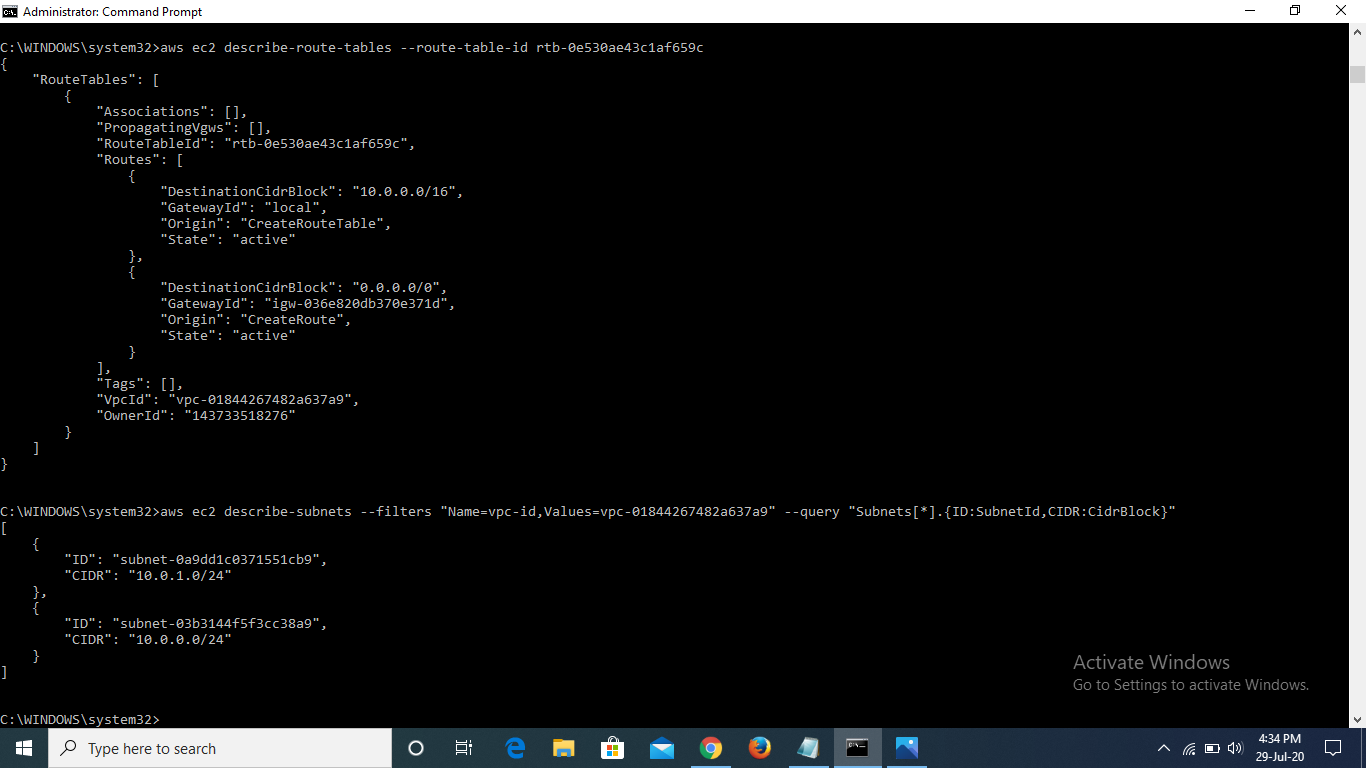
Viewing the Route Table and Subnets
To check whether route table and subnets are created and assigned successfully use the below commands:
aws ec2 describe-route-tables --route-table-id <RouteTableId>
aws ec2 describe-subnets --filters "Name=vpc-id,Values=<vpcId>"
                         --query "Subnets[*].{ID:SubnetId,CIDR:CidrBlock}"
Here replace your vpcId in place of <vpcId>.
Associating Route Table and modifying subnet
The next step is to associate the route table with the subnet and making the same subnet as public by mapping the public IP address to it. Enter the SubnetId and RouteTableId that you noted earlier. To associate route table type…
Type:
aws ec2 associate-route-table --subnet-id <SubnetId> --route-table-id <RouteTableId>
To map the public IP to the subnet, use the below command:
aws ec2 modify-subnet-attribute --subnet-id <SubnetId> --map-public-ip-on-launch

Creating Key Pair and Security Group
The most important step is to create a key pair. This key pair must be kept safe and secure with the user so that the person can access the EC2 instance created using this key pair.
Now, create the key-pair using the below command:
aws ec2 create-key-pair --key-name AWS-Keypair --query "KeyMaterial"
                        --output text > "C:\AWS\AWS_Keypair.pem"
Here we have named the key pair file(.pem file) as AWS-Keypair and the path where our file will be downloaded is C:\AWS\AWS_Keypair.pem. Both these things can be changed by the user.
For security group use the below commands:
aws ec2 create-security-group --group-name <security-group-name> --description "<description>"
                              --vpc-id <vpcId>
Here provide name and description to the security group and add it in place of <security-group-name> and <description> respectively. Note the GroupId and use it in the next step.
aws ec2 authorize-security-group-ingress --group-id <GroupId>
                                         --protocol tcp --port 22 --cidr 0.0.0.0/0
The protocol/port we use here is TCP/22.

Running the EC2 Instance
Finally, after all the setup completed successfully now the time is to run the instance. For running the EC2 Instance use the command as given below.
aws ec2 run-instances --image-id <ami-id> --count 1 --instance-type t2.micro
                      --key-name <Keypair-name> --security-group-ids <SecurityGroupId>
                      --subnet-id <SubnetId>
At this step, you will need an AMI(Amazon Machine Image) image ID. For this login to your AWS Console and choose any AMI of your type. Copy the image id and replace it here in place of <ami-id>. Also use your key pair name, security group id, and subnet id at the correct place in the above command. Also, make a note of the InstanceId.


Viewing the Instance
Now after the instance status is “running” type the command to view the complete details of the EC2 instance that you just created:
aws ec2 describe-instances --instance-id <InstanceId>
Enter the InstanceId you noted at the above step.

Verifying the EC2 Instance
To verify whether the EC2 instance created using the AWS CLI is created as per need, log in to your AWS Console and open the EC2 service and check for the instance.

Like Article
Suggest improvement
Share your thoughts in the comments
Please Login to comment...