Migrating from Create React App to NextJS: A Practical Guide
Last Updated :
06 Feb, 2024
NextJS is a React Framework created by Vercel. It is a full-stack framework with several advantages over Single Page Applications made using React. NextJs apps offer server-side rendering, Static page generation, SEO advantages, Image Optimizations, Route Handlers, and much more, out of the box.
Migrating from a React application (made by tools like create-react-app) to a NextJS application may sound daunting, but this practical guide will help you streamline the process and enjoy the advantages of NextJS for a React application.
Steps to Migrate from React App to Next JS:
Step 1: Run the following command in your terminal:
npx create-react-app myReactApp
Once the installation is complete, you will see a message :
Happy hacking!
Step 2: Now we can navigate into the project:
cd myReactApp
Step 3: Run the project
npm run start
This will produce the following message:
Starting the development server…
Compiled successfully!
You can now view trial in the browser.
Local: http://localhost:3000
This means the local server is up and running and once you open your browser and navigate to http://localhost:3000, you should see your React application:
-min-660.png)
Project Structure :
.png)
- node_modules folder contains all dependencies for our project.
- public folder contains static assets like images which are publicly accessible. It also has an index.html file which is the entry point of our application. This file has an empty div with the id of “root”
- src folder is the place for all the components of our app. It also has all the css files. The index.js file is the JavaScript entry point for the application, it grabs the empty div with the id of “root” and populates it with the App.js component.
Step 4: First uninstall react-scripts dependencies which was installed with the create-react-app tool.
npm uninstall react-scripts
Step 5: Now we will install the “next” dependency. Run the following command in your terminal :
npm install next
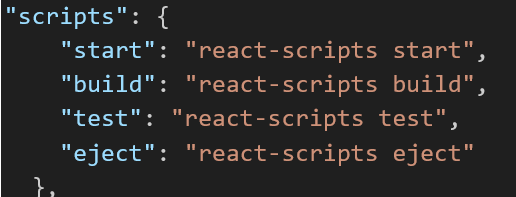
After this we need to change the scripts inside the package.json file. Head to your package.json file and locate the “scripts” object. It should look something like this :
old package.json
Change it and add NextJS scripts as follows :

new package.json
Step 6: We also need to install typescript which is the default language for NextJs apps.
npm install -g typescript
After this, run the following command in your terminal which will create a tsconfig.json file, required for running the TypeScript code:
tsc --init
In the end your package.json file should look like this:
"dependencies": {
    "@testing-library/jest-dom": "^5.17.0",
    "@testing-library/react": "^13.4.0",
    "@testing-library/user-event": "^13.5.0",
    "@types/react": "^18.2.48",
    "@types/react-dom": "^18.2.18",
    "next": "^14.1.0",
    "react": "^18.2.0",
    "react-dom": "^18.2.0",
    "web-vitals": "^2.1.4"
}
Step 7: Creating Pages:
- Leave the public folder as it is.
- Delete the index.html file as we no longer need it.
- Create a folder called “app” in the root level of the project.
- Inside the app directory, create a layout.tsx file. Add the following code to the layout.tsx file:
Javascript
export const metadata = {
title: 'My Next JS App',
description:
'Migrating from create-react-app to NextJS : a practical guide',
}
export default function RootLayout({
children,
}: {
children: React.ReactNode
}) {
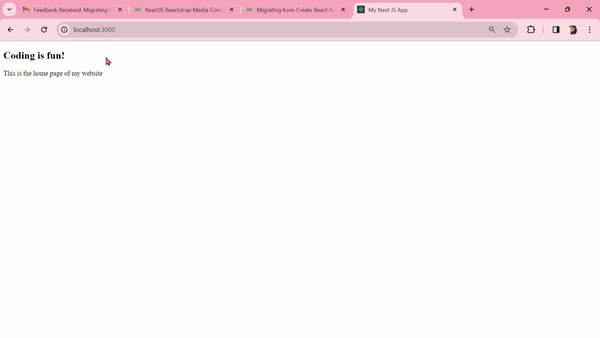
return (
<html lang="en">
<body>
<h2>Coding is fun!</h2>
{children}
</body>
</html>
)
}
|
- This is the root layout of the website, meaning the entire app will follow this layout.
- Here we have added an H2 before rendering the {children}. This means that the H2 text will always appear on all the pages, and below it the page content will be rendered.
- Now inside app folder, create another file called page.tsx
- Copy and paste the following piece of code inside page.tsx file:
Javascript
import React from 'react'
export default function App(){
return(
<>
<p>This is the home page of my website</p>
</>
)
}
|
Step 9: Components in NextJs create a components folder in the root level of the project and add a file called “myButton.tsx” inside it, which will have the following simple piece of code :
Javascript
import React from "react"
export default function MyButton() {
return (
<>
<button>CLICK ME!</button>
</>
)
}
|
Now let us create an “About” page for our app which will call this button. Inside the app directory, create a folder called “about” and add a “page.tsx” file inside it with the following piece of code :
Javascript
import React from "react";
import MyButton from "../../components/myButton";
export default function About(){
return(
<>
<p>This is the about page</p>
<MyButton/>
</>
)
}
|
Output: Navigate to “http://localhost:3000/about” in your web browser and it should look like this :
Share your thoughts in the comments
Please Login to comment...