JUnit 5 – Eclipse Test Templates
Last Updated :
05 Apr, 2024
JUnit 5 simplifies the process of writing and executing test cases in Java applications. It offers enhanced support for modern Java features, increased extensibility, and a testing API that is more flexible and expressive.
Test Templates
A test template is a predefined format for writing test cases or test methods, similar to what a software engineer would use. Test templates simplify the test writing process. It promotes similarity and effectiveness across various test cases in a project.
Here are some frequently used JUnit 5 test templates:
- JUnit Jupiter Test Template: It is used to develop a simple JUnit Jupiter test method. It often includes annotations such as @Test and assertions to validate the behavior of the code under test.
- Parameterized Test Template: It often includes annotations such as @ParameterizedTest and provides placeholders for specifying the parameters.
- Repeated Test Template: It often includes annotations such as @RepeatedTest and provides placeholders for specifying the repetition count.
- Test Lifecycle Template: It often includes annotations such as @BeforeEach and @AfterEach.
- Test Case Template: It frequently uses annotations such as @Nested to define nested test classes.
- Assertions Template: It often includes assertion methods such as Assertions.assertEquals and provides placeholders for providing the expected and actual values.
By considering the example of a calculator, we will discover how test templates help to write test cases effectively. Here we will write 5 to 6 test cases, but when we have to write a test for large projects, a test template will save our work pressure.
Example of Eclipse Test Templates in JUnit 5
Below are the steps to implement Eclipse Test Templates in JUnit 5.
Create a Simple Calculator
Here we will write a simple code for addition, subtraction, division, and multiplication of two numbers given by the user.
- To do this, we will open Eclipse and create a simple Spring Boot application.
- Give an app name according to the choice.
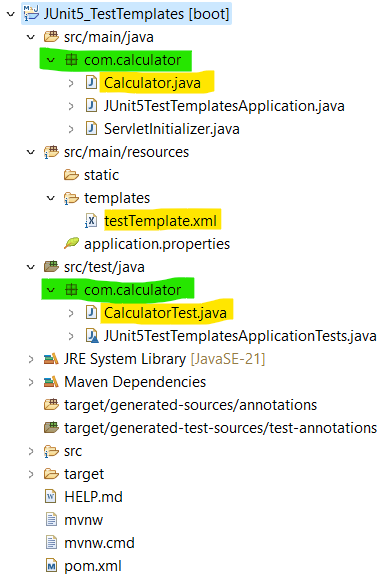
- Here we have given the name “JUnit5_TesTemplate” and created an application.
- Now under “src/main/java” create a package with the name “com.calculator,”
- And inside this package, create the class “Calculator.java”.
- Now inside the “src/main/resources” folder, we can see a template folder.
- Here, we will create a “testTemplate.xml” file.
- At last, we will write a test for our “Calculator.java” class.
- For that, we have to create a package with the name “com.calculator” under “src/test/java,” and inside this, create the class “CalculatorTest.java”.
Project Structure:
Step 1: Create POJO Class
- Now under the “Calculator.java” class, we will write a code to do basic arithmetic operations (addition, subtraction, multiplication, and division) based on the user’s inputs for a and b.
- After writing code, it will look like below:
Java
package com.calculator;

import java.util.Scanner;

public class Calculator
{
    private static Scanner scanner = new Scanner(System.in);

    public static void main(String[] args)
    {
        // Input for integer values of a and b
        System.out.println("Enter the value of a:");
        int a = scanner.nextInt();
        System.out.println("Enter the value of b:");
        int b = scanner.nextInt();

        // creating an instance of Calculator class
        Calculator calculator = new Calculator();

        // Perform addition
        int additionResult = calculator.add(a, b);
        System.out.println("Result of addition: " + additionResult);

        // Perform subtraction
        int subtractionResult = calculator.subtract(a, b);
        System.out.println("Result of subtraction: " + subtractionResult);

        // Perform multiplication
        int multiplicationResult = calculator.multiply(a, b);
        System.out.println("Result of multiplication: " + multiplicationResult);

        // Perform division
        try {
            double divisionResult = calculator.divide(a, b);
            System.out.println("Result of division: " + divisionResult);
        } catch (IllegalArgumentException e) {
            System.out.println(e.getMessage());
        }

        // Close the scanner
        scanner.close();
    }

    public int add(int a, int b)
    {
        return a + b;
    }

    public int subtract(int a, int b)
    {
        return a - b;
    }

    public int multiply(int a, int b)
    {
        return a * b;
    }

    public double divide(int a, int b)
    {
        if (b == 0)
        {
            throw new IllegalArgumentException("Cannot divide by zero");
        }
        return (double) a / b;
    }
}
Step 2: Creating a Test Template
- Now, to test our “Calculator.java,” we have to write test cases. By creating a test template according to our code snippet, we can test our class. Here, we are taking the example of Calculator to understand the importance of test templates.
- According to our code snippet, we will use the “Test Lifecycle Template” and “Assertions Template” formats to write tests.
- By referencing the structure of these templates, we have written our “testTemplate.xml” file, which is present under the Resources section. It will look like below:
XML
<?xml version="1.0" encoding="UTF-8" standalone="no"?>
<templates>
    <template autoinsert="true" context="java" deleted="false" description="JUnit5 BeforeEach" enabled="true" name="setup (JUnit5)">
        ${:import(org.junit.jupiter.api.BeforeEach)}
        @BeforeEach
        void setup() {
            calculator = new Calculator();
        }
    </template>
    <template autoinsert="true" context="java" deleted="false" description="JUnit5 AfterEach" enabled="true" name="teardown (JUnit5)">
        ${:import(org.junit.jupiter.api.AfterEach)}
        @AfterEach
        void teardown() {
            ${cursor}
        }
    </template>
    <template autoinsert="false" context="java-members" deleted="false" description="JUnit5 test method" enabled="true" id="org.eclipse.jdt.ui.templates.test" name="test (JUnit5)">
        ${:import(org.junit.jupiter.api.Test)}
        @Test
        void test${methodName}() {
            Assertions.assertEquals(${expectedResult}, calculator.${methodName}(${arg1}, ${arg2}));
        }
    </template>
</templates>
Step 3: Add a template created inside Eclipse
We created our template in the previous step. Now, to use it when writing tests, we need to add it to our Java templates. To add a template inside Eclipse, follow these steps:
- Click on the “Window” option in the top menu bar of Eclipse.
- Then, select “Preferences” from the dropdown menu that appears.
- A new window will pop up.
- On the left-hand side of this window, locate and click on the “Java” option.
- Within the Java options, find and click on “Editor,” then select “Templates.”
- On the right side of the screen, you will see an “Import” option. Click on it.
- Navigate to the location where your “testTemplate.xml” file is saved.
- Select the file and click “OK.”
- Next, click on “Apply,” and then on “Apply and Close” at the bottom right corner of the Eclipse screen.
- The window will now close.
- To verify that your template has been added, go back to the templates section. You should see your template listed with its keyword. In our case, we’ve added “(JUnit5)” after the keyword to help locate it easily in the long list of templates.
Video Reference to Add a Template:
Step 4: Writing Test Cases for Calculator
- Now to write tests for our Calculator class, go to our created file “CalculatorTest.java” and place a cursor on a particular line.
- Type the initial 3–4 letters of the methods in our template, hit “ctrl + space” or “cmd + space,” click on our method, and hit “enter.”
- By doing this, we have written a test case for our “Calculator class.”
CalculatorTest.java:
Now “CalculatorTest.java” will look like this:
Java
package com.calculator;

import org.junit.jupiter.api.AfterEach;
import org.junit.jupiter.api.Assertions;
import org.junit.jupiter.api.BeforeEach;
import org.junit.jupiter.api.Test;

public class CalculatorTest {

    private Calculator calculator;

    @BeforeEach
    void setup() {
        calculator = new Calculator();
    }

    @AfterEach
    void teardown() {
        // Clean up resources if needed
    }

    @Test
    void testAdd() {
        Assertions.assertEquals(5, calculator.add(2, 3));
    }

    @Test
    void testSubtract() {
        Assertions.assertEquals(-1, calculator.subtract(2, 3));
    }

    @Test
    void testMultiply() {
        Assertions.assertEquals(6, calculator.multiply(2, 3));
    }

    @Test
    void testDivide() {
        Assertions.assertEquals(2.5, calculator.divide(5, 2));
    }
}
Output:
Below we can see the result of CalculatorTest.
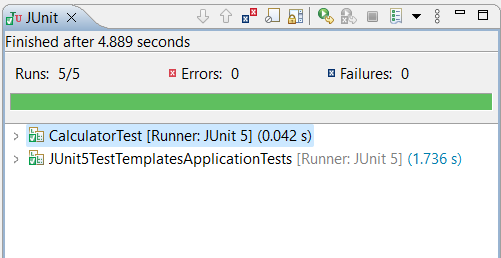
Now right-click on the app and run the application as “JUnit Test” to see whether our tests are executing and testing our code snippet or not.
FAQs for JUnit 5 – Eclipse Test Templates
Q. What is JUnit 5?
JUnit 5 simplifies the process of writing and executing test cases in Java applications. It offers enhanced support for modern Java features, increased extensibility, and a testing API that is more flexible and expressive.
Q. What are test templates?
A test template is a predefined format for writing test cases or test methods, similar to what a software engineer would use. Test templates simplify the test writing process. It promotes similarity and effectiveness across various test cases in a project.
Q. What are some commonly used types of JUnit 5 test templates?
Types of JUnit 5 templates include JUnit Jupiter Test Template, Parameterized Test Template, Repeated Test Template, Test Lifecycle Template, Test Case Template, and Assertions Template.
Q. Explain how to write test cases using test templates in Eclipse.
In Eclipse, place a cursor where you want to write the test, then simply type the initial letters of the methods in the template and press Ctrl + Space or Cmd + Space to access the suggestions. Select the desired method and press Enter to insert it into your test case.
Share your thoughts in the comments
Please Login to comment...