JUnit 5 – Conditional Test Execution
Last Updated :
13 Dec, 2023
JUnit is one of the popular unit testing frameworks for Java projects. JUnit 5 is the latest version provided by the JUnit team launched with the aim of supporting the latest Java features and also providing notable advanced features to its predecessor JUnit 4.
In this article, we will discuss one of the features called Conditional Test Execution in JUnit 5.
Prerequisites:
- Java
- JUnit
- Eclipse IDE or any other JAVA IDE
Conditional Test Execution
Conditional Test Execution is the ability to enable or disable the tests programmatically.
- It is done with the help of the ExecutionCondition extension API provided by JUnit Jupiter to determine whether to run a container and test it or not.
- The Execution Condition is evaluated for each container (test class) to determine if all the supplied tests should be run based on the ExecutionContext passed to it.
- The same goes for the test methods which will also evaluated based on the ExecutionContext.
If a test method is disabled via any conditional-based annotation, that does not prevent the test class from being instantiated.
When a test method or class contains multiple test conditions, if any of those conditions short-circuit results in disabling the test, then the test method or container will be disabled immediately without checking the remaining conditions similar to short-circuiting works in programmatic conditions.
Points to look for in ExecutionCondition
- The conditional annotations are not Inherited, if you need to use the same semantic in the subclasses, then you need to explicitly declare the same conditions for the subclasses too.
- Use meta annotation to group the repeated used conditional annotation to create your own custom composed annotation, if you need to use the same conditional annotation again and again.
- You can’t declare the same conditional annotation on a test method or class more than once, even if you do so JUnit will use the annotation which is declared first, however we can combine different conditional annotation to create different conditions.
Different Conditional Execution Types
So far, we have seen we can enable or disable tests based on different conditions programmatically, let’s see how we can use the conditions, the prebuilt conditions provided by JUnit 5 and how to use those in our testing.
Operating System and Architecture Conditions:
- In this type conditions, we can enable or disable the test based on the Operating system and the architecture of the system on which our testing application is running.
- If we need to run some specific test our app only on Linux machines with arm architecture only, we can do so by enabling the test only on those Systems with the below annotations.
- The parameters passed are,
- value => String array to denote the OS.Name enum.
- architectures => String array to denote the architectures for the condition
- disabledReason => optional string parameter for stating the reason for disabling.
|
@EnabledOnOs()
|
To enable a test on a particular OS or architecture passed as parameter.
|
|
@DisabledOnOs()
|
To disable a test on a particular OS or architecture passed as parameter.
|
Java Runtime Environment Conditions:
- In this type of conditions, we will enable or disable the test or container based on the Java version used to run the application.
- Provides four different annotations to enable or disable a test.
- Two annotations for specifying as a range of values by getting the min and max range, where other two annotations requires the JRE’s to be specified explicitly.
- The annotation which expects a range of JRE values, will go for JRE.JAVA_8 as the minimum range and JRE.OTHER as the maximum range value.
|
@EnabledOnJre()
|
Enables the test for the specified JRE’s
|
|
@DisabledOnJre()
|
Disables the test for the specified JRE’s
|
|
@EnableForJreRange()
|
Enables the test for the entire range of JRE’s
|
|
@DisableForJreRange()
|
Disables the test for the entire range of JRE’s
|
System Property Conditions:
- In this type of conditions, the test or container can be enabled or disabled based on the JVM System property value.
- Two different annotations are being used with two parameters,
- named => a string denotes the name of the JVM System property
- matches => a string interpreted as a regular – expression to match with the variable.
- These are repeatable annotations so that it can be used on a test method, interface, class multiple times resulting in checking of every annotation, not only the declaration of first annotation on that test method.
|
@EnabledIfSystemProperty()
|
Enables the test if the system property matches
|
|
@DisabledIfSystemProperty()
|
Disables the test if the system property matches
|
Environment Variable Conditions:
- In this type of conditions, the test or container can be enabled or disabled based on the Environment Variable set in the underlying Operating System. This is similar to the System Property Conditions but where as in System property conditions the JVM System property is used, here the underlying OS environment variables are being used.
- Two different annotations are being offered with two parameters,
- named => a string denotes the name of the Environment variable
- matches => a string interpreted as a regular – expression to match with the variable.
|
@EnabledIfEnvironmentalVariable()
|
Enables the test if the environment variable matches
|
|
@DisabledIfEnvironmentVariable()
|
Disables the test if the environment variable matches
|
Native Image Conditions:
- In this type of conditions, the test or container can be enabled or disabled if the Java application is running as a GraalVM native image, with two different annotations.
|
@EnabledInNativeImage
|
Enables the test in a GraalVM native image
|
|
@DisabledInNativeImage
|
Disables the test in a GraalVM native image
|
Custom Conditions:
- Apart from using the ExecutionCondition provided by the JUnit framework, we can also write our own conditions and pass it to the annotations for programmatically handling the test running.
- The custom condition written by us should return a boolean output stating whether to run the test or not.
- Condition should be passed to the annotations as an argument.
- The custom condition can be anywhere in the package as long as the full path is mentioned in the condition parameter.
|
@EnabledIf()
|
Enables the test if the custom condition passes.
|
|
@DisabledIf()
|
Disables the test if the custom condition passes.
|
Example of JUnit 5
In this below example, we will use some of the use cases of the annotations that we have just discussed above.
- Step 1: Create a Simple Java project with JUnit 5 testing framework.
- Step 2: Create a Utility class that provides basic features to test it using JUnit 5. For this example, I have created two basic functions for testing.
Java
package com.example.utils;
public class Utilities {
public static boolean isPrime(long n){
for (long val = 2; val * val <= n; val++) {
if (n % val == 0) {
return false;
}
}
return n > 1;
}
public static boolean isEven(long n){
return !((n & 1) == 1);
}
}
|
- Step 3: Create a JUnit testcase and write some tests with the annotations discussed.
Java
package com.example.test;
import static org.junit.jupiter.api.Assertions.assertFalse;
import static org.junit.jupiter.api.Assertions.assertTrue;
import com.example.utils.Utilities;
import org.junit.jupiter.api.Test;
import org.junit.jupiter.api.condition.DisabledOnOs;
import org.junit.jupiter.api.condition.EnabledForJreRange;
import org.junit.jupiter.api.condition.EnabledIfEnvironmentVariable;
import org.junit.jupiter.api.condition.EnabledIfSystemProperty;
import org.junit.jupiter.api.condition.EnabledOnOs;
import org.junit.jupiter.api.condition.JRE;
import org.junit.jupiter.api.condition.OS;
class UtilitiesTest {
@Test
@DisabledOnOs(value = OS.WINDOWS,
architectures = "amd64")
void
dontRunThisOnWindowsWith64Bit(){
assertTrue(Utilities.isPrime(13));
}
@Test @EnabledOnOs(OS.WINDOWS) void runOnWindows(){
assertTrue(Utilities.isPrime(71));
}
@Test
@EnabledForJreRange(min = JRE.JAVA_17)
void runOnlyOnJava17OrHigher(){
assertFalse(Utilities.isPrime(18));
}
@Test
@EnabledIfSystemProperty(named = "java.version",
matches = "17.*.*")
voidrunOnOnlyJava17(){
assertFalse(Utilities.isEven(19));
}
@Test
@EnabledIfEnvironmentVariable(named = "HOMEDRIVE",
matches = "C:")
void checkHomeDriveEnvVariable(){
assertTrue(Utilities.isEven(80));
}
}
|
- Step 4: Run the JUnit test and see the output.
Output:
In the below image, we can see that some tests are being disabled for not passing the JUnit test conditional annotations.
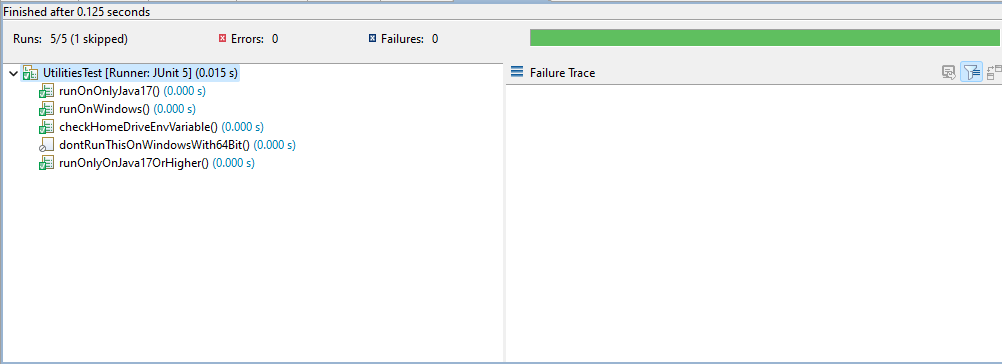
final output
Conclusion
With that being said, we have seen how we can use the JUnit 5 conditional test execution feature to enable or disable the tests and containers based on our need programmatically with the help of the annotations provided by the JUnit 5 framework and also seen an code example of the implementation of it.
Share your thoughts in the comments
Please Login to comment...