JUnit 5 – Execute Test in Eclipse
Last Updated :
26 Nov, 2023
JUnit is one of the widely used unit testing frameworks for Java-based Applications. We have different versions and upgrades published by JUnit 5, the latest version available in JUnit is JUnit 5. JUnit 5 is the upgraded version of JUnit 4, which is launched to support various latest features of Java like lambda expressions, etc. So, if you want to use JUnit 5 in your testing make sure that you are running a modern version of Java where Java 8 is the minimum version it can be.
Prerequisites
- Junit- Knowledge of Junit is required, as in this article we will be seeing how to execute the Junit test in Eclipse, not how to use Junit.
- Eclipse IDE- You should have installed Eclipse in your system, if not you can easily do it by visiting the Link.
Submodules in JUnit 5
To propose modular development and easy to maintain, the JUnit team launched this JUnit 5 as three different submodules, where its predecessor won’t work like that.The three Submodules are mentioned below:
- JUnit Platform: It’s like a work table to work on, it basically provides a runtime to run our tests on the JVM. JUnit 5 is also open to support different 3rd party build tools and IDE by default, so it provides a TestEngine API to integrate any other of our own testing frameworks with this JUnit 5, if we want to extend the JUnit 5 features we can do so by writing our own solutions by following the specification declared by the TestEngine API.
- JUnit Jupiter: It is the core of the JUnit testing framework, it provides a programming and extension model to write our tests, its the module which exposes different annotations to use like @Test, @BeforeAll, @BeforeEach, etc.
- JUnit Vintage: Java & Java based projects are known for its backward compatibility support, JUnit does not want to differentiate here, so to support older versions of JUnit testing libraries like JUnit 3 & JUnit 4, the JUnit Vintage module is used, if you are using any features of older versions of JUnit it won’t be an issue as JUnit Vintage can provide the necessary support for these older versions features.
Key Features of JUnit 5
The latest JUnit 5 comes with different modern features. Let’s us see the key features of JUnit 5.
- Display Names: With JUnit 5 we can use an alternative name instead of the method and class name, to be appeared on the JUnit test results or report. By default, the method or class name is the one that will appear on the test report, but if you want to use a meaningful big sentence to easily identify the test, you can do so by using the Display Name feature of the JUnit 5 framework.
To display our custom string in the test result or report use the DisplayName annotation and pass a string to it.
@DisplayName("Function to test 31 is prime or not")
@Test
void testPrimeNumbers() {
    // test logic
    assertTrue(31, Utility.isPrime(31));
}
// the above method's test report will contain the string
// in the DisplayName annotation rather the function name.
- Conditionally Test: While testing you may need run some tests based on some configuration set up of the system like a different test set for Production servers and a completely different test set for the Testing servers. This is common in the testing industry, to support this by native, JUnit 5 come up with conditionally testing a project with different annotations. If we need to run a test on Windows servers only or some test on Linux servers only or run tests if and only if there are some environment variables set on the system. There are different annotations makes it possible to run tests dynamically, they are
- @EnabledOnOs & @DisabledOnOs – test based on the running OS.
- @EnabledOnJre & @DisabledOnJre – test based on the JRE version.
- @EnableIfSystemProperty – run only if there are some env variables set on the system.
- @EnabledIfEnvironmentVariable – check whether the env variable contains the desired value.
- Repeated Tests: It is common in testing to run a same test multiple times to check it accuracy for multiple times. If you ever need to run a same test for multiple times, you can do so with the @RepeatedTest annotation by JUnit 5
- Nested Tests: While Unit testing a class or a method, in certain cases we may have to check some prerequisites for the test to run. This will basically forms a hierarchy of testing, so it will be easy if we can follow the same hierarchy in the testing code. With JUnit 5, we can write Nested tests inside a class using the @Nested Annotation, to create the relationship and hierarchy among the tests and making it as a group to visualize it hierarchically. The Nested test class should be a non-static inner class.
- Parameterized Tests: Let’s say you want to run a test with multiple different arguments. For this, in JUnit 5 you don’t need to write different tests. We can use the Parameterized Tests feature of JUnit 5, to run the same test with multiple different arguments. Here we will use the @ParameterizedTest annotation to define the test as a Parameterized test. To pass the arguments to this test, we have to use the @ValueSource annotation, the test will be running for every argument passed to the ValueSource annotation.
- Dynamic Tests: Dynamic test are just like test templates, but it often generated at the runtime. Incase of a test templates, we use the same logic with multiple repeated tests, where dynamic tests allow us to use different logic in that. To declare a method as a dynamic test, we have to make use of the @TestFactory annotation, to run the test with dynamically generated test cases. Note this dynamic tests appear to be running multiple times, but it does not support the standard JUnit test lifecyle, so it won’t invoke the BeforeEach or AfterEach lifecycle for the JUnit tests.
- Lambda expressions: As JUnit 5 has a minimum requirement of Java 8 or later, we can use the lambda expressions in our testing code. Lambda expressions is always much easier to use and work with as compared to generic Java code.
Creating a Java Project
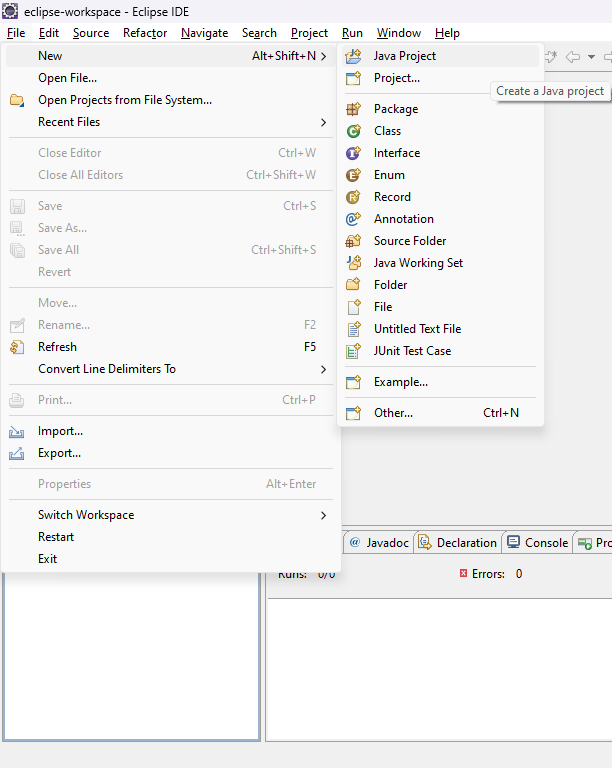
- In the top menu, go to File -> New -> Java Project.
- Once you clicked that a new dialog window will be opened to enter the details of the Project like Project name, runtime environment.
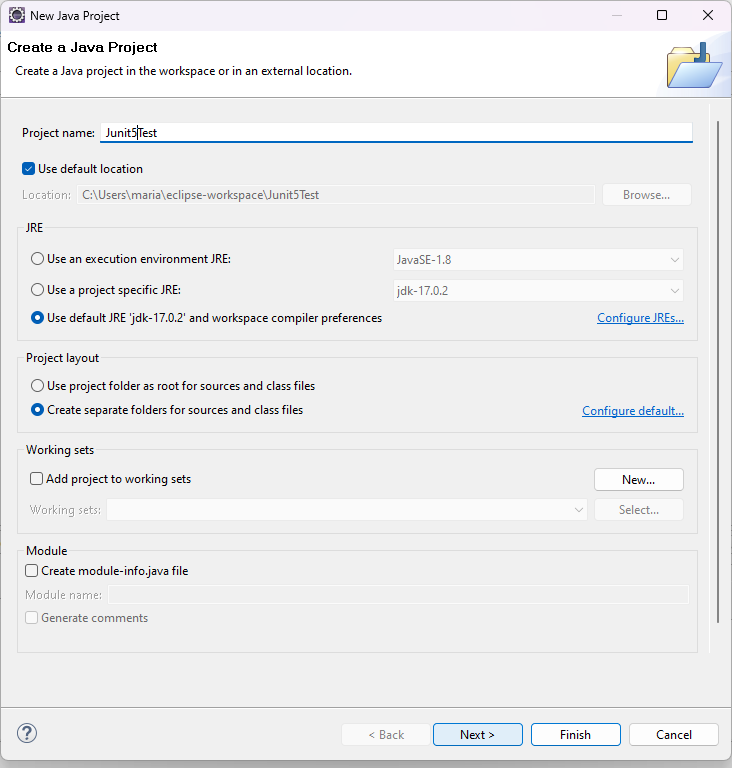
Creating JUnit 5 Project
In the new Project config dialog box, enter your configuration.
- Enter the project name and set the project location.
- If you need to use any different JRE for this project, also set it here.
- I have unchecked the create module-info.java, to reduce the complexity of the article and just focusing on testing Java Project with Junit5 in Eclipse.
- Click next once you have entered those details.
Setting the project config
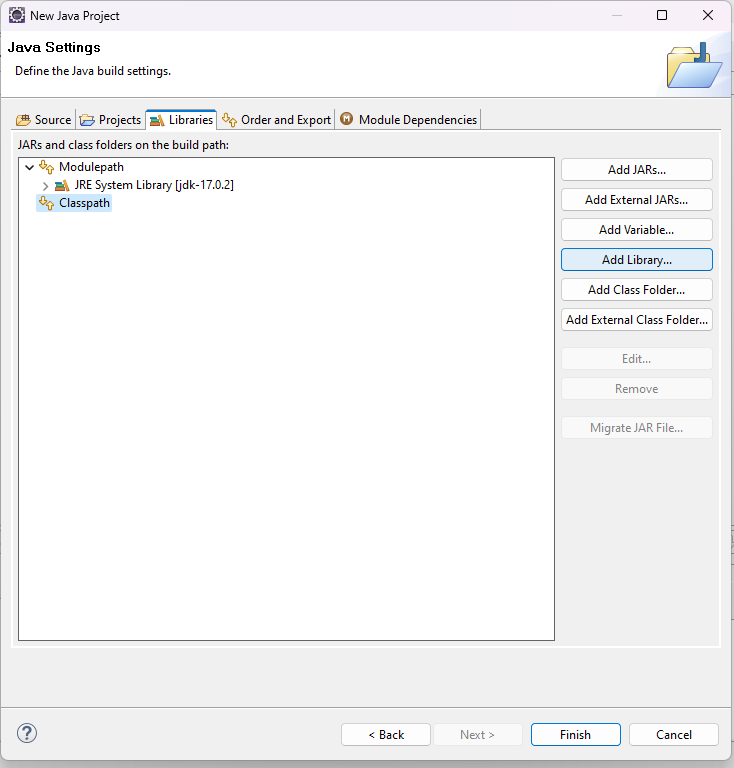
Setting Up JUnit 5 in Eclipse
- After that a different dialog box will be displayed, here we need to add Junit5 to the classpath, so that we can use Junit5 in our project.
- Classpath is the variable in java projects, where java will be looking for external jars or libraries used in the project.
- In the top bar, select Libraries tab.
- Click on the Classpath variable and in the right side you can find different buttons for adding jars, external jars, adding library.
- Click the Add Library button to add the Junit 5 library.
Setting up classpath
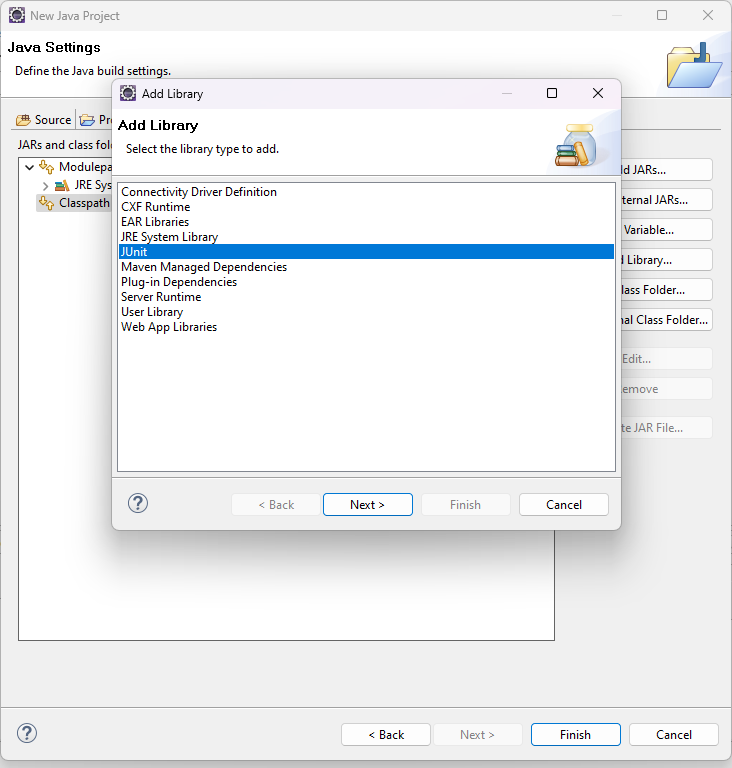
- Now you will be asked for the library to add with different options.
- Junit is included with the Eclipse IDE, no need to download any jars from the internet.
- To use the latest Junit, just make sure you have the latest version of Eclipse IDE.
- Select Junit in the list, and hit Next button.
Selecting junit library
- Now you need to decide which Junit version you are going to use for this project.
- Select Junit 5 in the select dropdown.
- Click the Finish button.
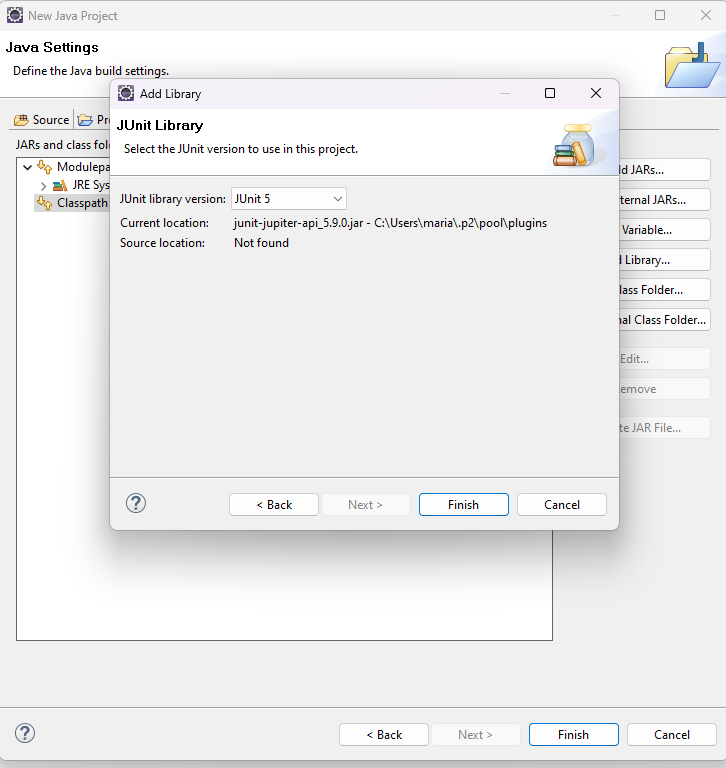
Selecting Junit 5
- Now verify whether classpath has the Junit5 library.
- In this below image, we can see the junit5 is newly added to the class path.
- Click on finish to create the java project.
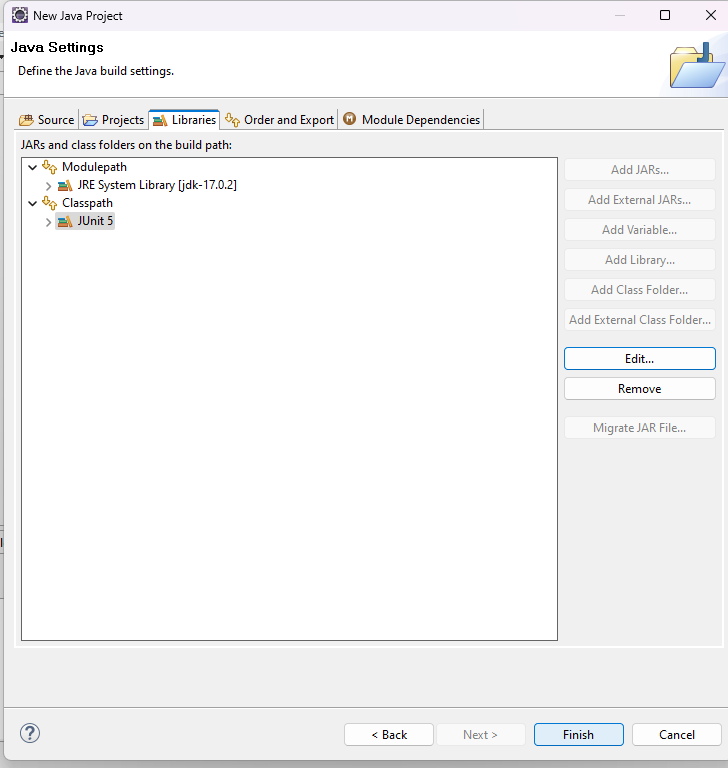
JUnit5 in the Classpath
- Once your project is created it should look alike the below directory structure.
- We can also find the external library junit5.

Junit 5 project file structure
- Now that we have configured the project for the Junit5 tests.
- Let’s create a simple feature of the project and test it using the Junit5 library.
Creating a simple class to test it using JUnit 5
- Create a Utilities class in the project.
- The Utilities project will have two different static function.
- A function which takes a Long as argument and will return us whether the number is prime or not.
- A function to check whether a given number is even or not.
- To make this article easy to refer, I just created two simple features to test it using Junit5.
- For that that right click on the src folder and go to New -> Class.
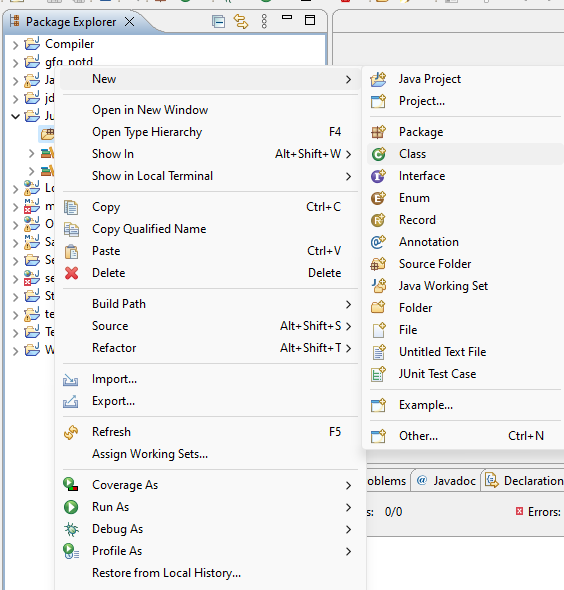
Creating a utility class to test
- A new dialog window will be displayed to enter the class details.
- Enter the class name you are going to use.
- It is a good practice in java projects to use packages for structuring our project.
- Enter the package name in the text box, I have created a sample package called com.example.utils, to hold the utility class.
- Click the finish button to create the Utilities Class.
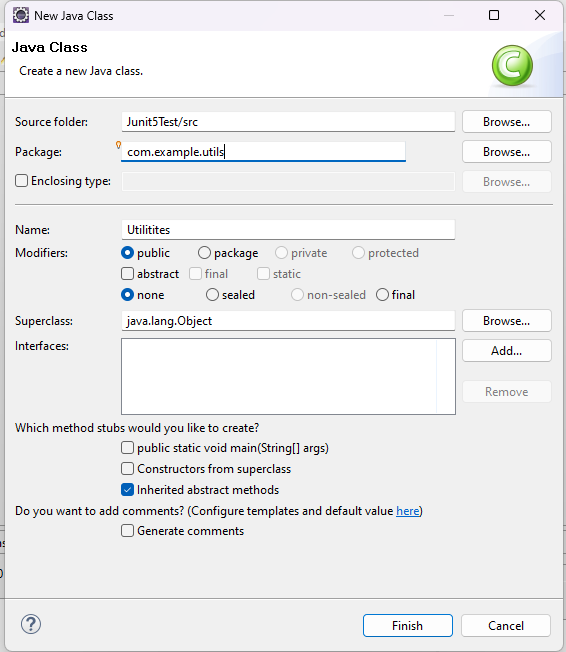
Creating the class
- Once the class is created, add the below code to the Utilities class.
- Save and close the file.
Java
package com.example.utils;
public class Utilities {
public static boolean isPrime(long n)
{
for (long val = 2; val * val <= n; val++) {
if (n % val == 0) {
return false;
}
}
return n > 1;
}
public static boolean isEven(long n)
{
return !((n & 1) == 1);
}
}
|
- We have created the Utilities class that provide some feature for the project.
- Let’s test this class with the Junit5 library.
Creating test case in JUnit 5
- To create a Junit Test case file, right click on the src folder and go to New -> Junit Test Case.
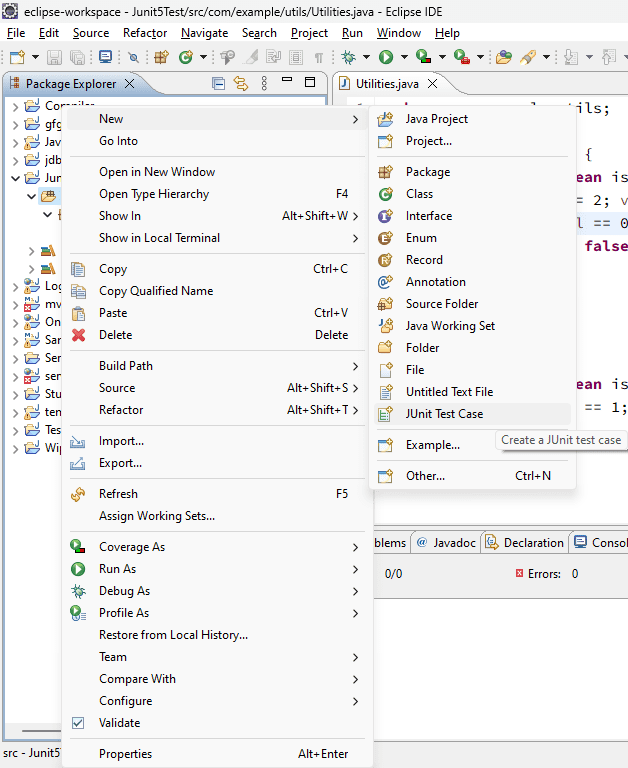
creating junit test case
- Once clicked that, a new dialog box will be displayed to enter the test case class details.
- Enter the Test class name.
- Enter the Utilities class name under the `class under test` textbox, the name should be along with the package name.
- Click on next.
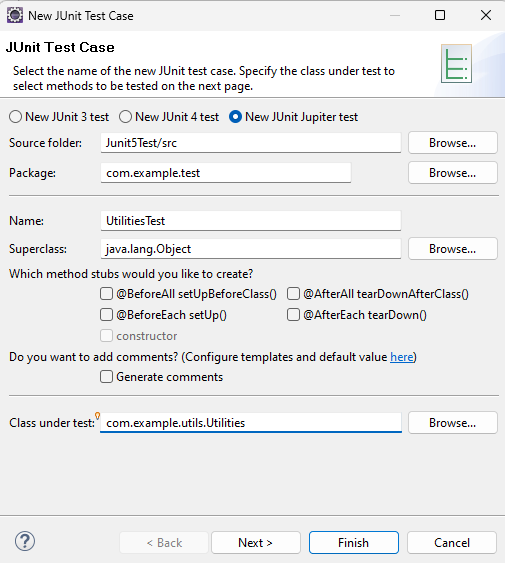
configuring test class
- Now you need to select the methods you are going to test.
- I have selected the two static methods of the class.
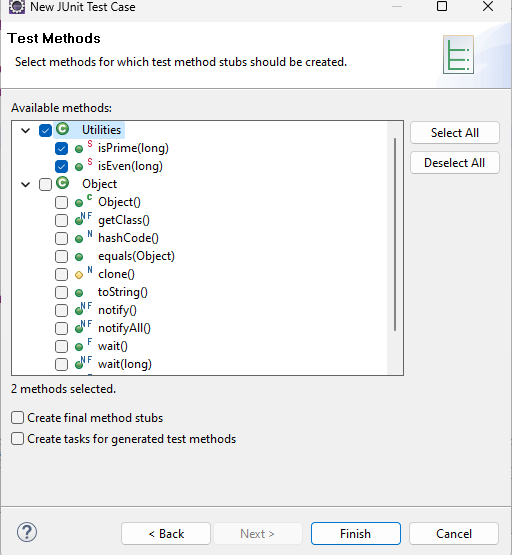
selecting methods
- Now add the below content to the test class.
- The below content, uses the basic @Test annotation to denote a method as a Junit Test case.
- In Junit 5 we don’t have to make our methods and class as public, so by default its just has the default scope to the current package.
Java
package com.example.test;
import static org.junit.jupiter.api.Assertions.assertFalse;
import static org.junit.jupiter.api.Assertions.assertTrue;
import com.example.utils.Utilities;
import org.junit.jupiter.api.Test;
class UtilitiesTest {
@Test
void testIsPrime1(){
assertTrue(Utilities.isPrime(13));
}
@Test
void testIsPrime2(){
assertFalse(Utilities.isPrime(18));
}
@Test
void testIsEven1(){
assertFalse(Utilities.isEven(19));
}
@Test
void testIsEven2(){
assertTrue(Utilities.isEven(80));
}
}
|
- Save and close the Test class file.
- Let’s see how we can run the Junit5 test and see the output.
Running JUnit 5 Tests:
- To run the test in Eclipse, right click on the project name and go to Run as -> JUnit Test.
- Now eclipse will automatically build and run the Junit test.
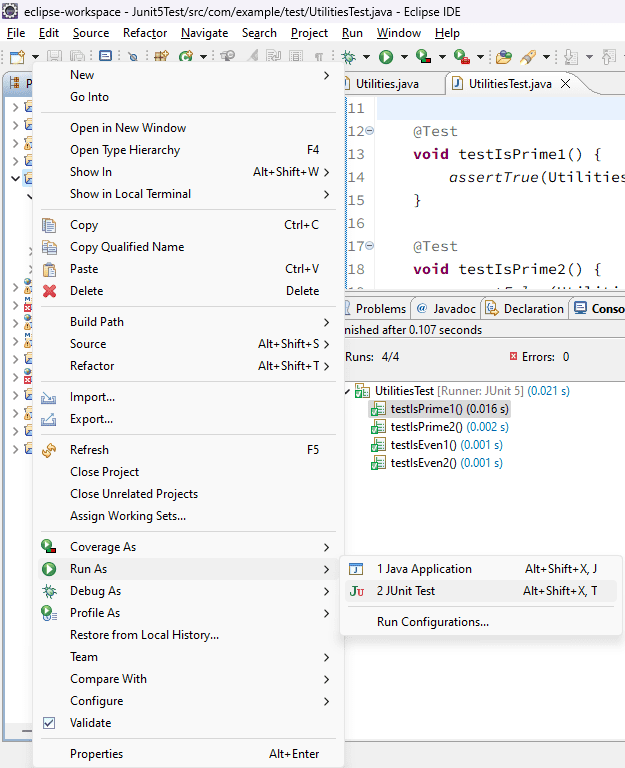
Running JUnit 5 test
Output:
- Once you have ran the Junit test, you can view its output in the Junit tab.
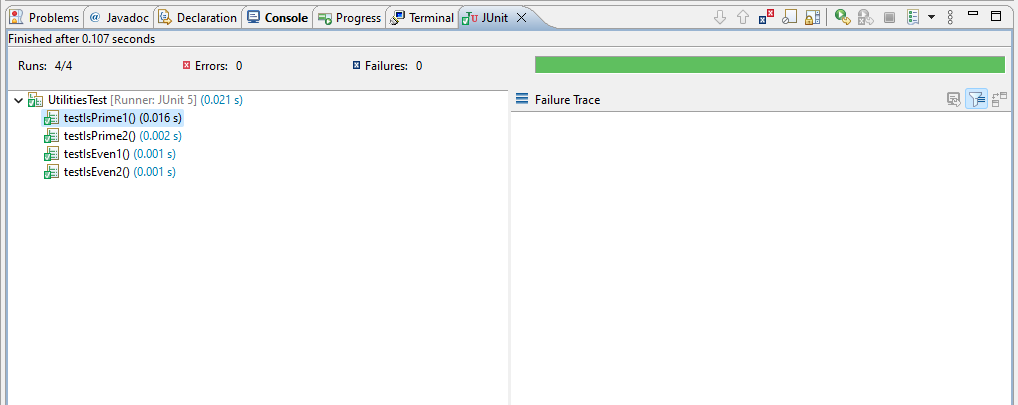
Junit test output
Share your thoughts in the comments
Please Login to comment...