JPA – Deleting an Entity
Last Updated :
09 Apr, 2024
In Java, JPA can be defined as Java Persistence API, deleting the entity is the crucial operation in managing database records. It can involve removing an object from the database and ensuring the data consistency and integrity of the application.
Steps to Implement
- Define Entity: We can define the entity of the JPA application.
- Retrieve the Entity: We need to obtain the reference to the entity that we wish to delete. This can be done using the JPA queries or EntityManager methods of the application.
- Mark for Deletion: Once the entity is retrieved it is marked for deletion using the EntityManager’s remove() method of the application
- Transaction Commit: We can ensure the deletion operation is included in the transaction and it can commit the transaction to persist the changes to the database of the application.
- Verify the Deletion: After committing the transaction we can verify that the entity has been successfully deleted from the database of the application.
Example:
// Step 1: Retrieve the entity
EntityManager entityManager = entityManagerFactory.createEntityManager();
EntityTransaction transaction = entityManager.getTransaction();
transaction.begin();

// Suppose we want to delete an entity of type Student with id = 1
Student student = entityManager.find(Student.class, 1);

// Step 2: Mark for Deletion
entityManager.remove(student);

// Step 3: Transaction Commit
transaction.commit();

// Step 4: Verify Deletion
Student deletedStudent = entityManager.find(Student.class, 1);
if(deletedStudent == null) {
    System.out.println("Entity successfully deleted!");
} else {
    System.out.println("Deletion failed!");
}

entityManager.close();
Further Subtopics
Cascade Deletion
JPA can allows defining the cascade rule where the associated with the entities are also deleted when the parent entity is deleted. This helps in the maintaining the referential integrity and it can simplifying the deletion process of the application.
Query based Deletion
Instead of the retrieving the entity first, We can directly execute the delete query using the JPQL(Java Persistence Query Language) or Criteria API of the JPA application.
Soft Deletion
Instead of the physically removing the records from the database and the entities are marked as the deleted by the updating the flag. This approach can helps in the maintaining the audit trails and it can recovering the deleted data if needed.
Step-by-Step Implementation of Deleting an Entity in JPA
Step 1: First, we will create the JPA project using the Intellij Idea named as jpa-delete-entity-demo of the project.
Step 2: Now, we will add the below dependencies into the JPA project.
Dependencies:
<dependency>
            <groupId>org.hibernate.orm</groupId>
            <artifactId>hibernate-core</artifactId>
            <version>6.0.2.Final</version>
        </dependency>
        <dependency>
            <groupId>org.glassfish.jaxb</groupId>
            <artifactId>jaxb-runtime</artifactId>
            <version>3.0.2</version>
        </dependency>
        <dependency>
            <groupId>org.junit.jupiter</groupId>
            <artifactId>junit-jupiter-api</artifactId>
            <version>${junit.version}</version>
            <scope>test</scope>
        </dependency>
        <dependency>
            <groupId>org.junit.jupiter</groupId>
            <artifactId>junit-jupiter-engine</artifactId>
            <version>${junit.version}</version>
            <scope>test</scope>
        </dependency>
        <dependency>
            <groupId>mysql</groupId>
            <artifactId>mysql-connector-java</artifactId>
            <version>8.0.28</version>
        </dependency>
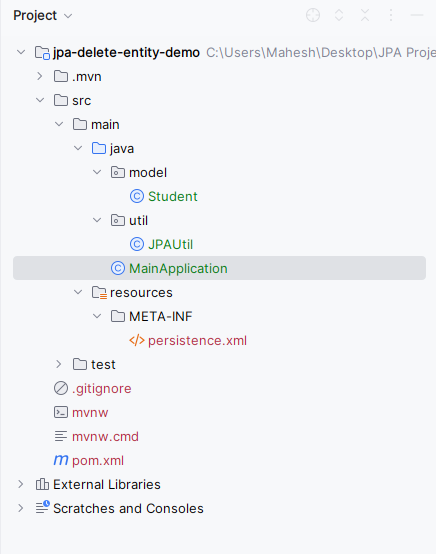
Once the project creation completed, then the file structure will look like the below image.

file structure
Step 3: Open persistance.xml and put the below code for the MYSQL database configuration of the database.
XML
<?xml version="1.0" encoding="UTF-8" standalone="yes"?>
<persistence xmlns="https://jakarta.ee/xml/ns/persistence"
             xmlns:xsi="http://www.w3.org/2001/XMLSchema-instance"
             xsi:schemaLocation="https://jakarta.ee/xml/ns/persistence https://jakarta.ee/xml/ns/persistence/persistence_3_0.xsd"
             version="3.0">
    <persistence-unit name="StudentPU">

        <properties>
            <property name="javax.persistence.jdbc.url" value="jdbc:mysql://localhost:3306/example"/>
            <property name="javax.persistence.jdbc.user" value="root"/>
            <property name="javax.persistence.jdbc.password" value=""/>
            <property name="javax.persistence.jdbc.driver" value="com.mysql.jdbc.Driver"/>
            <property name="hibernate.dialect" value="org.hibernate.dialect.MySQL5Dialect"/>
            <property name="hibernate.hbm2ddl.auto" value="update"/>
        </properties>

    </persistence-unit>
</persistence>
Step 4: Create the new Java package named as model in that package, create the new Entity Java class for the creation of the entity and it named as Student. Go to src > main > java > model > Student and put the below code.
Java
package model;

import jakarta.persistence.Entity;
import jakarta.persistence.Id;

@Entity
public class Student {
    @Id
    private int id;
    private String name;
    private int age;

    // Getters and setters


    public int getId() {
        return id;
    }

    public void setId(int id) {
        this.id = id;
    }

    public String getName() {
        return name;
    }

    public void setName(String name) {
        this.name = name;
    }

    public int getAge() {
        return age;
    }

    public void setAge(int age) {
        this.age = age;
    }
}
Step 5: Create the new Java package named as util in that package, create the new Entity Java class for the creation of the entity and it named as JPAUtil. Go to src > main > java > util > JPAUtil and put the below code.
Java
package util;

import jakarta.persistence.EntityManager;
import jakarta.persistence.EntityManagerFactory;
import jakarta.persistence.Persistence;

public class JPAUtil {
    private static final EntityManagerFactory emFactory;

    static {
        emFactory = Persistence.createEntityManagerFactory("StudentPU");
    }

    public static EntityManager getEntityManager() {
        return emFactory.createEntityManager();
    }

    public static void close() {
        emFactory.close();
    }
}
Step 6: Create the new Java class and named as the MainApplication. Go to src > main > java > MainApplication and put the below code.
Java
import jakarta.persistence.EntityManager;
import model.Student;
import util.JPAUtil;

public class MainApplication {

    public static void main(String[] args) {
        EntityManager entityManager = JPAUtil.getEntityManager();

        entityManager.getTransaction().begin();

        // Creating a new student
        Student student = new Student();
        student.setId(10);
        student.setName("Syam Sunder");
        student.setAge(20);

        entityManager.persist(student);

        entityManager.getTransaction().commit();

        // Deleting the student
        entityManager.getTransaction().begin();

        Student studentToDelete = entityManager.find(Student.class, 1);
        if (studentToDelete != null) {
            entityManager.remove(studentToDelete);
            entityManager.getTransaction().commit();
            System.out.println("Student successfully deleted!");
        } else {
            System.out.println("Student not found!");
        }

        JPAUtil.close();
    }
}
pom.xml:
XML
<?xml version="1.0" encoding="UTF-8"?>
<project xmlns="http://maven.apache.org/POM/4.0.0"
         xmlns:xsi="http://www.w3.org/2001/XMLSchema-instance"
         xsi:schemaLocation="http://maven.apache.org/POM/4.0.0 https://maven.apache.org/xsd/maven-4.0.0.xsd">
    <modelVersion>4.0.0</modelVersion>

    <groupId>org.example</groupId>
    <artifactId>jpa-delete-entity-demo</artifactId>
    <version>1.0-SNAPSHOT</version>
    <name>jpa-delete-entity-demo</name>

    <properties>
        <project.build.sourceEncoding>UTF-8</project.build.sourceEncoding>
        <maven.compiler.target>11</maven.compiler.target>
        <maven.compiler.source>11</maven.compiler.source>
        <junit.version>5.9.2</junit.version>
    </properties>

    <dependencies>
        <dependency>
            <groupId>org.hibernate.orm</groupId>
            <artifactId>hibernate-core</artifactId>
            <version>6.0.2.Final</version>
        </dependency>
        <dependency>
            <groupId>mysql</groupId>
            <artifactId>mysql-connector-java</artifactId>
            <version>8.0.28</version>
        </dependency>
        <dependency>
            <groupId>org.glassfish.jaxb</groupId>
            <artifactId>jaxb-runtime</artifactId>
            <version>3.0.2</version>
        </dependency>
        <dependency>
            <groupId>org.junit.jupiter</groupId>
            <artifactId>junit-jupiter-api</artifactId>
            <version>${junit.version}</version>
            <scope>test</scope>
        </dependency>
        <dependency>
            <groupId>org.junit.jupiter</groupId>
            <artifactId>junit-jupiter-engine</artifactId>
            <version>${junit.version}</version>
            <scope>test</scope>
        </dependency>
    </dependencies>

    <build>
        <plugins>
        </plugins>
    </build>
</project>
Step 7: Once the project is done, run the application and we can get the output like the below image.
.jpg)
output
In the above example, We can demonstrate the simple java application using the JPA and it can be delete the entity of the JPA application.
Conclusion
Deleting the entities in JPA can involves the several steps including the retrieval, marking for the deletion, transaction the commit and verification. Understanding the steps and also considering the additional factors like the cascade deletion and soft deletion is the essential for the effective database management in the JPA application.
Share your thoughts in the comments
Please Login to comment...