JPA – Creating an Entity
Last Updated :
22 Apr, 2024
JPA is defined as Java Persistence API (JPA) that can simplify the process of the persisting Java objects to the relational databases. Creating the entity in the JPA involves defining the java class that can represent the database table and it can be annotated with the JPA annotations to specify its mapping to the database schema.
Entity Related Annotations
- Entity: This annotation of the java class can indicate that it is the entity and it can represent the tables in the relational database. Example: @Entity
- Table: This annotation that can specifies the details of the database table to which the entity is mapped. Example: @Table
- Id: This annotation can mark the field in the entity as the primary key. Example: @Id
- GeneratedValue: This annotation can be configured the way primary key values are generated for the entity. Example: @GeneratedValue(strategy = GenerationType.IDENTITY)
- Column: This annotation can be specifies the maps of an entity field to the database column. Example: @Column
- Basic Configure: This annotation can specify the default fetch type for an entity field. Example: @Basic(fetch = FetchType.LAZY)
- Transient: This annotation can mark the field in the entity as the transient and it will not be persisted in the database. Example: @Transient
- ManyToOne: This annotation can define the many-to-one relationship between the entities. Example: @ManyToOne
- OneToMany: This annotation can define the one-to-many relationship between the entities. Example: @OneToMany
- OneToOne: This annotation can define the one-to-one relationship between the entities.
- JoinColumn: It can defined as the specifies the mapping of the foreign key column in the relationship. Example: @JoinColumn
- JoinTable: This annotation can be specifies the mapping of the intermediate table in the many to many relationship. Example: @JoinTable
- Getter and Setter Methods: This methods can be used to retrieve and set the values of the entity fields.
Example Project
Step 1: Create the new JPA project using the InteljIdea named as create-entity-demo once create the project then the file structure looks like the below image.
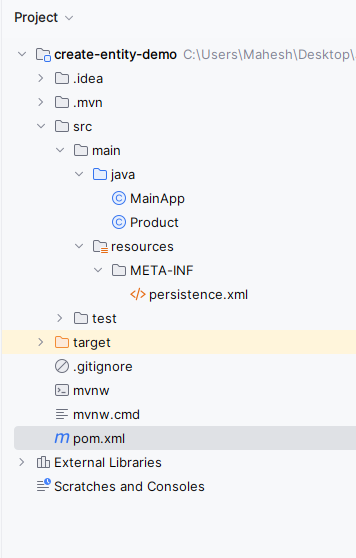
file structure
Step 2: Open the open.xml and add the below dependencies into the project.
 <!-- Database Driver (MySQL in this example) -->
<dependency>
      <groupId>mysql</groupId>
      <artifactId>mysql-connector-java</artifactId>
      <version>8.0.28</version>
</dependency>
<dependency>
      <groupId>org.hibernate.orm</groupId>
      <artifactId>hibernate-core</artifactId>
      <version>6.0.2.Final</version>
</dependency>
<dependency>
      <groupId>org.glassfish.jaxb</groupId>
      <artifactId>jaxb-runtime</artifactId>
      <version>3.0.2</version>
</dependency>
<dependency>
  <groupId>org.junit.jupiter</groupId>
  <artifactId>junit-jupiter-api</artifactId>
  <version>${junit.version}</version>
  <scope>test</scope>
</dependency>
<dependency>
      <groupId>org.junit.jupiter</groupId>
      <artifactId>junit-jupiter-engine</artifactId>
      <version>${junit.version}</version>
      <scope>test</scope>
</dependency>
Step 3: Open the persistence.xml and put the below code into the project and it can configure the database of the project.
XML
<?xml version="1.0" encoding="UTF-8" standalone="yes"?>
<persistence xmlns="https://jakarta.ee/xml/ns/persistence"
             xmlns:xsi="http://www.w3.org/2001/XMLSchema-instance"
             xsi:schemaLocation="https://jakarta.ee/xml/ns/persistence https://jakarta.ee/xml/ns/persistence/persistence_3_0.xsd"
             version="3.0">
    <persistence-unit name="example-unit">
        <class>Product</class>
        <properties>
            <property name="javax.persistence.jdbc.url" value="jdbc:mysql://localhost:3306/example"/>
            <property name="javax.persistence.jdbc.user" value="root"/>
            <property name="javax.persistence.jdbc.password" value=""/>
            <property name="javax.persistence.jdbc.driver" value="com.mysql.jdbc.Driver"/>
            <property name="hibernate.dialect" value="org.hibernate.dialect.MySQL5Dialect"/>
            <property name="hibernate.hbm2ddl.auto" value="update"/>
        </properties>

    </persistence-unit>
</persistence>
Step 4: Create the new Entity Java class named as the Product. Go to src > main > java > Product and put the below code.
Java
import jakarta.persistence.*;

@Entity
@Table(name = "products")
public class Product {
    @Id
    @GeneratedValue(strategy = GenerationType.IDENTITY)
    private Long id;

    private String name;
    private double price;

    public Long getId() {
        return id;
    }

    public void setId(Long id) {
        this.id = id;
    }

    public String getName() {
        return name;
    }

    public void setName(String name) {
        this.name = name;
    }

    public double getPrice() {
        return price;
    }

    public void setPrice(double price) {
        this.price = price;
    }
}
Step 5: Create the new Java class named as the MainApp. Go to src > main > java > MainApp and put the below code.
Java
import jakarta.persistence.EntityManager;
import jakarta.persistence.EntityManagerFactory;
import jakarta.persistence.Persistence;

import java.util.List;

public class MainApp {
    public static void main(String[] args) {
        // Initialize EntityManagerFactory
        EntityManagerFactory entityManagerFactory = Persistence.createEntityManagerFactory("example-unit");

        // Create EntityManager
        EntityManager entityManager = entityManagerFactory.createEntityManager();

        // Persist sample data
        persistSampleData(entityManager);

        // Display sample data
        displaySampleData(entityManager);

        // Close EntityManager
        entityManager.close();

        // Close EntityManagerFactory
        entityManagerFactory.close();
    }

    private static void persistSampleData(EntityManager entityManager) {
        // Begin transaction
        entityManager.getTransaction().begin();

        // Create sample products
        Product product1 = new Product();
        product1.setName("Product 1");
        product1.setPrice(10.99);

        Product product2 = new Product();
        product2.setName("Product 2");
        product2.setPrice(20.99);

        // Persist products
        entityManager.persist(product1);
        entityManager.persist(product2);

        // Commit transaction
        entityManager.getTransaction().commit();
    }

    private static void displaySampleData(EntityManager entityManager) {
        // Query all products
        List<Product> products = entityManager.createQuery("SELECT p FROM Product p", Product.class).getResultList();

        // Print product details
        System.out.println("Products:");
        for (Product product : products) {
            System.out.println("ID: " + product.getId() + ", Name: " + product.getName() + ", Price: " + product.getPrice());
        }
    }
}
pom.xml:
XML
<?xml version="1.0" encoding="UTF-8"?>
<project xmlns="http://maven.apache.org/POM/4.0.0"
         xmlns:xsi="http://www.w3.org/2001/XMLSchema-instance"
         xsi:schemaLocation="http://maven.apache.org/POM/4.0.0 https://maven.apache.org/xsd/maven-4.0.0.xsd">
    <modelVersion>4.0.0</modelVersion>

    <groupId>org.example</groupId>
    <artifactId>create-entity-demo</artifactId>
    <version>1.0-SNAPSHOT</version>
    <name>create-entity-demo</name>

    <properties>
        <project.build.sourceEncoding>UTF-8</project.build.sourceEncoding>
        <maven.compiler.target>11</maven.compiler.target>
        <maven.compiler.source>11</maven.compiler.source>
        <junit.version>5.9.2</junit.version>
    </properties>

    <dependencies>
        <dependency>
            <groupId>org.hibernate.orm</groupId>
            <artifactId>hibernate-core</artifactId>
            <version>6.0.2.Final</version>
        </dependency>
        <dependency>
            <groupId>org.glassfish.jaxb</groupId>
            <artifactId>jaxb-runtime</artifactId>
            <version>3.0.2</version>
        </dependency>
        <dependency>
            <groupId>org.junit.jupiter</groupId>
            <artifactId>junit-jupiter-api</artifactId>
            <version>${junit.version}</version>
            <scope>test</scope>
        </dependency>
        <dependency>
            <groupId>org.junit.jupiter</groupId>
            <artifactId>junit-jupiter-engine</artifactId>
            <version>${junit.version}</version>
            <scope>test</scope>
        </dependency>
        <dependency>
            <groupId>mysql</groupId>
            <artifactId>mysql-connector-java</artifactId>
            <version>8.0.28</version>
        </dependency>
    </dependencies>

    <build>
        <plugins>
        </plugins>
    </build>
</project>
Step 6: Once the project is completed, run the application then show the ID, name, product and prices of the products as output. Refer the below image for the better understanding of the concept.
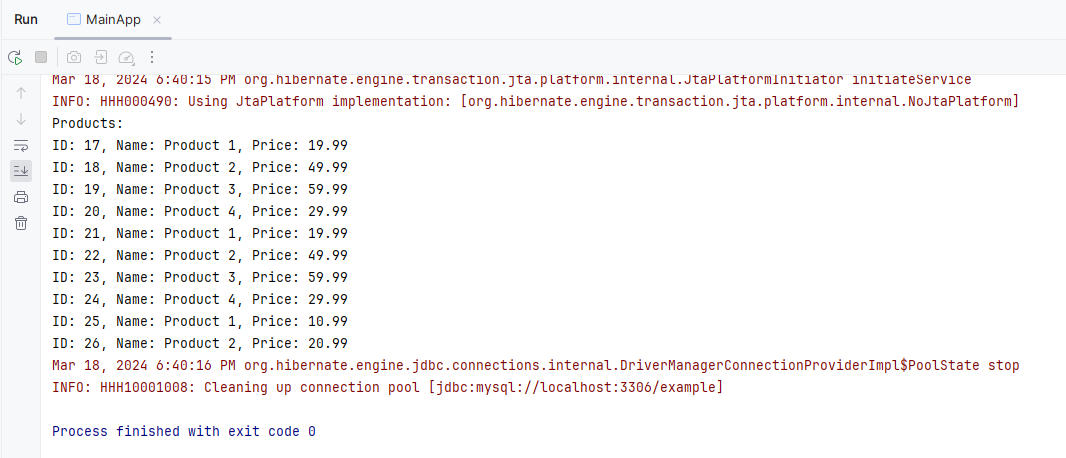
output
If we follow the above procedure, then we can successfully build the JPA application of the demonstration of the creating the entity of the JPA Application.
Conclusion
In JPA, Creating the entities are the fundamental building blocks for the developing the Java applications with database interaction and understanding the entities is the crucial for the effective utilization of the JPA in application development. By following the proper steps and utilizing the appropriate annotations and developers can be seamlessly integrate the entities into the application therefore the improving the code maintainability and database interaction efficiency.
Share your thoughts in the comments
Please Login to comment...