JPA – Update an Entity
Last Updated :
23 Apr, 2024
JPA refers to Java Persistence API. In JPA, Updating the entity is a crucial operation when working within the databases. This process involves modifying the attributes of the existing entity and it can persist the changes back to the database.
Steps to Update an Entity in JPA
Updating the entity in the JPA involves the following steps:
1. Retrieving the Entity
We need to update the entity before we can update an entity then we first need to retrieve it from the database. It can typically done using the EntityManager‘s find() method and passing the entity class and the primary key value as arguments. This method can return the entity instance if it exists in the database.
EntityManager entityManager = entityManagerFactory.createEntityManager();
EntityTransaction transaction = entityManager.getTransaction();
transaction.begin();

// Fetching the entity by its ID
Employee employee = entityManager.find(Employee.class, 1L);

transaction.commit();
entityManager.close();
2. Modifying the Attributes
Once we can retrieved the entity and it can modify its attributes as needed and it can involves the calling the setter methods on the entity object to updates its properties.
// Modifying attributes of the entity
employee.setSalary(5000); // Updating salary
employee.setDepartment("IT"); // Updating department
3. Persisting the Changes
After making the necessary modifications to entity and we need to the persist these changes back to database. It can be achieved by the either merging the entity or flushing the changes and it can depending on the whether the entity is in the managed.
EntityManager entityManager = entityManagerFactory.createEntityManager();
EntityTransaction transaction = entityManager.getTransaction();
transaction.begin();

// Merging the updated entity
entityManager.merge(employee);

transaction.commit();
entityManager.close();
By the following the above steps, we can successfully update the entities in the JPA. It can ensuring that any modifications made to the entity attributes are properly reflected in the database. This approach can helps the maintain data consistency and integrity within the Java applications.
Key Components:
- Dirty Checking: JPA employs the dirty checking to the automatically detect changes in the managed entities and it can synchronize them with the database upon the transaction commit.
- JPQL Updates: In addition to changing entity attributes directly. JPA provides the ability to create multiple updates through JPQL (Java Persistence Query Language) queries within a JPA application.
- Optimistic Locking: This JPA handles simultaneous updating of organizations by using optimistic locking mechanisms to prevent application data inconsistencies
Project Implementation to Update an Entity in JPA
Below are the implementation steps to Update an Entity.
Step 1: Create a new JPA project using the IntelliJ Idea named jpa-update-entity-demo.
Step 2: Open the pom.xml and write the below dependencies into it.
Dependencies:
  <dependency>
            <groupId>org.hibernate.orm</groupId>
            <artifactId>hibernate-core</artifactId>
            <version>6.0.2.Final</version>
        </dependency>
        <dependency>
            <groupId>org.glassfish.jaxb</groupId>
            <artifactId>jaxb-runtime</artifactId>
            <version>3.0.2</version>
        </dependency>
        <dependency>
            <groupId>org.junit.jupiter</groupId>
            <artifactId>junit-jupiter-api</artifactId>
            <version>${junit.version}</version>
            <scope>test</scope>
        </dependency>
        <dependency>
            <groupId>org.junit.jupiter</groupId>
            <artifactId>junit-jupiter-engine</artifactId>
            <version>${junit.version}</version>
            <scope>test</scope>
        </dependency>
        <dependency>
            <groupId>mysql</groupId>
            <artifactId>mysql-connector-java</artifactId>
            <version>8.0.28</version>
        </dependency>
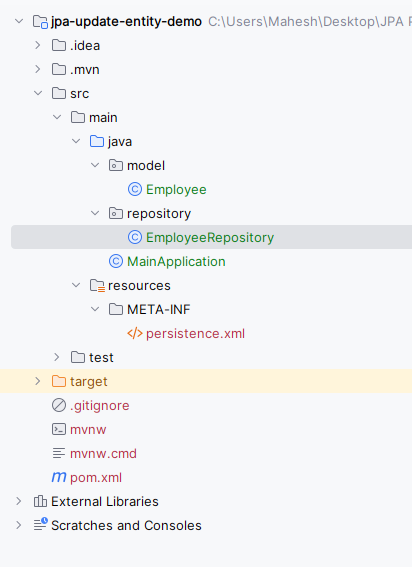
After project creation done, the file structure will look like below.
Step 3: Open persistence.xml file and write the below code into the project to configure the project database.
XML
<?xml version="1.0" encoding="UTF-8" standalone="yes"?>
<persistence xmlns="https://jakarta.ee/xml/ns/persistence"
             xmlns:xsi="http://www.w3.org/2001/XMLSchema-instance"
             xsi:schemaLocation="https://jakarta.ee/xml/ns/persistence https://jakarta.ee/xml/ns/persistence/persistence_3_0.xsd"
             version="3.0">
    <persistence-unit name="EmployeePU">

        <class></class>
        <properties>
            <property name="javax.persistence.jdbc.url" value="jdbc:mysql://localhost:3306/example"/>
            <property name="javax.persistence.jdbc.user" value="root"/>
            <property name="javax.persistence.jdbc.password" value=""/>
            <property name="javax.persistence.jdbc.driver" value="com.mysql.jdbc.Driver"/>
            <property name="hibernate.dialect" value="org.hibernate.dialect.MySQL5Dialect"/>
            <property name="hibernate.hbm2ddl.auto" value="update"/>
        </properties>
    </persistence-unit>
</persistence>
Step 4: Create a package named model, and in that package, create a new Entity class named Employee.
Go to src > main > java > model > Employee and write the following code.
Java
package model;

import jakarta.persistence.*;

@Entity
@Table(name = "employees")
public class Employee {
    @Id
    @GeneratedValue(strategy = GenerationType.IDENTITY)
    private Long id;

    private String name;
    private double salary;
    private String department;

    // Getters and setters

    public Long getId() {
        return id;
    }

    public void setId(Long id) {
        this.id = id;
    }

    public String getName() {
        return name;
    }

    public void setName(String name) {
        this.name = name;
    }

    public double getSalary() {
        return salary;
    }

    public void setSalary(double salary) {
        this.salary = salary;
    }

    public String getDepartment() {
        return department;
    }

    public void setDepartment(String department) {
        this.department = department;
    }
}
Step 5: Create a new Java package named repository and in that package, create a new Entity Java class named EmployeeRepository.
Go to src > main > java > repository > EmployeeRepository and put the below code.
Java
package repository;

import jakarta.persistence.EntityManager;
import jakarta.persistence.EntityManagerFactory;
import jakarta.persistence.EntityTransaction;
import jakarta.persistence.Persistence;
import model.Employee;

public class EmployeeRepository {

    // Create an entity manager factory
    private final EntityManagerFactory entityManagerFactory = Persistence.createEntityManagerFactory("EmployeePU");

    // Find an employee by ID
    public Employee findEmployeeById(Long id) {
        EntityManager entityManager = entityManagerFactory.createEntityManager();
        try {
            return entityManager.find(Employee.class, id);
        } finally {
            entityManager.close();
        }
    }

    // Save an employee to the database
    public void saveEmployee(Employee employee) {
        EntityManager entityManager = entityManagerFactory.createEntityManager();
        EntityTransaction transaction = entityManager.getTransaction();
        try {
            transaction.begin();
            entityManager.persist(employee);
            transaction.commit();
        } catch (Exception ex) {
            if (transaction.isActive()) {
                transaction.rollback();
            }
            ex.printStackTrace();
        } finally {
            entityManager.close();
        }
    }

    // Update an existing employee in the database
    public void updateEmployee(Employee employee) {
        EntityManager entityManager = entityManagerFactory.createEntityManager();
        EntityTransaction transaction = entityManager.getTransaction();
        try {
            transaction.begin();
            entityManager.merge(employee);
            transaction.commit();
        } catch (Exception ex) {
            if (transaction.isActive()) {
                transaction.rollback();
            }
            ex.printStackTrace();
        } finally {
            entityManager.close();
        }
    }
}
Step 6: Create a Java class named MainApplication.
Go to src > main > java > MainApplication and write the following code.
Java
import model.Employee;
import repository.EmployeeRepository;

public class MainApplication {
    public static void main(String[] args) {
        // Creating an instance of EmployeeRepository
        EmployeeRepository employeeRepository = new EmployeeRepository();

        // Adding a new employee
        Employee newEmployee = new Employee();
        newEmployee.setName("John Doe");
        newEmployee.setSalary(5000);
        newEmployee.setDepartment("IT");

        // Persisting the new employee
        employeeRepository.saveEmployee(newEmployee);
        System.out.println("New Employee Added:");
        printEmployeeData(newEmployee);

        // Retrieving the newly added employee
        Long employeeId = newEmployee.getId();
        Employee retrievedEmployee = employeeRepository.findEmployeeById(employeeId);

        // Updating the retrieved employee
        if (retrievedEmployee != null) {
            retrievedEmployee.setSalary(6000);
            retrievedEmployee.setDepartment("Finance");
            employeeRepository.updateEmployee(retrievedEmployee);

            System.out.println("\nEmployee Data After Update:");
            // Retrieving the updated employee
            Employee updatedEmployee = employeeRepository.findEmployeeById(employeeId);
            printEmployeeData(updatedEmployee);
        }
    }

    private static void printEmployeeData(Employee employee) {
        if (employee != null) {
            System.out.println("ID: " + employee.getId());
            System.out.println("Name: " + employee.getName());
            System.out.println("Salary: " + employee.getSalary());
            System.out.println("Department: " + employee.getDepartment());
        } else {
            System.out.println("Employee not found.");
        }
    }
}
pom.xml:
XML
<?xml version="1.0" encoding="UTF-8"?>
<project xmlns="http://maven.apache.org/POM/4.0.0"
         xmlns:xsi="http://www.w3.org/2001/XMLSchema-instance"
         xsi:schemaLocation="http://maven.apache.org/POM/4.0.0 https://maven.apache.org/xsd/maven-4.0.0.xsd">
    <modelVersion>4.0.0</modelVersion>

    <groupId>org.example</groupId>
    <artifactId>jpa-update-entity-demo</artifactId>
    <version>1.0-SNAPSHOT</version>
    <name>jpa-update-entity-demo</name>

    <properties>
        <project.build.sourceEncoding>UTF-8</project.build.sourceEncoding>
        <maven.compiler.target>11</maven.compiler.target>
        <maven.compiler.source>11</maven.compiler.source>
        <junit.version>5.9.2</junit.version>
    </properties>

    <dependencies>
        <dependency>
            <groupId>mysql</groupId>
            <artifactId>mysql-connector-java</artifactId>
            <version>8.0.28</version>
        </dependency>
        <dependency>
            <groupId>org.hibernate.orm</groupId>
            <artifactId>hibernate-core</artifactId>
            <version>6.0.2.Final</version>
        </dependency>
        <dependency>
            <groupId>org.glassfish.jaxb</groupId>
            <artifactId>jaxb-runtime</artifactId>
            <version>3.0.2</version>
        </dependency>
        <dependency>
            <groupId>org.junit.jupiter</groupId>
            <artifactId>junit-jupiter-api</artifactId>
            <version>${junit.version}</version>
            <scope>test</scope>
        </dependency>
        <dependency>
            <groupId>org.junit.jupiter</groupId>
            <artifactId>junit-jupiter-engine</artifactId>
            <version>${junit.version}</version>
            <scope>test</scope>
        </dependency>
    </dependencies>

    <build>
        <plugins>
        </plugins>
    </build>
</project>
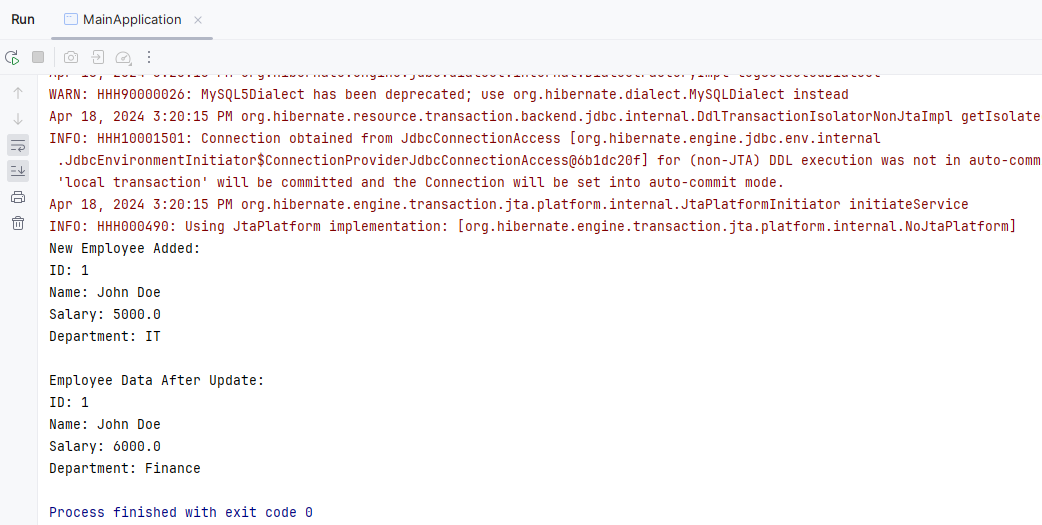
Step 7: Once the project is completed, run the application, then it will show the Employee data and updated Employee data as output. Refer the below image for the better understanding of the concept.
Share your thoughts in the comments
Please Login to comment...