How to Install and Use a Raspberry Pi for Beginners?
Last Updated :
23 Apr, 2024
Quick Solution!
Here is a quick solution for you. Follow these steps to Install & Use Raspberry Pi for Beginners:
Install Raspberry Pi:
- Download the Raspberry Pi Imager from the Official Page.
- Use the Raspberry Pi Operating System.
- Select the SD Card & click Write.
- Add the Raspberry Pi to the Monitor.
- Skip the Update for the time being
- Click Restart to complete the process.
Use Raspberry Pi:
- To use Raspberry Pi as a beginner, go to the Raspberry Pi Menu Bar.
- Use Browser, File Explorer, and Terminal to explore the things.
- Also, you can use the Raspberry Pi Menu to execute more tasks.
Computers & Laptops are the need of the generation, if there is no laptop, you cannot access modern technologies with their full potential. However, every individual is not self-reliant & capable of buying a laptop or a Computer. For such individuals, the Raspberry Pi operating system is present. You can install Raspberry Pi as a beginner.
Raspberry Pi is a small computer with the size of a credit card. Installing & using Raspberry Pi OS, you can get the feel of using a dedicated computer. However, with the help of the installed Raspberry Pi OS, one can perform any computer work. You can use Raspberry Pi OS for Programming, Browsing, Command Line Tool purposes, etc.
How to Set Up a Raspberry Pi for the First Time
In this article, we will discuss the steps required to Install Raspberry Pi along with the beginner friendly using process of Raspberry Pi.
To have a deep dive into the Raspberry Pi Concept, check the article Raspberry Pi a Computer for Geeks.
How to Install Raspberry Pi for Beginners?
Here, we will discuss the entire Raspberry Pi installation method in a section-wise format. Do check all of them in the proper sequence for better understanding.
Before we begin installing anything on your Raspberry Pi, we need to make sure the operating system is set up properly. Let’s walk through the process step by step
Step 1: Browse to the Official Page of Raspberry Pi to install Raspberry Pi Imager. Click on the Download buttons.

Step 2: Select the Raspberry Pi Operating System.

Step 3: Select the SD Card & click Write to start the process.

Section 2: First-Time Raspberry Pi Booting For Installation
In this section, we’ll guide you through the initial steps of booting up your Raspberry Pi for the first time. This is where the adventure begins!
Step 1: Add the SD Card to the Raspberry Pi Board & boot for the first time. Click on the Skip to bypass the update for the time being. However, the Update will go on in the Background for rebooting.

Step 2: Click on the Reset to complete the installation process.

Also Check: How to Find out the version of the Raspberry Pi?
How to Use Raspberry Pi for Beginners?
Note: After installing the Raspberry Pi, you should not go for any advanced tasks. There are a few simple applications are present that you can use to practice on the Raspberry Pi Environment. Here, we will show a few simple operations on Raspberry Pi.
Step 1: From the Raspberry Pi Menu Bar, select any one application like Browser, File Explorer, or Terminal to see the interface & different settings.

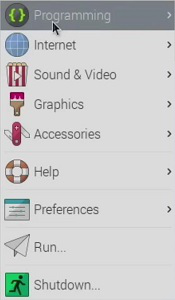
Step 2: Or you can click on the Raspberry Pi Menu & you will find some more options along with the Shut Down Button there to close.
The above discussion might make clear the installation & use of Raspberry Pi for beginners. Once you get Raspberry Pi OS, do sit with the system to practice more & more on the system. Also, while operating Raspberry Pi OS, you should not be afraid of any fault operation as Raspberry Pi is much more flexible.
Conclusion
In wrapping up, using a Raspberry Pi offers a whole new world for beginners in DIY computing. Throughout this guide, we’ve covered the basics of setting up your Raspberry Pi, from starting it for the first time to exploring what it can do.
A Raspberry Pi isn’t just a small computer; it’s a key to learning and creativity. With a Raspberry Pi, you can make all kinds of cool things, like a home automation system, a retro gaming console, or a media hub. You’re only limited by your imagination.
Also Read
How to Install and Use a Raspberry Pi for Beginners – FAQs
How to Install Raspberry Pi as a beginner?
To install Raspberry Pi as a beginner, use the following guidelines properly in a step-by-step format.
- Install the Raspberry Pi Imager from the Official Page.
- Select the Raspberry Pi Operating System
- Select the SD Card in the image.
- Click on the Write option.
- Add the SD Card to the Raspberry Pi Board.
How to Use Raspberry Pi as a beginner?
As a beginner, it is not recommended to go for any advanced task. As a beginner, we recommend to work on the Raspberry Pi Menu Bar. In the Raspberry Pi Menu bar, there are a few options present like Raspberry Pi Menu, Browser, Terminal, File Explorer, etc. Open them one by one & check the interface.
Can I use an Internet connection to the Raspberry Pi?
Yes! The Raspberry Pi Board comes with a dedicated space to attach the Ethernet connection. You can add the connection there. Also, the Raspberry Pi comes with a USB Port where you can add a WiFi Adapter to use the WiFi Connection on the Raspberry Pi.
Share your thoughts in the comments
Please Login to comment...