How to Install Linux on Raspberry Pi?
Last Updated :
15 Feb, 2024
Quick Preview to Install Linux on Raspberry Pi
- Make Ready the Raspberry Pi Imager:
- Download the Raspberry Pi Imager as per the current OS from the Official Site.
- Choose the Linux Distribution from the Operating System Section.
- Choose the SD Card inserted on the device.
- Click Next to move into the process.
- Install the Linux on Raspberry Pi:
- Now, insert the SD Card into Raspberry Pi.
- Connect Raspberry Pi with Internet Cable & monitor.
- Boot the system & select the language.
- Provide Username & Password details.
- Click on Continue to install the Linux.
When an individual wants to access any desktop or computer without investing much more amount for hardware purposes, the Raspberry Pi will be the best. The Raspberry Pi is a small size computer nearly like a Credit Card which has all hardware like Processor, Memory, Graphics Driver, etc. However to use, one should have the Linux OS Install on Raspberry Pi.
Installation of Linux on Raspberry Pi SBC is not like other Operating System installation processes. We can’t use the USB Driver for the installation process rather one SD Card should be inserted after the ISO File configuration. With the Latest Raspberry Pi SBC Update, no need to download ISO files from the internet to Get Linux on Raspberry Pi.
This article is intended to discuss the steps required for Linux Distribution Installation on Raspberry Pi without having any kind of issues.
If you want to know more about the Raspberry Pi Concept, check the article Raspberry-Pi a Computer for Geeks.
How to Install Linux on Raspberry Pi?
To Install & Configure Linux on Raspberry Pi, the following guidelines should be executed properly. We will start with the steps needed in the Raspberry Pi Imager.
Section 1: Configure the Raspberry Pi Imager with Linux Version
Step 1: Browse to the Official Page & download the Raspberry Pi Imager as per the OS on which the current operation going on.

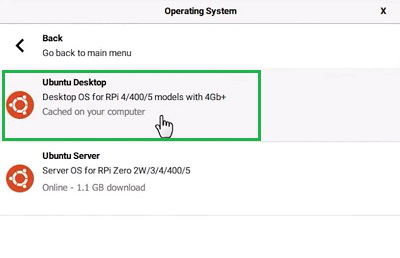
Step 2: Under the Operating System Section of Raspberry Pi Imager, go for the Ubuntu Desktop option.
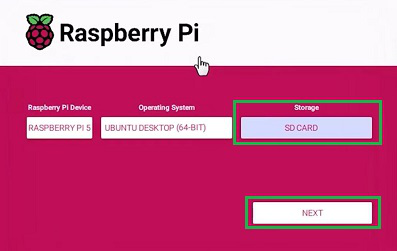
Step 3: Select the SD Card & click Next.
Section 2: Installation of Linux on Raspberry Pi
Step 1: Add the Raspberry Pi to an Internet Cable or Ethernet. Now, boot the system. The System will start booting.

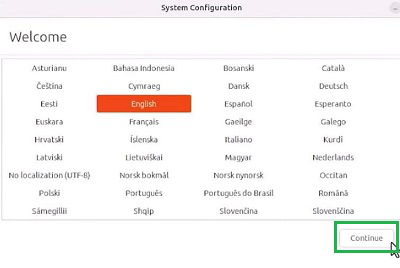
Step 2: Select the Language from the list & click on Continue.
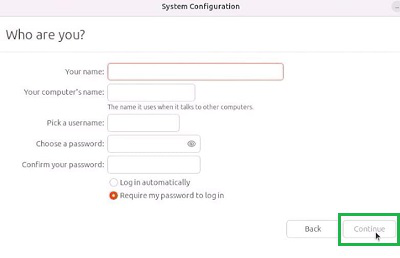
Step 3: Provide Username & Password for the login process there. At last, click Continue to complete the installation process.
So, from the above discussion, we can conclude that the Raspberry Pi Linux Installation can be divided into two parts. In one part, we have to Configure the Raspberry Pi Imager that will be used for the Linux installation process. If we properly execute these two sections, the rest will be ready by the system itself.
Also Read
Frequently Asked Questions to Install Linux on Raspberry Pi
How to Install Linux on Raspberry Pi?
To install the Linux on the Raspberry Pi, the following steps should be properly used.
- Get ready for the Raspberry Pi Imager with Linux Version.
- Add the Raspberry Pi to the internet & computer monitor.
- Start booting the service.
- Select the language.
- Enter Username & Password.
- Click Continue to complete the process.
How to get ready Raspberry Pi Imager for Linux Installation?
To get ready Raspberry Pi Imager for Linux Installation, the following steps are worth to get executed.
- Download the Raspberry Pi Imager from the Official Site.
- Click on Click on Operating System & select Linux Distribution.
- Select the SD Card inserted into the device.
- Click on Next to make the changes.
Can I use any custom ISO File on the Raspberry Pi Imager?
Yes! You can use the Custom ISO Files on the Raspberry Pi Imager. On the Operating System concept, the option Custom Imager will present that you can utilize to upload custom ISO Files. However, it will be best to go for the already configured ISO files on the Raspberry Pi Imager.
Share your thoughts in the comments
Please Login to comment...