Implement Photoshop High Pass Filter (HPF) using OpenCV in Python
Last Updated :
03 Jan, 2023
In this article, we will discuss how to implement photoshop High Pass Filter (HPF) image in Python OpenCV.
High Pass Filter
When we talk about Digital Signal Processing or Digital Image Processing Filters are the most fundamental concept. A Filter or a Digital Filter is used to sifting out the unwanted frequency response from the signals. A filter can be used to fulfill two main tasks in Digital Signal processing and those are signal separation and signal restoration. Signal separation is basically a noise separation and noise attenuation from the input signals. This process is mainly used in EKG, An electrocardiogram monitor to filter the breathing and heartbeat of the mother. Signal Restoration is a process when the input signal is distorted by any means. This is mainly used in deblurring an image. We shall look at what High Pass Filter is mainly used for.
A High Pass Filter(HPF) main advantage is used to sharpen the image by attenuating the low frequency. When the impulse response or signal is passed through a high pass filter, an HPF mainly allows high frequencies to pass through. As High pass filters are used for sharpening the images, the frequency obtained is less compared to the cut-off frequency(ωc). In OpenCV and in digital image processing we also use HPF functionality to find the edges in an image.
Method 1: High Pass Filter(HPF) in Python OpenCV
Here we are going to perform HPF using OpenCV in Python
Used images:

Now that we have an image, using the Python OpenCV module we shall read the image.
img = cv2.imread(“outimage.(jpeg/png/jpg)”)
Given the size of the image, we can also resize the shape this step is completely optional. While resizing the image you can pass an interpolation so that the image maintains its quality. You are free to choose cv2.INTER_BITS, cv2.INTER_CUBIC or cv2.INTER_LINEAR methods for resizing interpolation.
img = cv2.resize(img,(width,height),interpolation=cv2.INTER_BITS)
The next step is to blur the image. The reason to blur the image is to add smoothening effect to an image. By blurring the image we can filter the unwanted noise from the image. In the OpenCV library, we widely use the Gaussian Filter. It employs the technique “kernel convolution”.
Note: 127 is added after subtracting the image with a blurred image to add the greyish look. We shall use Gaussian Blur to blur the image.
hpf = img – cv2.GaussianBlur(img,(21,21),3)+127
Implementation
Python3
import cv2
img = cv2.imread("naruto.jpg")
img = cv2.resize(img, (680, 520),
interpolation=cv2.INTER_CUBIC)
hpf = img - cv2.GaussianBlur(img, (21, 21), 3)+127
cv2.imshow("Original", img)
cv2.imshow("High Passed Filter", hpf)
cv2.waitKey(0)
cv2.destroyAllWindows()
|
Output:

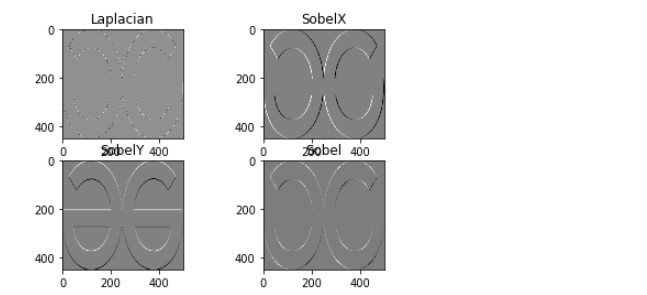
Method 2: Using Sobel and Laplacian
Python OpenCV supports Sobel and Laplacian implementation.
Syntax for Laplacian: laplacian=cv2.Laplacian(gray,cv2.CV_64F)
Syntax For SobelX: [dx=1 and dy=0]: sobelx=cv2.Sobel(gray,cv2.CV_64F,1,0,ksize=7)
Syntax For SobelY: [dx=0 and dy=1]: sobely=cv2.Sobel(gray,cv2.CV_64F,dx=0,dy=1,ksize=7)
Note: cv2.CV_64F denotes the depth of the image
Python3
import cv2
import numpy as np
import matplotlib.pyplot as plt
img = cv2.imread("naruto.jpeg")
img = cv2.resize(img, (500, 450), interpolation=cv2.INTER_CUBIC)
gray = cv2.cvtColor(img, cv2.COLOR_BGR2GRAY)
laplacian = cv2.Laplacian(gray, cv2.CV_64F)
sobelx = cv2.Sobel(gray, cv2.CV_64F, 1, 0, ksize=7)
sobely = cv2.Sobel(gray, cv2.CV_64F, 0, 1, ksize=7)
sobel = cv2.bitwise_and(sobelx, sobely)
plt.subplot(2, 2, 1)
plt.imshow(laplacian, cmap='gray')
plt.title('Laplacian')
plt.subplot(2, 2, 2)
plt.imshow(sobelx, cmap='gray')
plt.title('SobelX')
plt.subplot(2, 2, 3)
plt.imshow(sobely, cmap='gray')
plt.title('SobelY')
plt.subplot(2, 2, 4)
plt.imshow(sobel, cmap='gray')
plt.title('Sobel')
plt.show()
cv2.waitKey(0)
cv2.destroyAllWindows()
|
Output:
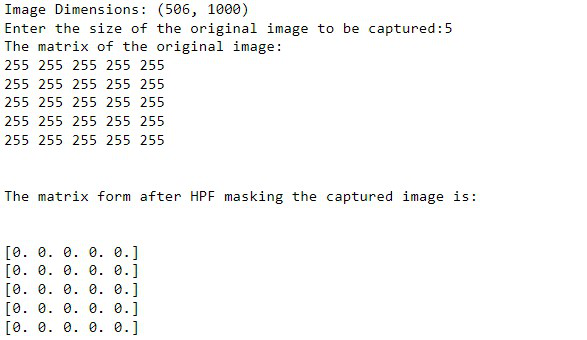
Method 3: Manually Perform High Pass Filter On Image
Since we have already defined the matrix method, let us manually filter our image data. By keeping a reference of the Laplacian Matrix let’s display the pixel matrix format of an image after HPF masking.
Python3
import cv2
import numpy as np
img = cv2.imread('naruto.jpeg')
gray = cv2.cvtColor(img, cv2.COLOR_BGR2GRAY)
dimensions = gray.shape
print("Image Dimensions:", dimensions)
n = int(input("Enter the size of the original image to be captured:"))
print("The matrix of the original image:")
for i in range(0, n):
for j in range(0, n):
print(gray[i][j], end=" ")
print()
filter = np.zeros(shape=(n, n))
for i in range(0, n):
for j in range(0, n):
filter[i][j] = 0*gray[i][j]-1*gray[i][j+1]\
+0*gray[i][j+2]-1*gray[i+1][j]+4 * \
gray[i+1][j+1]-1*gray[i+1][j+2]+0*gray[i+2][j] - \
1*gray[i+2][j+1]+0*gray[i+2][j+2]
print("\n")
print("The matrix form after HPF masking the captured image is:")
print("\n")
for hpf in filter:
print(hpf)
cv2.imshow("Image", gray)
cv2.waitKey(0)
cv2.destroyAllWindows()
|
Output:
Share your thoughts in the comments
Please Login to comment...