Computer vision has an exciting area called human pose detection, which deals with the identification and tracking of postures or forms of people in digital images or videos. This technology is applicable in a wide range of areas including fitness tracking, augmented reality, surveillance and sports analytics. MoveNet is one of the cutting-edge utilities employed for identifying human poses and relies on TensorFlow as well as TensorFlow Hub for accurate as well as efficient pose estimation. In this article, we are going to implement MoveNet model for human pose detection in both static images and image sequences.
What is MoveNet?
- MoveNet is an advanced pose recognition model developed by Google, specially designed for real-time, highly accurate pose prediction across platforms.
- It uses deep learning techniques, especially Convolutional Neural Networks (CNNs), to analyze images or video inputs and estimate the positions of people in the scene.
- At its core, MoveNet provides a lightweight Deep Neural Network framework optimized for efficient reasoning on a variety of hardware platforms, including CPUs, GPUs, TPUs (Tensor Processing Units) and special accelerators so from mobile phones and tablets to desktop computing clouds, it is suitable for use on a wide range of devices to servers. MoveNet is trained on large datasets containing annotated human pose samples, enabling it to obtain complex representations of human bodies in a variety of settings like different poses, clothing, lighting conditions and a wide range of backgrounds that training data supports. MoveNet optimizes unseen images or videos, enabling it to accurately detect human posture in real environments.
Advantage of using MoveNet
A key advantage of MoveNet is its ability to perform real-time state estimates, which means it can process video streams or camera feeds at high frame rates, typically in excess of 30 frames per second (fps) on modern hardware. Being this real-time capability is critical for applications that require real-time feedback or interaction like exercise training, gesture recognition and immersive experiences. Also, MoveNet is available as a pre-trained model in the TensorFlow Hub which is a repository of pre-trained machine learning models provided by Google for developers and researchers to integrate MoveNet into their projects by using the TensorFlow ecosystem.
Implementation of Human Pose Detection using MoveNet
Human Pose Detection for Static Image
Step 1: Importing required modules
At first, we will import all required Python libraries like TensorFlow, OpenCV, NumPy and ImageIO etc.
import tensorflow as tf
import tensorflow_hub as hub
import numpy as np
import cv2
from google.colab.patches import cv2_imshow
import imageio
Step 2: Loading the MoveNet model
we will load a pretrained latest version (4) of MoveNet model for further interference.
# Load the MoveNet model from TensorFlow Hub
movenet = hub.load("https://tfhub.dev/google/movenet/singlepose/lightning/4")
Step 3: Defining human pose mapping
Now we will define the total 17 key points of any human body with their corresponding connection nodes.
# Define the mapping of keypoints to body parts
keypoint_names = ['nose', 'left_eye', 'right_eye', 'left_ear', 'right_ear', 'left_shoulder', 'right_shoulder',
                  'left_elbow', 'right_elbow', 'left_wrist', 'right_wrist', 'left_hip', 'right_hip',
                  'left_knee', 'right_knee', 'left_ankle', 'right_ankle']

# Define the connections between keypoints to draw lines for visualization
connections = [(0, 1), (0, 2), (1, 3), (2, 4), (0, 5), (0, 6), (5, 7), (7, 9), (6, 8), (8, 10),
               (5, 6), (5, 11), (6, 12), (11, 12), (11, 13), (13, 15), (12, 14), (14, 16)]
Step 4: Extracting key points
- we will define a small function named `detect_pose_static` responsible for performing pose detection on a static image.
- Initially, the function reads the image from the specified path using OpenCV. The image is then converted to the RGB format, as MoveNet, the pose detection model used, expects RGB images. Next, the image is resized to match the expected input size of MoveNet, which is 192×192 pixels.
- After resizing, the image tensor is converted to a NumPy array with a data type of int32. Inference is then performed on the resized image using the MoveNet model, and the detected key points are extracted from the model outputs. Finally, the function returns the key points obtained from the pose detection process.
# Function to perform pose detection on a static image
def detect_pose_static(image_path):
    # Read the image
    image = cv2.imread(image_path)
    # Convert image to RGB (MoveNet expects RGB images)
    image_rgb = cv2.cvtColor(image, cv2.COLOR_BGR2RGB)
    # Resize image to the expected input size of MoveNet
    image_resized = tf.image.resize_with_pad(tf.expand_dims(image_rgb, axis=0), 192, 192) #192 for lightning
    # Convert the resized image tensor to a NumPy array with dtype uint8
    image_np = image_resized.numpy().astype(np.int32)
    # Perform inference
    outputs = movenet.signatures["serving_default"](tf.constant(image_np))
    # Extract the keypoints
    keypoints = outputs['output_0'].numpy()
    # Return the keypoints
    return keypoints
Defining function to visualize the pose
- Here we will define function `visualize_pose_static` is designed to visualize key points on a static image.
- Initially, the function reads the image from the specified path using OpenCV. The key points are then converted to a NumPy array for further processing. If the shape of the key points array matches the expected shape (1, 1, 17, 3), the function proceeds to extract and iterate through each key point.
- For each key point, it calculates the corresponding pixel coordinates in the image and draws a blue circle at that position using OpenCV’s `cv2.circle` function. Additionally, it draws lines connecting key points, with the thickness increased and color changed to red for better visibility. Finally, the function displays the image with key points and lines using `cv2_imshow`. If the shape of the key points array is not as expected, it prints a message indicating an unexpected shape.
# Function to visualize keypoints on a static image
def visualize_pose_static(image_path, keypoints):
    # Read the image
    image = cv2.imread(image_path)
    # Convert keypoints to numpy array
    keypoints = np.array(keypoints)
    #print("Shape of keypoints array:", keypoints.shape)
    # Ensure keypoints array has the expected shape
    if keypoints.shape == (1, 1, 17, 3):
        # Extract keypoints from the array
        keypoints = keypoints[0, 0]
        # Loop through each keypoint
        for kp in keypoints:
            # Extract x and y coordinates of the keypoint
            x = int(kp[1] * image.shape[1])
            y = int(kp[0] * image.shape[0])
            # Draw a circle at the keypoint position
            cv2.circle(image, (x, y), 12, (255, 0, 0), -1)  # Increase thickness and change color to blue
        # Draw lines connecting keypoints
        for connection in connections:
            start_point = (int(keypoints[connection[0], 1] * image.shape[1]),
                           int(keypoints[connection[0], 0] * image.shape[0]))
            end_point = (int(keypoints[connection[1], 1] * image.shape[1]),
                         int(keypoints[connection[1], 0] * image.shape[0]))
            cv2.line(image, start_point, end_point, (0, 0, 255), 8)  # Increase thickness and change color to red
        # Show the image with keypoints and lines using cv2_imshow
        cv2_imshow(image)
    else:
        print("Unexpected shape of keypoints array:", keypoints.shape)
Step 5: Visualizing output
Now we will pass an input image to the functions defined previously and visualize its output.
static_image_path = "/content/pexels-yogendra-singh-4384679.jpg"
# Perform pose detection on static image
static_keypoints = detect_pose_static(static_image_path)
visualize_pose_static(static_image_path, static_keypoints)
Complete Code:
Python3
import tensorflow as tf
import tensorflow_hub as hub
import numpy as np
import cv2
from google.colab.patches import cv2_imshow
import imageio

# Load the MoveNet model from TensorFlow Hub
movenet = hub.load("https://tfhub.dev/google/movenet/singlepose/lightning/4")

# Define the mapping of keypoints to body parts
keypoint_names = ['nose', 'left_eye', 'right_eye', 'left_ear', 'right_ear', 'left_shoulder', 'right_shoulder',
                  'left_elbow', 'right_elbow', 'left_wrist', 'right_wrist', 'left_hip', 'right_hip',
                  'left_knee', 'right_knee', 'left_ankle', 'right_ankle']

# Define the connections between keypoints to draw lines for visualization
connections = [(0, 1), (0, 2), (1, 3), (2, 4), (0, 5), (0, 6), (5, 7), (7, 9), (6, 8), (8, 10),
               (5, 6), (5, 11), (6, 12), (11, 12), (11, 13), (13, 15), (12, 14), (14, 16)]

# Function to perform pose detection on a static image
def detect_pose_static(image_path):
    # Read the image
    image = cv2.imread(image_path)
    # Convert image to RGB (MoveNet expects RGB images)
    image_rgb = cv2.cvtColor(image, cv2.COLOR_BGR2RGB)
    # Resize image to the expected input size of MoveNet
    image_resized = tf.image.resize_with_pad(tf.expand_dims(image_rgb, axis=0), 192, 192) #192 for lightning
    # Convert the resized image tensor to a NumPy array with dtype uint8
    image_np = image_resized.numpy().astype(np.int32)
    # Perform inference
    outputs = movenet.signatures["serving_default"](tf.constant(image_np))
    # Extract the keypoints
    keypoints = outputs['output_0'].numpy()
    # Return the keypoints
    return keypoints

# Function to visualize keypoints on a static image
def visualize_pose_static(image_path, keypoints):
    # Read the image
    image = cv2.imread(image_path)
    # Convert keypoints to numpy array
    keypoints = np.array(keypoints)
    #print("Shape of keypoints array:", keypoints.shape)
    # Ensure keypoints array has the expected shape
    if keypoints.shape == (1, 1, 17, 3):
        # Extract keypoints from the array
        keypoints = keypoints[0, 0]
        # Loop through each keypoint
        for kp in keypoints:
            # Extract x and y coordinates of the keypoint
            x = int(kp[1] * image.shape[1])
            y = int(kp[0] * image.shape[0])
            # Draw a circle at the keypoint position
            cv2.circle(image, (x, y), 12, (255, 0, 0), -1)  # Increase thickness and change color to blue
        # Draw lines connecting keypoints
        for connection in connections:
            start_point = (int(keypoints[connection[0], 1] * image.shape[1]),
                           int(keypoints[connection[0], 0] * image.shape[0]))
            end_point = (int(keypoints[connection[1], 1] * image.shape[1]),
                         int(keypoints[connection[1], 0] * image.shape[0]))
            cv2.line(image, start_point, end_point, (0, 0, 255), 8)  # Increase thickness and change color to red
        # Show the image with keypoints and lines using cv2_imshow
        cv2_imshow(image)
    else:
        print("Unexpected shape of keypoints array:", keypoints.shape)
static_image_path = "/content/pexels-yogendra-singh-4384679.jpg"
# Perform pose detection on static image
static_keypoints = detect_pose_static(static_image_path)
visualize_pose_static(static_image_path, static_keypoints)
Input Image:
.jpg)
Input image
Output Image:
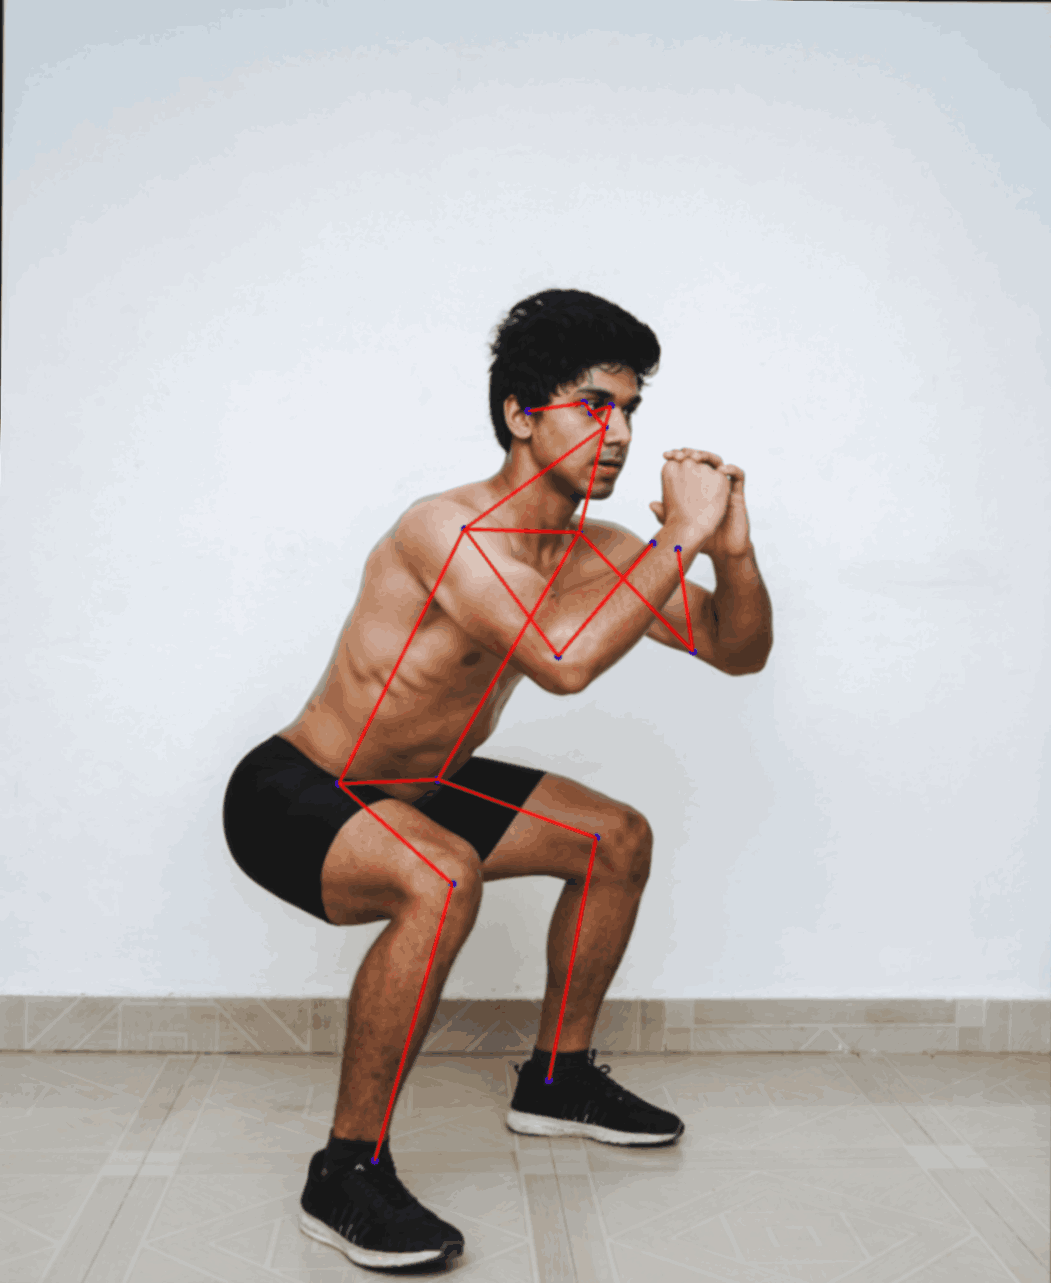
Output image
So, we can see the human pose detection is correctly performed.
Human Pose Detection for GIF
Defining function for image sequence
Now we will test it with image sequence or GIF file. For that, we will define a function `detect_pose_sequence`, designed to perform pose detection on an image sequence or GIF. It begins by loading the GIF using OpenCV’s `cv2.VideoCapture` function and reads frames from it iteratively until there are no more frames left. Each frame is then converted to RGB format using `cv2.cvtColor`, resized to the expected input size of the MoveNet model using TensorFlow’s `tf.image.resize_with_pad` function, and converted to a NumPy array with data type uint8. Inference is performed on each frame using the MoveNet model, and the key points are extracted from the model outputs. These key points are appended to a list for each frame. Finally, the function returns a list containing key points for all frames in the image sequence or GIF.
# Function to perform pose detection on an image sequence or GIF
def detect_pose_sequence(gif_path):
    # Load the GIF
    gif = cv2.VideoCapture(gif_path)
    frames = []
    # Read frames from the GIF
    while True:
        ret, frame = gif.read()
        if not ret:
            break
        frames.append(frame)
    # Initialize an empty list to store keypoints for each frame
    all_keypoints = []
    # Iterate through each frame
    for frame in frames:
        # Convert frame to RGB
        frame_rgb = cv2.cvtColor(frame, cv2.COLOR_BGR2RGB)
        # Resize frame to the expected input size of MoveNet
        frame_resized = tf.image.resize_with_pad(tf.expand_dims(frame_rgb, axis=0), 192, 192) # 192 for lightning
        # Convert the resized frame tensor to a NumPy array with dtype uint8
        frame_np = frame_resized.numpy().astype(np.int32)
        # Perform inference
        outputs = movenet.signatures["serving_default"](tf.constant(frame_np))
        # Extract the keypoints
        keypoints = outputs['output_0'].numpy()
        # Append keypoints to the list
        all_keypoints.append(keypoints)
    # Return keypoints for all frames
    return all_keypoints
Pose detection function for GIF
Here we will define a function `visualize_and_create_pose_sequence` aims to visualize key points on an image sequence or GIF and create a new GIF with the keypoints overlay. It starts by loading the input GIF using ImageIO’s `imageio.get_reader` function and initializes a list to store frames with key points overlay. Then, it iterates through each frame and its corresponding key points, converting the key points to a NumPy array and ensuring they have the expected shape. For each key point, it calculates its position and adjusts it if it’s a critical key point (e.g., nose, eyes) based on the average position of neighboring key points. Circles are drawn at the adjusted key point positions, and lines connecting key points are drawn using OpenCV’s `cv2.line` function. The frames with key points overlay are appended to the list. Finally, the function saves the frames with key points overlay as a new GIF using ImageIO’s `imageio.mimsave` function.
# Function to visualize keypoints on an image sequence or GIF and create a new GIF
def visualize_and_create_pose_sequence(gif_path, keypoints_list, output_gif_path, default_fps=10):
    # Load the GIF
    gif = imageio.get_reader(gif_path)
    # Initialize list to store frames with keypoints overlay
    frames_with_keypoints = []
    # Loop through each frame and its corresponding keypoints
    for frame_index, (frame, keypoints) in enumerate(zip(gif, keypoints_list)):
        # Convert keypoints to numpy array
        keypoints = np.array(keypoints)
        # Ensure keypoints array has the expected shape
        if keypoints.shape == (1, 1, 17, 3):
            # Extract keypoints from the array
            keypoints = keypoints[0, 0]
            # Loop through each keypoint
            for kp_index, kp in enumerate(keypoints):
                # Extract x and y coordinates of the keypoint
                x = int(kp[1] * frame.shape[1])
                y = int(kp[0] * frame.shape[0])
                # Check if the keypoint is critical
                if keypoint_names[kp_index] in ['nose', 'left_eye', 'right_eye', 'left_ear', 'right_ear']:
                    # Calculate the average position of neighboring keypoints
                    neighbor_indices =
                    neighbor_positions = []
                    for connection in neighbor_indices:
                        neighbor_kp_index = connection[0] if connection[1] == kp_index else connection[1]
                        neighbor_positions.append(keypoints[neighbor_kp_index])
                    neighbor_positions = np.array(neighbor_positions)
                    average_x = int(np.mean(neighbor_positions[:, 1]) * frame.shape[1])
                    average_y = int(np.mean(neighbor_positions[:, 0]) * frame.shape[0])
                    # Update the position of the critical keypoint
                    x = average_x
                    y = average_y
                # Draw a circle at the adjusted keypoint position
                cv2.circle(frame, (x, y), 4, (255, 0, 0), -1)  # Increase thickness and change color to blue
            # Draw lines connecting keypoints
            for connection in connections:
                start_point = (int(keypoints[connection[0], 1] * frame.shape[1]),
                               int(keypoints[connection[0], 0] * frame.shape[0]))
                end_point = (int(keypoints[connection[1], 1] * frame.shape[1]),
                             int(keypoints[connection[1], 0] * frame.shape[0]))
                cv2.line(frame, start_point, end_point, (0, 0, 255), 1)  # Increase thickness and change color to red
            # Append the frame with keypoints overlay to the list
            frames_with_keypoints.append(frame)
        else:
            print("Unexpected shape of keypoints array for frame", frame_index + 1)
    # Remove the last frame if it's a black frame
    if np.all(frames_with_keypoints[-1] == [0, 0, 0]):
        frames_with_keypoints.pop()
    # Get the frame rate from the metadata if available, otherwise use the default frame rate
    try:
        fps = gif.get_meta_data()['fps']
    except KeyError:
        fps = default_fps
    # Save the frames with keypoints overlay as a new GIF
    imageio.mimsave(output_gif_path, frames_with_keypoints, fps=fps)
Visualizing output
Now we will pass a GIF input file through the functions we have already defined.
input_gif_path = "/content/production_id_4944392.gif"  # Replace with the path to your input GIF
output_gif_path = "/content/output_gif_with_keypoints.gif"  # Path to save the new GIF with keypoints overlay
sequence_keypoints = detect_pose_sequence(input_gif_path)
visualize_and_create_pose_sequence(input_gif_path, sequence_keypoints, output_gif_path)
Complete Code for
Python3
# Function to perform pose detection on an image sequence or GIF
def detect_pose_sequence(gif_path):
    # Load the GIF
    gif = cv2.VideoCapture(gif_path)
    frames = []
    # Read frames from the GIF
    while True:
        ret, frame = gif.read()
        if not ret:
            break
        frames.append(frame)
    # Initialize an empty list to store keypoints for each frame
    all_keypoints = []
    # Iterate through each frame
    for frame in frames:
        # Convert frame to RGB
        frame_rgb = cv2.cvtColor(frame, cv2.COLOR_BGR2RGB)
        # Resize frame to the expected input size of MoveNet
        frame_resized = tf.image.resize_with_pad(tf.expand_dims(frame_rgb, axis=0), 192, 192) # 192 for lightning
        # Convert the resized frame tensor to a NumPy array with dtype uint8
        frame_np = frame_resized.numpy().astype(np.int32)
        # Perform inference
        outputs = movenet.signatures["serving_default"](tf.constant(frame_np))
        # Extract the keypoints
        keypoints = outputs['output_0'].numpy()
        # Append keypoints to the list
        all_keypoints.append(keypoints)
    # Return keypoints for all frames
    return all_keypoints
# Function to visualize keypoints on an image sequence or GIF and create a new GIF
def visualize_and_create_pose_sequence(gif_path, keypoints_list, output_gif_path, default_fps=10):
    # Load the GIF
    gif = imageio.get_reader(gif_path)
    # Initialize list to store frames with keypoints overlay
    frames_with_keypoints = []
    # Loop through each frame and its corresponding keypoints
    for frame_index, (frame, keypoints) in enumerate(zip(gif, keypoints_list)):
        # Convert keypoints to numpy array
        keypoints = np.array(keypoints)
        # Ensure keypoints array has the expected shape
        if keypoints.shape == (1, 1, 17, 3):
            # Extract keypoints from the array
            keypoints = keypoints[0, 0]
            # Loop through each keypoint
            for kp_index, kp in enumerate(keypoints):
                # Extract x and y coordinates of the keypoint
                x = int(kp[1] * frame.shape[1])
                y = int(kp[0] * frame.shape[0])
                # Check if the keypoint is critical
                if keypoint_names[kp_index] in ['nose', 'left_eye', 'right_eye', 'left_ear', 'right_ear']:
                    # Calculate the average position of neighboring keypoints
                    neighbor_indices = [c for c in connections if kp_index in c]
                    neighbor_positions = []
                    for connection in neighbor_indices:
                        neighbor_kp_index = connection[0] if connection[1] == kp_index else connection[1]
                        neighbor_positions.append(keypoints[neighbor_kp_index])
                    neighbor_positions = np.array(neighbor_positions)
                    average_x = int(np.mean(neighbor_positions[:, 1]) * frame.shape[1])
                    average_y = int(np.mean(neighbor_positions[:, 0]) * frame.shape[0])
                    # Update the position of the critical keypoint
                    x = average_x
                    y = average_y
                # Draw a circle at the adjusted keypoint position
                cv2.circle(frame, (x, y), 4, (255, 0, 0), -1)  # Increase thickness and change color to blue
            # Draw lines connecting keypoints
            for connection in connections:
                start_point = (int(keypoints[connection[0], 1] * frame.shape[1]),
                               int(keypoints[connection[0], 0] * frame.shape[0]))
                end_point = (int(keypoints[connection[1], 1] * frame.shape[1]),
                             int(keypoints[connection[1], 0] * frame.shape[0]))
                cv2.line(frame, start_point, end_point, (0, 0, 255), 1)  # Increase thickness and change color to red
            # Append the frame with keypoints overlay to the list
            frames_with_keypoints.append(frame)
        else:
            print("Unexpected shape of keypoints array for frame", frame_index + 1)
    # Remove the last frame if it's a black frame
    if np.all(frames_with_keypoints[-1] == [0, 0, 0]):
        frames_with_keypoints.pop()
    # Get the frame rate from the metadata if available, otherwise use the default frame rate
    try:
        fps = gif.get_meta_data()['fps']
    except KeyError:
        fps = default_fps
    # Save the frames with keypoints overlay as a new GIF
    imageio.mimsave(output_gif_path, frames_with_keypoints, fps=fps)

input_gif_path = "/content/production_id_4944392.gif"  # Replace with the path to your input GIF
output_gif_path = "/content/output_gif_with_keypoints.gif"  # Path to save the new GIF with keypoints overlay
sequence_keypoints = detect_pose_sequence(input_gif_path)
visualize_and_create_pose_sequence(input_gif_path, sequence_keypoints, output_gif_path)
Input:
.gif)
Output:
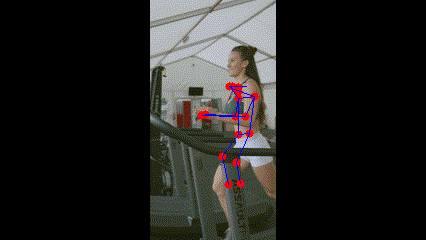
Output GIF
So, the output is partially correct as it correctly shows lower human poses. But there is a problem with facial points. It is due to the use of small MoveNet model variant which is Lightning. If you have better computer resources you can use the large MoveNet model which is Thunder. That model can remove this potential issues in facial pose detection. However, the small model can estimate the all over human pose by probability. So, in this case all node points are moving correctly but there are little misplace nodes.
Applications of Human-pose detection
Some of the widely used applications of Human-pose detection are discussed below:
- Fitness tracking and analysis: Human pose recognition finds great value in fitness tracking and analysis systems. By accurately capturing and analyzing body position during exercise or exercise, these systems can provide real-time feedback on form and technique of, helping users optimize their movements to prevent injury and be more effective -Set and achieve goals.
- Augmented Reality (AR) Experiences: Human pose recognition is central to augmented reality applications, allowing for the seamless integration of real-world-like objects or characters. Applications that drive engagement and engagement increase from gaming, entertainment to retail and education.
- Gesture recognition and human-computer interaction (HCI): Gesture recognition systems use human posture recognition to interpret and respond to users’ gestures. Through spatial pattern analysis of body parts on these systems can recognize specific gestures and translate them into corresponding actions or commands. This technology is widely used in interactive presentations, virtual reality environments, and natural user interfaces, enabling intuitive, hands-free interaction with computers, devices and applications
- Sports Analytics and Performance Management: Human pose recognition plays an important role in sports analytics and performance management applications. By analyzing the athletes’ movements and postures during training or competition, these systems can provide valuable insight into the process.
Share your thoughts in the comments
Please Login to comment...