how to use validate_ipv4_address in django
Last Updated :
02 Oct, 2023
A validator is a callable that takes a value and raises a ValidationError if it doesn’t meet the criteria. Validators can be useful for re-using validation logic between different types of fields. In this article, we will learn how to use the ‘validate_ipv4_address’ validator in Django.
Required Modules
Use of validate_ipv4_address in Django
To start the project use this command
django-admin startproject queryexpressionsproject
cd app
To start the app use this command
python manage.py startapp app
Now add this app to the ‘settings.py’
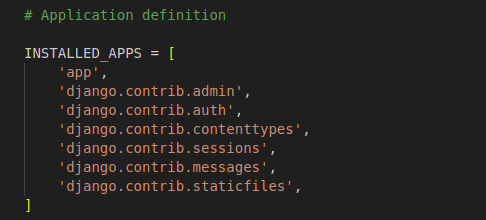
Starting the Project
model.py: This code snippet demonstrates how to define a Django model with custom validators for specific fields. It enforces data integrity by ensuring that the ip_address field, the ip_address field contains a valid IPv4 address.‘ip_address’ as a character field with a maximum length of 15 characters. It uses the built-in ‘validate_ipv4_address’ validator to validate that the input data is a valid IPv4 address.
Python3
from django.db import models
from django.core.exceptions import ValidationError
from django.core.validators import validate_ipv4_address
class Product(models.Model):
name = models.CharField(max_length=100)
price = models.DecimalField(max_digits=10, decimal_places=2)
quantity = models.PositiveIntegerField()
ip_address = models.CharField(max_length=15,
validators=[validate_ipv4_address])
def __str__(self):
return self.name
|
form.py: This custom validation method if any part of the input is not a valid integer, it raises a validation error. Otherwise, it returns the cleaned data as a string with valid integers.
Python3
from django import forms
from .models import Product
class ProductForm(forms.ModelForm):
class Meta:
model = Product
fields = ['name', 'price', 'quantity', 'ip_address']
|
view.py: Overall, this code represents a Django application with views that display expensive products and allow users to create new products through a form. The ‘Product’ model is used to interact with the database, and the views handle the logic for rendering templates and processing form submissions.
Python3
from django.http import HttpResponse
from django.db import models
from .models import Product
from django.shortcuts import render, redirect
from .forms import ProductForm
def home(request):
return HttpResponse('Hello, World!')
def expensive_products(request):
expensive_products = Product.objects.annotate(
total_value=models.ExpressionWrapper(models.F('price') * models.F('quantity'),
output_field=models.DecimalField())
).filter(total_value__gt=1000)
return render(request, 'myapp/index.html',
{'expensive_products': expensive_products})
def create_product(request):
if request.method == 'POST':
form = ProductForm(request.POST)
if form.is_valid():
form.save()
return redirect('expensive_products')
else:
form = ProductForm()
return render(request, 'myapp/index2.html', {'form': form})
|
Setting up GUI
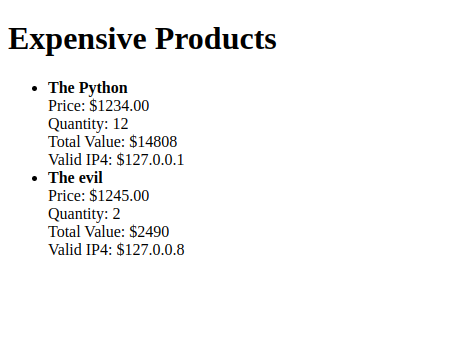
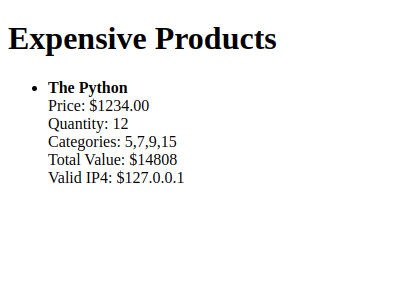
index.html: The index.html template to display the categories for each product.
HTML
<!DOCTYPE html>
<html>
<head>
<title>Expensive Products</title>
</head>
<body>
<h1>Expensive Products</h1>
<ul>
{% for product in expensive_products %}
<li>
<strong>{{ product.name }}</strong><br>
Price: ${{ product.price }}<br>
Quantity: {{ product.quantity }}<br>
Total Value: ${{ product.total_value }}<br>
Valid IP4: ${{ product.ip_address }}
</li>
{% endfor %}
</ul>
</body>
</html>
|
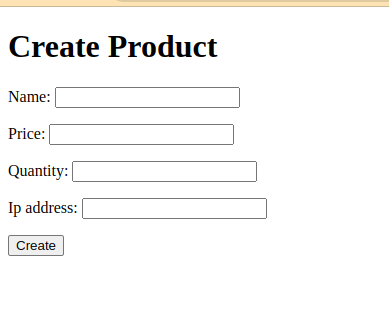
index2.html: This template renders the product creation form.
HTML
<!DOCTYPE html>
<html>
<head>
<title>Create Product</title>
</head>
<body>
<h1>Create Product</h1>
<form method="post">
{% csrf_token %}
{{ form.as_p }}
<button type="submit">Create</button>
</form>
{% if form.errors %}
<div class="alert alert-danger">
<strong>Error:</strong>
<ul>
{% for error in form.errors %}
<li>{{ error }}</li>
{% endfor %}
</ul>
</div>
{% endif %}
</body>
</html>
|
urls.py: It include a new URL pattern for the product creation view.
Python3
from django.urls import path
from . import views
urlpatterns = [
path('hello/', views.home, name='home'),
path('expensive-products/', views.expensive_products, name='expensive_products'),
path('create-product/', views.create_product, name='create_product'),
]
|
urls.py: Include the ‘products’ app’s URLs in the project’s main urls.py file.
Python3
from django.contrib import admin
from django.urls import path, include
urlpatterns = [
path('admin/', admin.site.urls),
path('', include('mini.urls')),
]
|
Deployement of the Project
Run these commands to apply the migrations:
python3 manage.py makemigrations
python3 manage.py migrate
Run the server with the help of following command:
python3 manage.py runserver
Output
Share your thoughts in the comments
Please Login to comment...