The article provides a comprehensive guide on leveraging GPU support in TensorFlow for accelerated deep learning computations. It outlines step-by-step instructions to install the necessary GPU libraries, such as the CUDA Toolkit and cuDNN, and install the TensorFlow GPU version.
Modern GPUs are highly parallel processors optimized for handling large-scale computations. By the parallel processing power of GPUs, TensorFlow can accelerate training and inference tasks, leading to significant reductions in computation time.
There are several methods for utilizing TensorFlow with GPU support. Here are some common approaches with steps for utilizing TensorFlow with GPU support are as follows:
- GPU support in Google Colab
- Using NVIDIA Driver for GPU
- Using CUDA Toolkit and cuDNN Library
Google Colab
Using TensorFlow with GPU support in Google Colab is straightforward.
Here’s some steps which have to follow:
- Open a new Google Colab notebook.
- Go to the “Runtime” menu at the top.
- Select “Change runtime type.”
- Choose “GPU” as the hardware accelerator.
- Click “Save.”
Step 1: Click on New notebook in Google Colab.
.png)
Step 1: Click on New notebook.
Step 2: Click on runtime on top menu bar then click on “Change runtime type”.

Step 2:Click on runtime
Step 3: Choose “GPU” as the hardware accelerator.
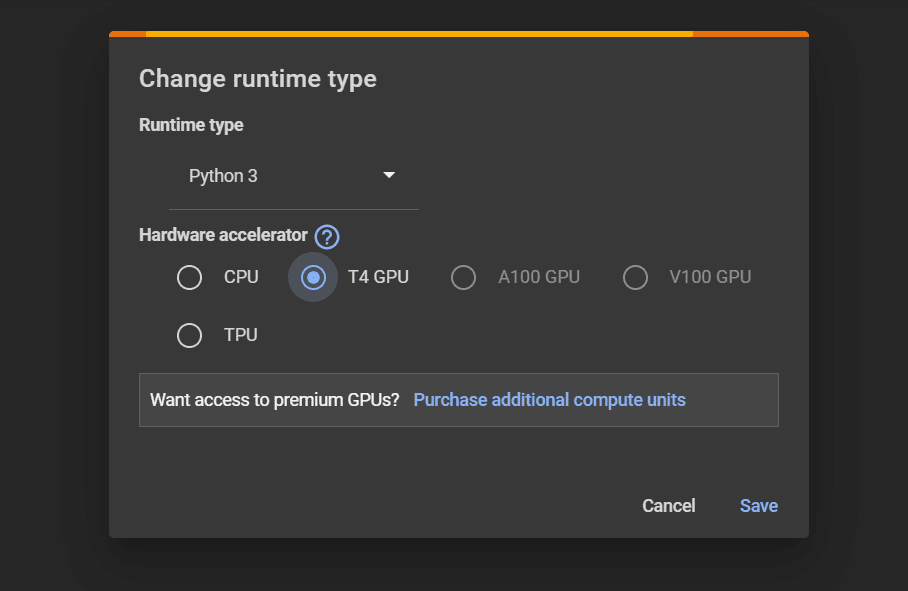
Step 2:Click on T4 GPU
Step 4: Click on “Save” Button.
By following these steps, you can leverage GPU acceleration in Google Colab to speed up your TensorFlow-based machine learning experiments and training tasks.
Using NVIDIA Driver for GPU
NVIDIA website
Here’s some steps which have to follow:
Step 1: Identify Your GPU
Determine the exact model of your NVIDIA GPU. You can usually find this information in your computer’s specifications or by checking the GPU itself.
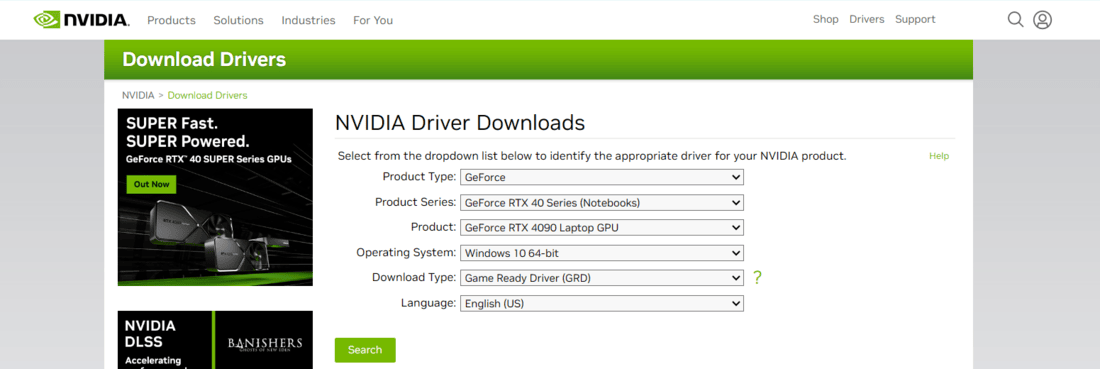
Step 2: Download the Driver
Visit the NVIDIA website and use the dropdown menus to specify your GPU model, operating system, and other relevant details.
Step 3: Install the Driver
Run the downloaded driver installer and continue with the installation process. This usually involves accepting the license agreement, selecting installation options and waiting for the installation to complete.
Step 4: Verify the Installation
you can verify that the new driver is installed correctly by checking the NVIDIA Control Panel on Windows.
By adhering to these procedures, you can effectively utilize an NVIDIA driver for your GPU. If you encounter any issues during the installation process refer to the documentation provided by NVIDIA from their support resources.
Using CUDA Toolkit and cuDNN Library
To use the CUDA Toolkit and cuDNN library for GPU programming, particularly with NVIDIA GPUs, follow these general steps:
Step 1: Verify GPU Compatibility
Make sure your GPU is compatible with the CUDA Toolkit and cuDNN library. Check the NVIDIA website for compatibility information.
Step 2: Download CUDA Toolkit

NVIDIA CUDA Toolkit
Visit the NVIDIA CUDA Toolkit website and download the version of the CUDA Toolkit that corresponds to your operating system and GPU model.
Step 3: Install CUDA Toolkit
Run the CUDA Toolkit installer and follow the on-screen instructions. Make sure to select appropriate options during installation, such as whether to install the CUDA driver, samples, and other components.
Step 4: Set Environment Variables
Depending on operating system, Set environment variables to point to the CUDA installation directory. This step helps compilers and other tools locate the CUDA libraries and binaries. On Windows, set CUDA_PATH variable.
Step 5: Download cuDNN Library

NVIDIA cuDNN
Download the cuDNN library version that matches your CUDA Toolkit version. Might need to register for an NVIDIA Developer account to access the cuDNN downloads.
Step 6: Install cuDNN Library
Extract the cuDNN archive and copy the included files to the appropriate directories within your CUDA Toolkit installation.
Step 7: Verify Installation
Compile and run a sample CUDA program to verify that everything is set up correctly. You can use the samples included with the CUDA Toolkit or write your own simple CUDA program.
Create a Virtual Environment Using Pip or Anaconda
Here’s how you can create a virtual environment using either Pip or Anaconda and then install TensorFlow GPU, follow these steps.
Using pip
To create a virtual environment using pip, you’ll first need to have Python installed on your system. Most modern versions of Python come with pip pre-installed. Here’s how you can create a virtual environment using pip.
Step 1: Open a Terminal or Command Prompt
Open your terminal or command prompt application. This is where you’ll enter the commands to create the virtual environment.
Step 2: Install ‘virtualenv’
If you don’t have ‘virtualenv’ installed, you can install it using pip
pip install virtualenv
Step 3: Create Virtual Environment
Use the virtualenv command followed by the name you want to give to your virtual environment.
python -m venv myenv
Step 4: Activate Virtual Environment
Depending on your operating system, the command to activate the virtual environment will vary
on windows:
myenv\Scripts\activate
Step 5: Install TensorFlow GPU
pip install tensorflow-gpu
Using Anaconda
Creating a virtual environment using Anaconda is straightforward.
Step 1: Open Anaconda Prompt or Terminal
Start by opening Anaconda Prompt (on Windows) or a terminal (on macOS/Linux).
Step 2: Create the Virtual Environment
Use the conda create command to create a new virtual environment. Specify the Python version you want to use and the name of the environment.
conda create --name myenv
Step 3: Activate Virtual Environment
Once the environment is created, you need to activate it. Use the following command:
conda activate myenv
Step 4: Install TensorFlow GPU
You can install tensorflow-gpu packages inside the virtual environment using conda install or pip install.
conda install tensorflow-gpu
That’s it! Created and managed a virtual environment using Anaconda and pip. This environment is isolated from your base environment, allowing you to install and manage packages independently.
This will guide you through the steps required to set up TensorFlow with GPU support, enabling you to leverage the immense computational capabilities offered by modern GPU architectures.
Share your thoughts in the comments
Please Login to comment...